| Oracle® HTML DB User's Guide Release 1.5 Part Number B10992-01 |
|


|
View PDF |
| Oracle® HTML DB User's Guide Release 1.5 Part Number B10992-01 |
|
|
View PDF |
This section describes how to run and modify the demonstration applications that install with Oracle HTML DB. Running and analyzing how these applications work is an effective way to better understand how you can use Oracle HTML DB to build your own applications.
This section contains the following topics:
|
See Also: |
Oracle HTML DB installs with a number of demonstration applications. Use these applications to learn more about the different types of functionality you can include in your applications.
To view the demonstration applications included with Oracle HTML DB:
Log in to Oracle HTML DB as described in "Logging in to Oracle HTML DB".
Oracle HTML DB appears.
From the Tasks list on the right side of the page, select Review Demonstration Applications.
The Demonstration Applications page appears, displaying links to the following applications:
The Status column on the Demonstration Applications page indicates whether or not an application is currently installed.
To re-install a demonstration application:
Navigate to the Demonstration Applications page as described in the previous procedure.
Scroll down to the application you wish to install, click Re-install.
Follow the on-screen instructions.
Oracle HTML DB installs with a number of demonstration applications. Once a demonstration application has been installed, there are a number of ways to run it.
The simplest way to run a demonstration application is navigate to the Demonstration Applications page.
To run a demonstration application from the Demonstration Applications page:
Log in to Oracle HTML DB as described in "Logging in to Oracle HTML DB".
Oracle HTML DB appears.
From the Tasks list on the right side of the page, select Review Demonstration Applications.
The Demonstration Applications page appears.
Locate the application you wish to run.
In the Action column, click Run.
Enter your Oracle HTML DB username and password and click Login.
You can also run a demonstration application from Application Builder. Application Builder is the tool you use to build the pages that comprise an application.
To run a demonstration application from Application Builder:
Log in to Oracle HTML DB as described in "Logging in to Oracle HTML DB".
Oracle HTML DB appears.
Click the Build navigation bar icon in the upper right corner of the window.
Application Builder appears.
From the Available Applications list, select the desired demonstration application and click Go.
Click Run. (See Figure 3-1.)
Enter your Oracle HTML DB username and password and click Login.
Each demonstration application features a different set of functionality. This section describes the demonstration application, Sample Application.
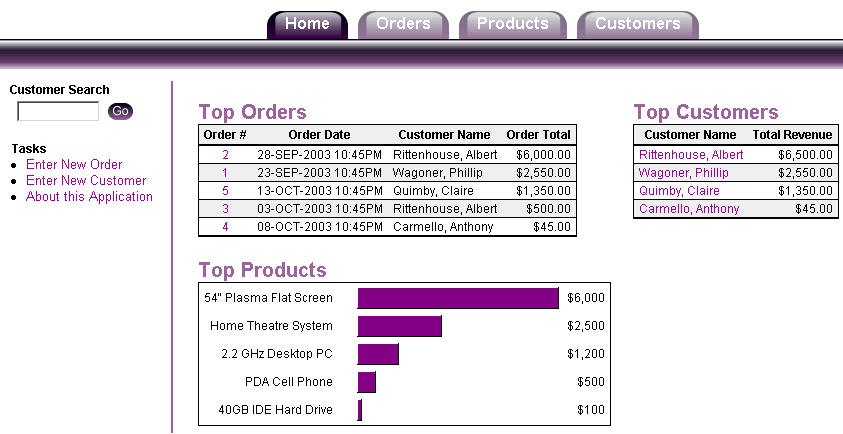
As show in Figure 3-2, Sample Application features an easy-to-use interface for viewing, updating, and searching order and customer information for electronic and computer products. Users can navigate between the pages using the Home, Orders, Products, and Customers tabs.
Sample Application demonstrates the following functionality:
Searching for customers
Viewing order and customer details
Editing customer and product information
Viewing all orders, products, or customers
Sorting order, product, and customer information by column heading
Creating new orders, products, and customers
Viewing pages in printer friendly mode
The sections that follow describe specific functionality available on each page.
The Home page contains three distinct sections:
Customer search field
Tasks list
Orders, customers, and products reports
You can search for customers using the Customer Search field. Type a customer name in the Customer Search field and click Go.
The right side of the Home page features two different report formats and a bar chart. Note that in the Top Order report you can link to order details by selecting the Order number. In the Top Customers report you can link to customer details by selecting the customer name.
The Tasks list consists of a series of links that take you to other pages within the application. Links available on the Home Page Tasks list include:
Enter New Order links to a wizard that walks you through the process of creating a new order. First you select a customer name and then you add items to the order
Enter New Order links to a form where you can enter new customer information.
About this Application links to an informational page describing this application.
Use the Orders page to search, view, and enter order information. By default, the right side of the page displays current orders. To search for an order, enter the order number in the Search for field and click Go. Click a column heading to sort the information. You view more details about a specific order by clicking the view icon. (See Figure 3-3.)
To enter new orders or view reports that display order revenue by month and orders by customer, use the Tasks list on the left side of the page.
Use the Products page to view and edit product information. By default, the right side of the page displays current products. Click a column heading to sort the information. You can edit a product description by clicking Edit. To add a new product or view a chart displaying products by category, use the Tasks list on the left side of the page.
Use the Customers page to view and edit customer information. To search for a customer, type a customer name in the Search for field and click Go. By default, the right side of the page displays customer information. Click a column heading to sort the information. Click Edit to update customer information. To view all customers or to enter a new customer record, use the Tasks list on the left side of the page.
Clicking Print in the upper right corner of the page displays the current page in Printer Friendly mode. When in Printer Friendly mode, the HTML DB engine displays all text within HTML from fields as text.
To enable your application to display in Printer Friendly mode, you need to create and then specify a Print Mode Page Template on the Edit Application Attributes page.
|
See Also: "Working with Templates" and "About User Interface Templates" for more information on specifying a Print Mode Page Template |
Once you understand the type of functionality available in a demonstration application, the next step is to learn more about how each page is constructed. You edit an application using Application Builder. Using Application Builder you can edit existing pages in an application, add pages to an application, or create entirely new applications.
When you log in to Oracle HTML DB having developer privileges and run an application, a Developer toolbar displays at the bottom of every page. As shown in Figure 3-4, the Developer toolbar offers a quick way to edit the currently running page, create a new page, control, or component, view session state, or turn edit links on or off.
Figure 3-4 Developer Toolbar in Sample Application

The Developer toolbar consists of the following links:
Edit Application links you to the Application Builder home page. (See "Viewing a Page Definition".)
Edit Page accesses the Page Definition for the currently running page. (See "Viewing Page Attributes".)
New links to a wizard that enables you to create a new blank page, a component (report, chart, or form), a page control (region, button, or item), or a shared component (menu, list, or tab).
Session links you to session state information for the current page. (See "Viewing Session State".)
Debug runs the current page in debug mode. (See "Accessing Debug Mode".)
Show edit links toggles between Show edit links and Hide edit links. Clicking Show edit links displays an edit link (resembling four gray dots) to the right of most page components or controls. By clicking an edit link you can edit the selected component or control.
There are two common ways to edit a demonstration application:
From Demonstration Applications page, click Edit next to the desired application
If you are running an application, click Edit Application on the Developer toolbar
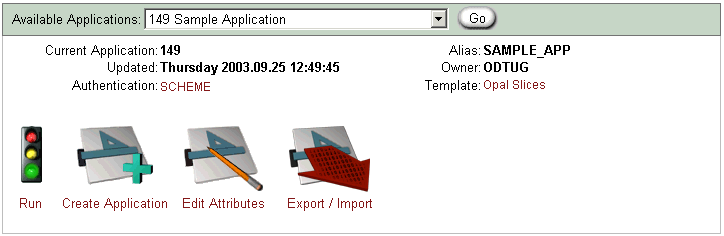
As shown in Figure 3-5, the Available Applications list displays at the top of the Application Builder home page. Note that the Available Applications list displays the current application name.
The current application ID, last update date, authentication scheme, alias, owner, and selected template display directly beneath the list. You can run an existing application, create a new application, edit application attributes, or export information by clicking the following icons:
Run submits the pages in the current application to the HTML DB engine to render viewable HTML beginning on the Home Link identified in the application attributes.
Create Application creates a new application using the Create Application Wizard.
Edit Attributes displays the Edit Application Attributes page.
Export/Install links you to the Export Import Wizard.
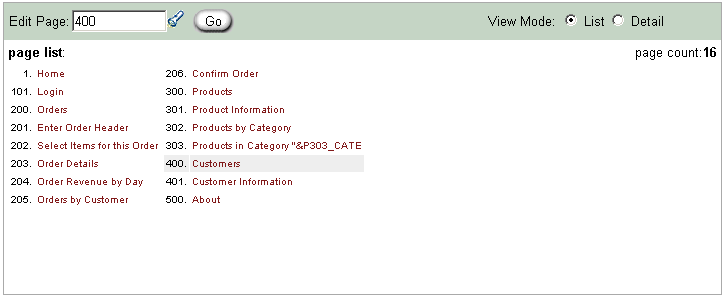
As shown in Figure 3-6, the bottom of the Application Builder home page displays a list of all pages in the currently selected application.
To access a specific page, enter a page ID in the Edit Page field and click Go. To edit a page, drill down on the page name. Note that application in Figure 3-6 contains 16 pages.
|
See Also:
|
The HTML DB engine renders applications in real time based on data stored in database tables. You can view the database objects for any demonstration application in SQL Workshop.
To view the database objects used for an application:
Click the SQL icon.
You view by schema and type and then by name. Under Data Browser, you can selecting existing database objects by selecting a database object type.
Under Data Browser, select Tables.
To create a search:
In Schema, select your workspace
In Type, select Table
In Search, type DEMO
Click Go
All tables having names that contain the string DEMO appear.
To view table details, click the view icon adjacent to the appropriate table name.
The Object Detail page appears.
Optionally, select a task from Tasks list on the right side of the page.
|
 Copyright © 2003 Oracle Corporation All Rights Reserved. |
|