| Oracle® Enterprise Manager Advanced Configuration 10g Release 1 (10.1) Part Number B12013-01 |
|


|
View PDF |
| Oracle® Enterprise Manager Advanced Configuration 10g Release 1 (10.1) Part Number B12013-01 |
|
|
View PDF |
This chapter describes how to configure Oracle Enterprise Manager Security. Specifically, this chapter contains the following sections:
Configuring Security for the Enterprise Manager Application Server Control
Configuring Security for the Oracle Enterprise Manager 10g Database Control
Configuring Enterprise Manager for Use with Oracle Application Server Single Sign-On
Configuring Enterprise Manager for Use with Enterprise User Security
Oracle Enterprise Manager provides tools and procedures to help you ensure that you are managing your Oracle environment in a secure manner. Oracle Enterprise Manager security can be divided into these categories:
Security for the Oracle Enterprise Manager 10g Grid Control
Security for the Oracle Enterprise Manager 10g Application Server Control
|
See Also: Oracle Application Server 10g Administrator's Guide for information about securing the Oracle Enterprise Manager 10g Application Server Control |
Security for the Oracle Enterprise Manager 10g Database Control
The following sections describe the security features that apply to these categories.
The goals of Oracle Enterprise Manager security are:
To be sure that only users with the proper privileges have access to critical monitoring and administrative data.
This goal is met by requiring username and password credentials before users can access the Enterprise Manager consoles. This includes access to the Oracle Enterprise Manager 10g Grid Control, the Oracle Enterprise Manager 10g Database Control, and the Oracle Enterprise Manager 10g Application Server Control.
To be sure that all data transferred between Enterprise Manager components is transferred in a secure manner and that all data gathered by each Oracle Management Agent can be transferred only to the Oracle Management Service for which the Agent is configured.
This goal is met by enabling Enterprise Manager Framework Security. Enterprise Manager Framework Security automates the process of securing the Enterprise Manager components installed and configured on your network.
Oracle Enterprise Manager supports different classes of Oracle users, depending upon the environment you are managing and the context in which you are using Oracle Enterprise Manager 10g.
The types of users supported by Enterprise Manager vary depending upon the Enterprise Manager product you are using. For example:
The Grid Control provides support for creating and managing Enterprise Manager administrator accounts.
The Enterprise Manager administrators you create and manage in the Grid Control are granted privileges and roles to log in to the Grid Control and to manage specific target types and to perform specific management tasks.
The default super administrator for the Grid Control is the SYSMAN user, which is a database user associated with the Oracle Management Repository. You define the password for the SYSMAN account during the Enterprise Manager installation procedure.
Oracle Application Server administrators use the Oracle Application Server administrator account (ias_admin) to log in to the Application Server Control.
You use the ias_admin account to manage the components of a specific Oracle Application Server instance. You define the password for the ias_admin account during the Oracle Application Server installation procedure.
Oracle Database 10g administrators can use the SYS, SYSTEM, or SYSMAN database user accounts to log in to the Database Control.
The SYSMAN database user is the default super administrator for managing Oracle Database 10g. You define the password for the SYSMAN account during the Oracle Database 10g installation procedure.
By restricting access to privileged users and providing tools to secure communications between Oracle Enterprise Manager 10g components, Enterprise Manager protects critical information in the Oracle Management Repository.
The Management Repository contains management data that Enterprise Manager uses to help you monitor the performance and availability of your entire enterprise. This data provides you with information about the types of hardware and software you have deployed, as well as the historical performance and specific characteristics of the applications, databases, applications servers, and other targets that you manage.
The Management Repository also contains information about the Enterprise Manager administrators who have the privileges to access the management data.
Authorization and access enforcement for Enterprise Manager is controlled as follows:
When you use the Grid Control, you create and manage Enterprise Manager administrator accounts. The SYSMAN super administrator can assign specific privileges and roles to each of the additional administrators. These privileges and roles control the targets an administrator can manage and the specific types of tasks the administrator can perform.
|
See Also: "About Administrators and Roles" in the Enterprise Manager online help |
When you use the Application Server Control, access to the Console is restricted to administrators who use the ias_admin administrator's account. The ias_admin account is set up automatically and you assign a password for the account during the Oracle Application Server installation procedure.
|
See Also: Oracle Application Server 10g Administrator's Guide for more information about theias_admin account |
When you use the Oracle Enterprise Manager 10g Database Control, access and authorization for the Database Control is limited to specific database users who have been granted management privileges by the SYS, SYSTEM, or SYSMAN user.
|
See Also: "About Administrators and Roles" in the Enterprise Manager online help |
As a Web-based application, Enterprise Manager relies on industry-standard technologies to provide secure access to the Oracle Enterprise Manager 10g Grid Control, Database Control, and Application Server Control.
When you configure security for the Oracle Enterprise Manager 10g Grid Control, Enterprise Manager Framework Security provides secure communications between the components of your Enterprise Manager installation. However, you should also use the security services of your Oracle HTTP Server to be sure access to the Grid Control is secure.
|
See Also: "Configuring Security for the Grid Control Framework" for more information about the Enterprise Manager Framework SecurityOracle HTTP Server Administrator's Guide for information about configuring security for your Oracle HTTP Server. |
Enterprise Manager deploys the Application Server Control and Database Control within a single, standalone Oracle Application Server Containers for J2EE (OC4J) instance. As a result, when you configure security for the Application Server Control, or for the Database Control, Enterprise Manager uses the standard security services of OC4J to protect your management data.
Oracle Enterprise Manager 10g takes advantage of Oracle Identity Management in two ways:
First, you can configure the Grid Control so it uses Oracle Application Server Single Sign-On. Administrators can then use their Single Sign-On credentials to log in to the Grid Control.
Similarly, you can configure the Oracle Enterprise Manager 10g Database Control so it uses Oracle Application Server Single Sign-On credentials.
|
See Also: Oracle Application Server Single Sign-On Administrator's Guide for general information about Oracle Application Server Single Sign-On"Configuring Enterprise Manager for Use with Oracle Application Server Single Sign-On" |
Second, you can take advantage of the Enterprise User Security features of the Oracle database. Enterprise User Security provides single sign-on (SSO) or single password authentication for your database users.
|
See Also: "Managing Enterprise User Security" in the Oracle Advanced Security Administrator's Guide"Configuring Enterprise Manager for Use with Enterprise User Security" |
This section contains the following topics:
Overview of the Steps Required to Enable Enterprise Manager Framework Security
Enabling Security with Multiple Management Service Installations
Enterprise Manager Framework Security provides safe and secure communication channels between the components of Enterprise Manager. For example, Framework Security provides secure connections between your Oracle Management Service and its Management Agents.
Enterprise Manager Framework Security works in concert with—but does not replace—the security features you should enable for your Oracle HTTP Server. Oracle HTTP Server is part of the Oracle Application Server instance that is used to deploy the Management Service J2EE Web application.
Figure 2-1 shows how Enterprise Manager Framework Security provides security for the connections between the Enterprise Manager components. However, the secure HTTPS connection between your browser and the Grid Control should be configured like any other Web application by using the security features of your Oracle HTTP Server.
Figure 2-1 Enterprise Manager Framework Security
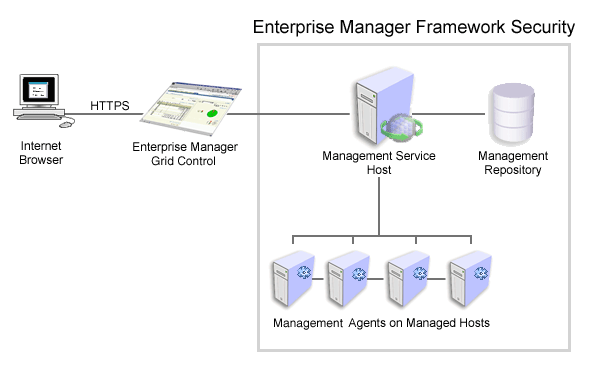
Enterprise Manager Framework Security implements the following types of secure connections between the Enterprise Manager components:
HTTPS and Public Key Infrastructure (PKI) components, including signed digital certificates, for communications between the Management Service and the Management Agents.
|
See Also: Oracle Security Overview for an overview of Public Key Infrastructure features, such as digital certificates and public keys |
Oracle Advanced Security for communications between the Management Service and the Management Repository.
To enable Enterprise Manager Framework Security, you must configure each of the Enterprise Manager components in a specific order. The following list outlines the process for securing the Management Service and the Management Agents that upload data to the Management Service:
Use the opmnctl stopall command to stop the Management Service, the Oracle HTTP Server, and the other components of the Oracle Application Server that are used to deploy the Management Service.
Use emctl secure oms to enable security for the Management Service.
Restart the Management Service, the Oracle HTTP Server, OracleAS Web Cache, and the other application server components using the opmnctl startall command.
For each Management Agent, stop the Management Agent, use the emctl secure agent command to enable security for the Agent, and restart the Management Agent.
After security is enabled for all the Management Agents, use the emctl secure lock command to restrict HTTP Access to the Management Service. This will ensure that all data gathered from the Management Agents is uploaded over a secure HTTPS connection.
The following sections describe how to perform each of these steps in more detail.
To enable Enterprise Manager Framework Security for the Management Service, you use the emctl secure oms utility, which is located in the following subdirectory of the Management Service home directory:
$ORACLE_HOME/bin
The emctl secure oms utility performs the following actions:
Generates a Root Key within your Management Repository. The Root Key is used during distribution of Oracle Wallets containing unique digital certificates for your Agents.
Modifies your Oracle HTTP Server to enable an HTTPS channel between your Management Service and Management Agents, independent from any existing HTTPS configuration that may be present in your Oracle HTTP Server.
Enables your Management Service to accept requests from Management Agents using Enterprise Manager Framework Security.
To run the emctl secure oms utility you must first choose an Agent Registration Password. The Agent Registration password is used to validate that future installation sessions of Oracle Management Agents are authorized to load their data into this Enterprise Manager installation.
To enable Enterprise Manager Framework Security for the Oracle Management Service:
Change directory to the following directory in the Management Service home:
ORACLE_HOME/opmn/bin
Stop the Management Service, the Oracle HTTP Server, and the other application server components using the following command:
$PROMPT> ./opmnctl stopall
Change directory to the following directory in the Management Service home:
ORACLE_HOME/bin
Enter the following command:
$PROMPT> ./emctl secure oms
Enterprise Manager prompts you for the Enterprise Manager Root Password.
Enter the password for the SYSMAN administrator account used for the Management Repository.
Enterprise Manager prompts you to specify an Agent Registration Password, which is a new password that will be required for any Management Agents that attempt to connect to the Management Service.
Specify an Agent Registration Password for the Management Service.
Enterprise Manager prompts you to confirm the hostname of the Management Service.
Enter the fuly qualified name of the host (including the domain) where the Management Service resides.
The emctl secure utility reconfigures the Management Service to enable Framework Security. shows a sample of the output you should receive from the emctl secure oms command.
When the operation is complete, restart the Management Service, the Oracle HTTP Server, and OracleAS Web Cache:
$PROMPT> cd $ORACLE_HOME/opmn/bin
$PROMPT> ./opmnctl startall
After the Management Service restarts, test the secure connection to the Management Service by browsing to the following secure URL using the HTTPS protocol:
https://hostname.domain:4888/
For example:
https://mgmthost1.acme.com:4888/
If the Management Service security has been enabled, your browser displays the Oracle Application Server Welcome page.
The 4888 port number is the default secure port used by the Management Agents to upload data to the Management Service. This port number may vary if the default port is unavailable.
|
Caution: While theemctl secure oms command provides immediate HTTPS browser access to the Grid Control via the secure Management Agent upload port, it does not enable security for the default OracleAS Web Cache or Oracle HTTP Server ports that your administrators use to display the Grid Control.
To enable security for users who access the Grid Control through OracleAS Web Cache and the default Oracle HTTP Server ports, refer to Oracle Application Server 10g Security Guide. |
Example 2-1 Sample Output of the emctl secure oms Command
$PROMPT> ./emctl secure oms
Oracle Enterprise Manager 10g Release 10.1.0.2.0.
Copyright (c) 1996, 2003 Oracle Corporation.  All rights reserved.
Enter Enterprise Manager Root Password :
Enter Agent Registration password :
Enter a Hostname for this OMS : hsunnab14.us.oracle.com
Checking Repository...   Done.
Checking Repository for an existing Enterprise Manager Root Key...   Done.
Generating Enterprise Manager Root Key (this takes a minute)...   Done.
Fetching Root Certificate from the Repository...   Done.
Generating Registration Password Verifier in the Repository...   Done.
Generating Oracle Wallet Password for Enterprise Manager OMS...   Done.
Generating Oracle Wallet for Enterprise Manager OMS...   Done.
Generating Oracle Wallet for iAS HTTP Server...   Done.
Updating HTTPS port in emoms.properties file...   Done.
Generating Oracle Wallet Distribution Service...   Done.
Generating HTTPS Virtual Host for Enterprise Manager OMS...   Done.
|
Note: Alternatively, you can enter theemctl secure oms command all on one line, but if you enter the command on one line, the passwords you enter will be displayed on the screen as you type:
$PROMPT> emctl secure oms sysman_pwd agent_reg_pwd |
When you install the Management Agent on a host, you must identify the Management Service that will be used by the Management Agent. If the Management Service you specify has been configured to take advantage of Enterprise Manager Framework Security, you will be prompted for the Agent Registration Password and Enterprise Manager Framework Security will be enabled for the Agent during the installation.
Otherwise, if the Management Service has not been configured for Enterprise Manager Framework Security, then security will not be enabled for the Management Agent. In those cases, you can later enable Enterprise Manager Framework Security for the Management Agent.
To enable Enterprise Manager Framework Security for the Management Agent, you use the emctl secure agent utility, which is located in the following directory of the Management Agent home directory:
AGENT_HOME/bin (UNIX)
AGENT_HOME\bin (Windows)
The emctl secure agent utility performs the following actions:
Obtains an Oracle Wallet from the Management Service that contains a unique digital certificate for the Management Agent. This certificate is required in order for the Management Agent to conduct SSL communication with the secure Management Service.
Obtains an Agent Key for the Management Agent that is registered with the Management Service.
Configures the Management Agent so it is available on your network over HTTPS and so it uses the Management Service HTTPS upload URL for all its communication with the Management Service.
To enable Enterprise Manager Framework Security for the Management Agent:
Ensure that your Management Service and the Management Repository are up and running.
Change directory to the following directory:
AGENT_HOME/bin (UNIX)
AGENT_HOME\bin (Windows)
Stop the Management Agent:
$PROMPT> ./emctl stop agent
Enter the following command:
$PROMPT> ./emctl secure agent (UNIX)
$PROMPT> emctl secure agent (Windows)
The emctl secure agent utility prompts you for the Agent Registration Password, authenticates the password against the Management Service, and reconfigures the Management Agent to use Enterprise Manager Framework Security.
|
Note: Alternatively, you can enter the command all on one line, but if you enter the command on one line, the password you enter will be displayed on the screen as you type:$PROMPT> ./emctl secure agent agent_registration_pwd (UNIX) $PROMPT> emctl secure agent agent_registration_pwd (Windows) |
shows sample output of the emctl secure agent utility.
Restart the Management Agent:
$PROMPT> ./emctl start agent
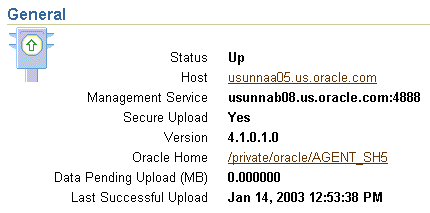
Confirm that the Management Agent is secure by checking the Management Agent home page.
In the General section of the Management Agent home page (Figure 2-2), the Secure Upload field indicates whether or not Enterprise Manager Framework Security has been enabled for the Management Agent.
|
See Also: "Checking the Status of an Oracle Management Agent" in the Enterprise Manager online help |
Example 2-2 Sample Output of the emctl secure agent Utility
$PROMPT> ./emctl secure agent
Oracle Enterprise Manager 10g Release 10.1.0.2.0.
Copyright (c) 1996, 2003 Oracle Corporation.  All rights reserved.
Enter Agent Registration password :
Requesting an HTTPS Upload URL from the OMS...   Done.
Requesting an Oracle Wallet and Agent Key from the OMS...   Done.
Check if HTTPS Upload URL is accessible from the agent...   Done.
Configuring Agent for HTTPS...   Done.
EMD_URL set in /private/oracle/agent/sysman/config/emd.properties
$PROMPT>
Figure 2-2 Secure Upload Field on the Management Agent Home Page
If you already have a secure Management Service running and you install an additional Management Service that uses the same Management Repository, you will need to enable Enterprise Manager Framework Security for the new Management Service. This task is executed using the same procedure that you used to secure the first Management Service, by running the emctl secure oms utility.
Because you have already established at least one Agent Registration Password and a Root Key in your Management Repository, they must be used for your new Management Service. Your secure Management Agents can then operate against either Management Service.
All the registration passwords assigned to the current repository are listed on the Registration Passwords page in the Oracle Enterprise Manager 10g Grid Control.
If you install a new Management Service that uses a new Management Repository, the new New Management Service is considered to be a distinct enterprise. There is no way for the new Management Service to partake in the same security trust relationship as another Management Service that uses a different Management Repository. Secure Management Agents of one Management Service will not be able to operate against the other Management Service.
By default, when you enable Enterprise Manager Framework Security on your Oracle Management Service there are no default restrictions on HTTP access. Any Oracle Management Agent can access the Grid Control and Management Service using HTTP or HTTPS connections.
However, it is important that only secure Management Agent installations that use the Management Service HTTPS channel are able to upload data to your Management Repository.
To restrict access so Management Agents can upload data to the Management Service only over HTTPS:
Stop the Management Service, the Oracle HTTP Server, and the other application server components:
$PROMPT> cd $ORACLE_HOME/opmn/bin
$PROMPT> ./opmnctl stopall
Change directory to the following location in the Management Service home:
$ORACLE_HOME/bin
Enter the following command to prevent Management Agents from uploading data to the Management Service over HTTP:
$PROMPT> emctl secure lock
Restart the Management Service, the Oracle HTTP Server, and the other application server components:
$PROMPT> cd $ORACLE_HOME/opmn/bin
$PROMPT> ./opmnctl startall
Verify that you cannot access the Management Agent upload URL using the HTTP protocol:
For example, navigate to the following URL:
http://hostname.domain:4889/em/upload
You should receive an error message similar to the following:
ForbiddenYou don't have permission to access /em/upload on this server
Verify that you can access the Management Agent using the HTTPS protocol:
For example, navigate to the following URL:
https://hostname.domain:4888/em/upload
You should receive the following message, which confirms the secure upload port is available to secure Management Agents:
Http XML File receiverHttp Recceiver Servlet active!
To remove the restriction for HTTPS uploads from the Management Agents, repeat the preceding procedure, but replace the emctl secure lock command with the following command:
$PROMPT> emctl secure unlock
|
Caution: Theemctl secure lock command does not prevent users from accessing the Oracle Enterprise Manager 10g Grid Control over HTTP. It restricts non-secure access only for Management Agents that attempt to upload data to the Management Service using the upload URL, which is usually:
http://hostname.domain:4889/em/upload |
To restrict HTTP access to the Oracle Enterprise Manager 10g Grid Control, configure your Oracle HTTP Server and OracleAS Web Cache as described in the Oracle Application Server documentation.
Enterprise Manager uses the Agent Registration password to validate that installations of Oracle Management Agents are authorized to load their data into the proper Oracle Management Service.
You create the registration password when you use emctl secure oms to configure security for the Oracle Management Service installation.
After you enable security for your Enterprise Manager components, you can use the Grid Control to manage your existing registration passwords or create additional registration passwords:
Click Setup at the top of any Grid Control page.
Click Registration Passwords.
Enterprise Manager displays the Registration Passwords page (Figure 2-3). After you enable security for the Management Service, the registration password you created when you ran the emctl secure oms command appears in the Registration Passwords table.
Use the Registration Passwords page to change your registration password, create additional registration passwords, or remove registration passwords associated with the current Management Repository.
Figure 2-3 Managing Registration Passwords in the Grid Control
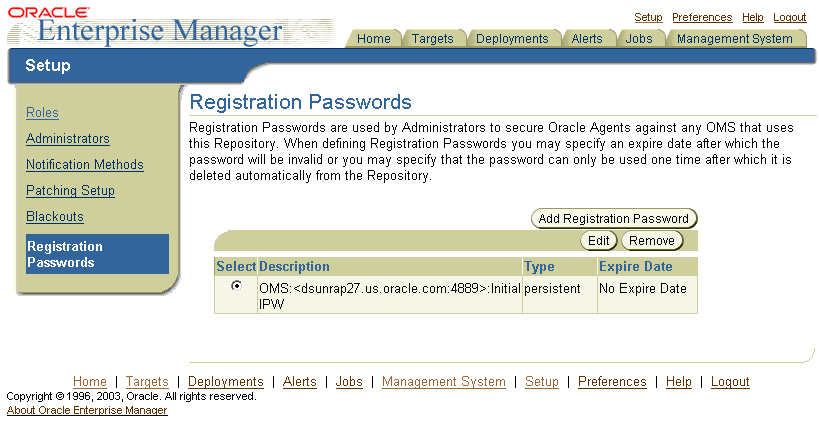
When you create or edit an Agent Registration Password on the Registration Passwords page, you can determine whether the password is persistent and available for multiple agents or to be used only once or for a predefined period of time.
For example, if an administrator requests to install a Management Agent on a particular host, you can create a one-time-only password that the administrator can use to install and configure one Management Agent.
On the other hand, you can create a persistent password that an administrator can use for the next two weeks before it expires and the administrator must ask for a new password.
To change an existing Agent Registration Password, use the following emctl command:
$PROMPT> emctl secure setpwd sysman_password new_Install_Password
Note that the emctl secure setpwd command requires that you provide the password of the Enterprise Manager super administrator user, sysman, to authorize the resetting of the Agent Registration Password.
If you change the Agent Registration Password, you must communicate the new password to other Enterprise Manager administrators who need to install new Management Agents, enable Enterprise Manager Framework Security for existing Management Agents, or install additional Management Services.
As with other security passwords, you should change the Agent Registration Password on a regular and frequent basis to prevent it from becoming too widespread.
This section describes how to enable Security for the Oracle Management Repository. This section includes the following topics:
About Oracle Advanced Security and the sqlnet.ora Configuration File
Configuring the Management Service to Connect to a Secure Management Repository Database
Enabling Oracle Advanced Security for the Management Repository
You enable security for the Management Repository by using Oracle Advanced Security. Oracle Advanced Security ensures the security of data transferred to and from an Oracle database.
To enable Oracle Advanced Security for the Management Repository database, you must make modifications to the sqlnet.ora configuration file. The sqlnet.ora configuration file is used to define various database connection properties, including Oracle Advanced Security parameters.
The sqlnet.ora file is located in the following subdirectory of the Database home:
ORACLE_HOME/network/admin
After you have enabled Security for the Management Repository and the Management Services that communicate with the Management Repository, you must also configure Oracle Advanced Security for the Management Agent by modifying the sqlnet.ora configuration file in the Management Agent home directory.
It is important that both the Management Service and the Management Repository are configured to use Oracle Advanced Security. Otherwise, errors will occur when the Management Service attempts to connect to the Repository. For example, the Management Service might receive the following error:
ORA-12645: Parameter does not exist
To correct this problem, be sure both the Management Service and the Management Repository are configured as described in the following sections.
|
Note: The procedures in this section describe how to manually modify thesqlnet.ora configuration file to enable Oracle Advanced Security. Alternatively, you can make these modifications using the administration tools described in the Oracle Advanced Security Administrator's Guide. |
If you have enabled Oracle Advanced Security for the Management Service database—or if you plan to enable Oracle Advanced Security for the Management Repository database—use the following procedure to enable Oracle Advanced Security for the Management Service:
Stop the Management Service:
$PROMPT> ORACLE_HOME/bin/emctl stop oms
Locate the following configuration file in the Management Service home directory:
ORACLE_HOME/network/admin/emoms.properties
Using a text editor, add the entries described in Table 2-1 to the emoms.properties file.
The entries described in the table correspond to valid parameters you can set when you configure network data encryption for the Oracle Database.
|
See Also: "Configuring Network Data Encryption and Integrity for Oracle Servers and Clients" in the Oracle Application Server 10g Administrator's Guide |
Save your changes and exit the text editor.
Restart the Management Service.
Table 2-1 Oracle Advanced Security Properties in the Enterprise Manager Properties File
To be sure your database is secure and that only encrypted data is transferred between your database server and other sources, review the security documentation available in the Oracle Database 10g documentation library.
The following instructions provide an example of how you can confirm that Oracle Advanced Security is enabled for your Management Repository database and its connections with the Management Service:
Locate the sqlnet.ora configuration file in the following directory of the database Oracle Home:
ORACLE_HOME/network/admin
Using a text editor, look for the following entries (or similar entries) in the sqlnet.ora file:
SQLNET.ENCRYPTION_SERVER = REQUESTED
SQLNET.CRYPTO_SEED = "abcdefg123456789"
|
See Also: "Configuring Network Data Encryption and Integrity for Oracle Servers and Clients" in the Oracle Application Server 10g Administrator's Guide |
Save your changes and exit the text editor.
After you have enabled Oracle Advanced Security for the Management Repository, you must also enable Advanced Security for the Management Agent that is monitoring the repository:
Locate the sqlnet.ora configuration file in the following directory inside the home directory for the Management Agent that is monitoring the Management Repository:
AGENT_HOME/network/admin (UNIX)
AGENT_HOME\network\admin (Windows)
Using a text editor, add the following entry to the sqlnet.ora configuration file:
SQLNET.CRYPTO_SEED = "abcdefg123456789"
|
See Also: "Configuring Network Data Encryption and Integrity for Oracle Servers and Clients" in the Oracle Application Server 10g Administrator's Guide |
Save your changes and exit the text editor.
Restart the Management Agent.
When you install Oracle Application Server 10g Release 2 (9.0.4), the installation procedure also installs and configures the Oracle Enterprise Manager 10g Application Server Control, which you use to manage your application server instances.
|
See Also: "Introduction to Administration Tools" in the Oracle Application Server 10g Administrator's Guide for more information about using the Application Server Control |
The Application Server Control relies on several underlying technologies, including a version of the Oracle Management Agent that is designed to provide monitoring data to the Application Server Control.
By default, you access the Application Server Control through your Web browser using the non-secure, HTTP protocol. In addition, communications between the local Oracle Management Agent and the Application Server Control are transferred over an insecure HTTP connection.
To secure the communications between the Management Agent and the Application Server Control, and to provide HTTPS access to the Application Server Control, Enterprise Manager provides the emctl secure em command-line utility.
The emctl secure em utility enables HTTPS and Public Key Infrastructure (PKI) components, including signed digital certificates, for communications between the Application Server Controland the local Management Agent.
|
Caution: Before you use the emctl secure agent command to secure the Application Server Control, be sure to stop the Application Server Control. |
To configure security for the Application Server Control, use the following procedure:
Stop the Application Server Control by entering the following command in the IAS_HOME/bin directory:
$PROMPT> ./emctl stop iasconsole
Enter the following command in the IAS_HOME/bin directory:
$PROMPT> ./emctl secure em
Enterprise Manager secures the Application Server Control. Sample output of the emctl secure em command is shown in .
Start the Application Server Control by entering the following command in the IAS_HOME/bin directory:
$PROMPT> ./emctl start iasconsole
Test the security of the Application Server Control by entering the following URL in your Web browser:
https://hostname:port/
For example:
https://mgmthost1:1812/
Example 2-3 Sample Output from the emctl secure em Command
$PROMPT> ./emctl secure em
Oracle Enterprise Manager 9.0.4
Copyright (c) 2002, 2003 Oracle Corporation.  All rights reserved.
Generating Standalone Console Root Key (this takes a minute)...   Done.
Fetching Standalone Console Root Certificate...   Done.
Generating Standalone Console Agent Key...   Done.
Generating Oracle Wallet for the Standalone Console Agent...   Done.
Configuring Agent for HTTPS...   Done.
EMD_URL set in /dsk01/oracle/appserver1/sysman/config/emd.properties
Generating Standalone Console Java Keystore...   Done.
$PROMPT>
This section describes the architecture and configuration of security for the Oracle Enterprise Manager 10g Database Control.
|
See Also: Oracle Database Security Guide for an overview of Oracle Database 10g security features |
Oracle strongly recommends that you use the Secure Socket Layer (SSL) protocol and HTTPS for all connections to Enterprise Manager and that you use a valid digital security certificate.
To configure security for the Database Control:
Stop the Database Control by entering the following command in the ORACLE_HOME/bin directory (UNIX) or the ORACLE_HOME\bin (Windows):
$PROMPT> ./emctl stop dbconsole (UNIX)
$PROMPT> emctl stop dbconsole (Windows)
Change directory to the ORACLE_HOME/bin directory or the ORACLE_HOME\bin (Windows) and enter the following emctl command
$PROMPT> ./emctl secure dbconsole (UNIX)
$PROMPT> emctl secure dbconsole (Windows)
Enterprise Manager prompts you for the Enterprise Manager Root Password.
Enter the password for the SYSMAN database user.
Enterprise Manager prompts you to specify an Agent Registration Password, which is a new password that will be required for any Management Agents that attempt to connect to the Management Service.
Specify an Agent Registration Password for the Management Service.
Enterprise Manager prompts you to confirm the hostname of the Management Service.
Enter the name of the host where the Management Service resides.
The emctl secure utility reconfigures the Management Service to enable Framework Security. If the Management Service is up and running, Enterprise Manager restarts the Management Service.
When the operation is complete, communications between the Enterprise Manager components is secure.
In addition, you can access the Grid Control using the HTTPS protocol.
Start the Database Control by entering the following command in the ORACLE_HOME/bin directory or the ORACLE_HOME\bin (Windows):
$PROMPT> ./emctl start dbconsole (UNIX)
$PROMPT> emctl start dbconsole (Windows)
Test the security of the Database Control by entering the following URL in your Web browser:
https://hostname:port/em
For example:
https://dbhost1:1820/em
|
Note: Alternatively, you can enter theemctl secure dbconsole command all on one line, but if you enter the command on one line, the passwords you enter will be displayed on the screen as you type:
$PROMPT> emctl secure dbconsole sysman_pwd agent_reg_pwd |
If you are currently using Oracle Application Server Single Sign-On to control access and authorization for your enterprise, you can extend those capabilities to the Grid Control.
By default, when you navigate to the Grid Control, Enterprise Manager displays the Enterprise Manager login page. However, you can configure Enterprise Manager so it uses Oracle Application Server Single Sign-On to authorize your Grid Control users. Instead of seeing the Enterprise Manager login page, Grid Control users will see the standard Oracle Application Server Single Sign-On login page. From the login page, administrators can use their Oracle Application Server Single Sign-On credentials to access the Oracle Enterprise Manager 10g Grid Control.
The following sections describe how to configure Enterprise Manager as a OracleAS Single Sign-On Partner Application:
Configuring Enterprise Manager to Use the Single Sign-On Logon Page
Registering Single Sign-On Users as Enterprise Manager Administrators
To configure the Grid Control for use with Oracle Application Server Single Sign-On:
Set the ORACLE_HOME environment variables to the Management Service home directory.
For example:
$PROMPT> setenv ORACLE_HOME /dev01/oracle/em10g_GridControl
Change directory to the bin directory of the Management Service Oracle home:
$PROMPT> cd $ORACLE_HOME/opmn/bin
Stop the Management Service, the Oracle HTTP Server, and the other components of the application server:
$PROMPT> ./opmnctl stopall
Change directory to the bin directory of the Management Service Oracle home:
$PROMPT> cd $ORACLE_HOME/bin
Enter the following command at the operating system prompt:
$PROMPT> ./emctl config oms sso -host ssoHost -port ssoPort -sid ssoSid -pass ssoPassword -das http://ssohost:port/
For example:
$PROMPT> ./emctl config oms sso -host sshost1.acme.com -port 1521 -sid asdb -pass Ch22x5xt -das http://ssohost1.acme.com:7777
Table Table 2-2 describes the arguments on the emctl config oms sso command line.
shows the typical output generated by the emctl config oms sso command.
Restart the Management Service, Oracle HTTP Server, and the other application server components:
$PROMPT> cd $ORACLE_HOME/opmn/bin
$PROMPT> ./opmnctl startall
Go the Grid Control URL.
For example:
http://mgmthost1.acme.com:7777/em
The browser is redirected to the standard Single Sign-On Logon page.
Table 2-2 Arguments for the emctl sso Command
| Argument | Description |
|---|---|
| -host | The name of the host computer where the Oracle Application Server Single Sign-On server resides. Be sure to use the fully-qualified host name. |
| -port | The port for the Oracle Application Server Single Sign-On database. For example, 1521. |
| -sid | The system identifier (SID) for the Oracle Application Server Single Sign-On database. |
| -pass | The password for the Oracle Application Server Single Sign-On schema (orasso). The orasso schema password is randomized when the Oracle Application Server infrastructure is installed.
To obtain the password, see "Obtaining the Single Sign-On Schema Password" in the Oracle Application Server Single Sign-On Administrator's Guide. |
| -das | The URL containing the host and port for the Delegated Administration Service (DAS). Generally, the DAS hostname and port are the same as the hostname and port of the Oracle Application Server Single Sign-On server. For example:
|
Example 2-4 Sample Output of the emctl config oms sso Command
$PROMPT> ../opmn/bin/opmnctl stopall
opmnctl: stopping opmn and all managed processes...
$PROMPT> ./emctl config oms sso -host mgmthost1.acme.com -port 1521 -sid asdb
-pass E9p36Yst -das http://mgmthost1.acme.com:7777
Oracle Enterprise Manager 10g Release 10.1.0.2.0.
Copyright (c) 1996, 2003 Oracle Corporation.  All rights reserved.
/private/oracle/em10gRel5a/Apache/Apache/conf/httpd.conf has already been
set to enable SSO.
/private/oracle/em10gRel5a/sysman/config/emoms.properties has been modified.
Registering to SSO server, please wait...
Parameters passed to SSO registration tool :
param0:-oracle_home_path param1:/private/oracle/em10gRel5a param2:-host
param3:mgmthost1.acme.com param4:-port param5:1521 param6:-sid param7:asdb
param8:-schema param9:orasso param10:-pass param11:E9p36Yst param12:-site_name
param13:ssohost2.acme.com:7777 param14:-success_url
param15:http://ssohost2.acme.com:7777/osso_login_success param16:-logout_url
param17:http://ssohost2.acme.com:7777/osso_logout_success param18:-cancel_url
param19:http://ssohost2.acme.com:7777/ param20:-home_url
param21:http://ssohost2.acme.com:7777/ param22:-config_mod_osso param23:TRUE
param24:-u param25:oracle param26:-sso_server_version param27:v1.2
-DinstallType=
-DoldOracleHome=
-DoldOHSUser=root
Check /private/oracle/em10gRel5a/sso/log/ssoreg.log for the result of registration
$PROMPT> ../opmn/bin/opmnctl startall
opmnctl: starting opmn and all managed processes...$PROMPT>
After you have configured Enterprise Manager to use the Single Sign-On logon page, you can register any Single Sign-On user as an Enterprise Manager administrator:
Go the Grid Control URL.
For example:
http://mgmthost1.acme.com:7777/em
The browser is redirected to the standard Single Sign-On Logon page.
Enter the credentials for a valid Single Sign-On user.
If the Single Sign-On user is not an Enterprise Manager administrator, the browser is redirected to a modified version of the Enterprise Manager logon page (Figure 2-4).
Log in to Enterprise Manager as a Super Administrator.
Click Setup and then click Administrators to display the Administrators page.
|
See Also: "Creating, Editing, and Viewing Administrators" in the Enterprise Manager online help |
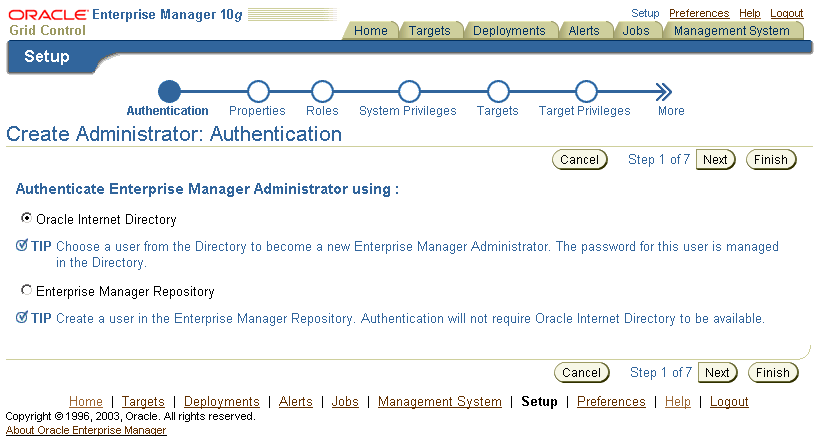
Because Enterprise Manager has been configured to use Single Sign-On, the first page in the Create Administrator wizard now offers you the option of creating an administrator based on a registered Oracle Internet Directory user (Figure 2-5).
Select Oracle Internet Directory and advance to the next page in the wizard.
Enter the name and email address of the Oracle Internet Directory user, or click the flashlight icon to search for a user name in the Oracle Internet Directory.
Use the rest of the wizard pages to define the roles, system privileges, and other characteristics of the Enterprise Manager administrator and then click Finish.
Enterprise Manager displays a summary page that lists the characteristics of the administrator account.
Click Finish to create the new Enterprise Manager administrator.
The OID user is now included in the list of Enterprise Manager administrators. You can now verify the account by logging out of the Grid Control and logging back in using the OID user credentials on the Single Sign-On logon page.
Figure 2-4 Modified Enterprise Manager Logon Page When Configuring SSO
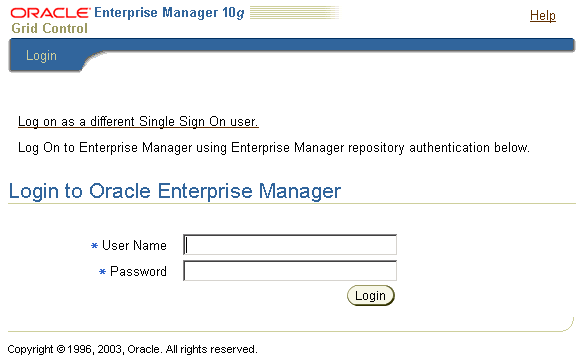
Figure 2-5 Create Administrator Page When SSO Support Is Enabled
The emctl config oms sso command adds the Oracle Enterprise Manager 10g Grid Control as an Oracle Application Server Single Sign-On partner application. Partner applications are those applications that have delegated authentication to the Oracle Application Server Single Sign-On Server.
To see the list of partner applications, navigate to the following URL:
http://hostname:port/pls/orasso/orasso.home
For example:
http://ssohost1.acme.com:7777/pls/orasso/orasso.home
After you configure Enterprise Manager to use the Single Sign-On logon page, you can bypass the Single Sign-On page at any time and go directly to the Enterprise Manager logon page by entering the following URL:
http://hostname.domain:port/em/console/logon/logon
For example:
http://mgmthost1.acme.com:7777/em/console/logon/logon
Enterprise User Security enables you to create and store Oracle9i database information as directory objects in an LDAP-compliant directory server. For example, an administrator can create and store enterprise users and roles for the Oracle9i database in the directory, which helps centralize the administration of users and roles across multiple databases.
|
See Also: "Enterprise User Security Configuration Tasks and Troubleshooting" in the Oracle Database Advanced Security Administrator's Guide |
If you currently use Enterprise User Security for all your Oracle9i databases, you can extend this feature to Enterprise Manager. Configuring Enterprise Manager for use with Enterprise User Security simplifies the process of logging in to database targets you are managing with the Oracle Enterprise Manager 10g Grid Control.
To configure Enterprise Manager for use with Enterprise User Security:
Ensure that you have enabled Enterprise User Security for your Oracle Management Repository database, as well as the database targets you will be managing with the Grid Control.
Stop the Oracle Management Service.
Change directory to the IAS_HOME/sysman/config directory and open the emoms.properties file with your favorite text editor.
Add the following entry in the emoms.properties file:
oracle.sysman.emSDK.sec.DirectoryAuthenticationType=EnterpriseUser
Save and close the emoms.properties file.
Start the Management Service.
The next time you use the Oracle Enterprise Manager 10g Grid Control to drill down to a managed database, Enterprise Manager will attempt to connect to the database using Enterprise User Security. If successful, Enterprise Manager will connect you to the database without displaying a login page. If the attempt to use Enterprise User Security fails, Enterprise Manager will prompt you for the database credentials.
After you enable security for the Enterprise Manager components and framework, thee are additional security considerations. This section provides the following topics:
This section describes how to respond to browser-specific security alert dialog boxes when you are using Enterprise Manager in a secure environment.
The security alert dialog boxes described in this section should appear only if you have enabled Enterprise Manager Framework Security, but you have not completed the more extensive procedures to secure your Oracle HTTP Server properly.
This section contains the following topics:
Responding to the Internet Explorer Security Alert Dialog Box
Responding to the Netscape Navigator New Site Certificate Dialog Box
Preventing the Display of the Internet Explorer Security Information Dialog Box
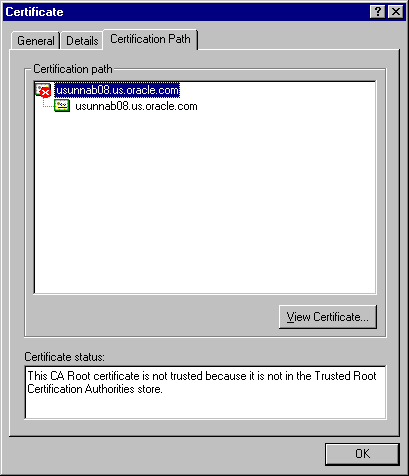
If you enable security for the Management Service, but you do not enable the more extensive security features of your Oracle HTTP Server, you will likely receive a Security Alert dialog box similar to the one shown in Figure 2-6 when you first attempt to display the Grid Control using the HTTPS URL in Internet Explorer.
|
Note: The instructions in this section apply to Internet Explorer 5.5. The instructions may vary for other supported browsers. |
Figure 2-6 Internet Explorer Security Alert Dialog Box

When Internet Explorer displays the Security Alert dialog box, use the following instructions to install the certificate and avoid viewing this dialog box again in future Enterprise Manager sessions:
In the Security Alert dialog box, click View Certificate.
Click the Certificate Path tab and select the first entry in the list of certificates as shown in Figure 2-7.
Click View Certificate to display a second Certificate dialog box.
Click Install Certificate to display the Certificate Import wizard.
Accept the default settings in the wizard, click Finish when you are done, and then click Yes in the Root Certificate Store dialog box.
Internet Explorer displays a message box indicating that the Certificate was imported successfully.
Click OK to close each of the security dialog boxes and click Yes on the Security Alert dialog box to continue with your browser session.
You should no longer receive the Security Alert dialog box in any future connections to Enterprise Manager when you use this browser.
Figure 2-7 Certificate Path Tab on the Internet Explorer Certificate Dialog Box
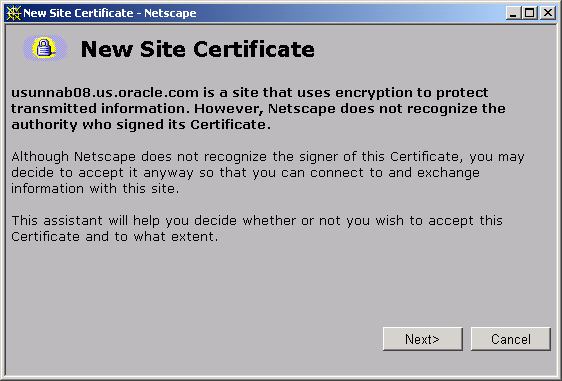
If you enable security for the Management Service, but you do not enable the more extensive security features of your Oracle HTTP Server, you will likely receive a New Site Certificate dialog box similar to the one shown in Figure 2-8 when you first attempt to display the Grid Control using the HTTPS URL in Netscape Navigator.
|
Note: The instructions in this section apply to Netscape Navigator 4.79. The instructions may vary for other supported browsers. |
When Netscape Navigator displays the New Site Certificate dialog box, use the following instructions to install the certificate and avoid viewing this dialog box again in future Enterprise Manager sessions:
Review the instructions and information on each wizard pages; click Next until you are prompted to accept the certificate.
Select Accept this certificate forever (until it expires) from the list of options.
On the last screen of the wizard, click Finish to close the wizard and continue with your browser session.
You should no longer receive the Security Alert dialog box when using the current browser.
Figure 2-8 Netscape Navigator New Site Certificate Dialog Box
After you enable Security for the Management Service, you may receive a dialog box similar to the one shown in Figure 2-9 whenever you access certain Enterprise Manager pages.
|
Note: The instructions in this section apply to Internet Explorer 6.0. The instructions may vary for other supported browsers. |
Figure 2-9 Internet Explorer Security Information Dialog Box
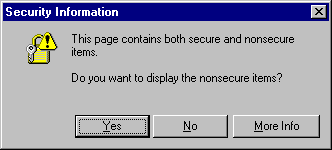
To stop this dialog box from displaying:
Select Internet Options from the Internet Explorer Tools menu.
Click the Security tab.
Select Internet and then click Custom Level.
Internet Explorer displays the Security Settings dialog box.
Scroll down to Miscellaneous settings and enable the Display Mixed Content option.
Oracle Beacons provide application performance availability and performance monitoring. They are part of the Application Performance Management features of Enterprise Manager.
|
See Also: "About Application Performance Management" in the Enterprise Manager Online Help |
When a Beacon is used to monitor a URL over SSL (using an HTTPS URL), the Beacon must be configured to recognize the Certificate Authority that has been used by the Web site where that URL resides.
|
See Also: "The Public Key Infrastructure Approach to Security" in Oracle Security Overview for an overview of Public Key Infrastructure features, such as Certificate Authorities |
The Beacon software is preconfigured to recognize most commercial Certificate Authorities that are likely to be used by a secure Internet Web Site. However, you may encounter Web Sites that, although available over HTTPS, do not have a Certificate that has been signed by a commercial Certificate Authority recognized by the Beacon.
In those cases, for example, if you attempt to use the Test section of the Beacon Performance page to test the HTTP Response of the secure URL, the following error appears in the Status Description column of the Response Metrics table on the URL Test Page:
javax.net.ssl.SSLException: SSL handshake failed: X509CertChainIncompleteErr--https://mgmtsys.acme.com/OracleMyPage.Home
|
See Also: "Using Beacons to Monitor Remote URL Availability" in the Enterprise Manager online help |
To correct this problem you must allow the Beacon to recognize the Certificate Authority that was used by the Web Site to support HTTPS. You must add the Certificate of that Certificate Authority to the list of Certificate Authorities recognized by Beacon.
To configure the Beacon to recognize the Certificate Authority:
Obtain the Certificate of the Web Site's Certificate Authority, as follows:
In Microsoft Internet Explorer, connect to the HTTPS URL of the Web Site you are attempting to monitor.
Double-click the lock icon at the bottom of the browser screen, which indicates that you have connected to a secure Web site.
The browser displays the Certificate dialog box, which describes the Certificate used for this Web site. Other browsers offer a similar mechanism to view the Certificate detail of a Web Site.
Click the Certificate Path tab and select the first entry in the list of certificates as shown in Figure 2-7.
Click View Certificate to display a second Certificate dialog box.
Click the Details tab on the Certificate window.
Click Copy to File to display the Certificate Manager Export wizard.
In the Certificate Manager Export wizard, select Base64 encoded X.509 (.CER) as the format you want to export and save the certificate to a text file with an easily-identifiable name, such as beacon_certificate.cer.
Open the certificate file using your favorite text editor.
The content of the certificate file will look similar to the content shown in .
Update the list of Beacon Certificate Authorities, as follows:
Locate the b64InternetCertificate.txt file in the following directory of Agent Home of the Beacon host:
agent_home/sysman/config/
This file contains a list of Base64 Certificates.
Edit the b64InternetCertificate.txt file and add the contents of the Certificate file you just exported to the top of the file, taking care to include all the Base64 text of the Certificate including the BEGIN and END lines.
Restart the Management Agent.
After you restart the Management Agent, the Beacon detects your addition to the list of Certificate Authorities recognized by Beacon and you can successfully monitor the availability and performance of the secure Web site URL.
|
 Copyright © 2003 Oracle Corporation All Rights Reserved. |
|

