|
|
Start of Tutorial > Start of Trail > Start of Lesson | Search |
If you haven't read the Paintingsection, please do so right now. That section describes how Swing components are painted -- essential information if you're going to write custom painting code.
Before you implement a component that performs custom painting, first make sure that you really need to do so. You might be able to use the text and image capabilities of labels
If you really need to perform custom painting, then you need to decide which superclass to use. We recommend that you extend either
JPanelor a more specialized Swing component class. For example, if you're creating a custom button class, you should probably implement it by extending a button class such asJButtonorJToggleButton. That way you'll inherit the state management provided by those classes. If you're creating a component that paints on top of an image, you might want to create aJLabelsubclass. On the other hand, if you're implementing a component that generates and displays a graph on top of a blank or transparent background, then you might want to use aJPanelsubclass.When implementing custom painting code, keep two things in mind:
- Your custom painting code belongs in a method named
paintComponent.- You can -- and probably should -- use a border to paint the outside edges of your component.
The following code gives an example of custom painting. It shows an image twice, once at its natural size and once very wide.Here is the result:class ImagePanel extends JPanel { ... public void paintComponent(Graphics g) { super.paintComponent(g); //paint background //Draw image at its natural size first. g.drawImage(image, 0, 0, this); //85x62 image //Now draw the image scaled. g.drawImage(image, 90, 0, 300, 62, this); } }
This is a picture of the applet's GUI. To run the applet, click the picture. The applet will appear in a new browser window.The example code is from
ImageDisplayer.java, which is further discussed in Displaying Images. The example demonstrates a few rules that apply to all components that perform custom painting:
- The painting code does something that no standard Swing component does. If we just wanted to display the figure once, at its natural size, we would have used a
JLabelobject instead of the custom component.- The custom component is a
JPanelsubclass. This is a common superclass for custom components.- All the custom painting code is in a method called
paintComponent.- Before performing any custom painting, the component paints its background by invoking
super.paintComponent. If we remove that call, either our custom painting code must paint the component's background or we must invokesetOpaque(false)on the component. Doing the latter would inform the Swing painting system that the components behind the non-opaque component might be visible, and thus should be painted.One thing this component does not do is take borders into account. Not only does it not use a border, but it also doesn't adjust its painting coordinates to take a border into account. A production-quality component would adjust to borders as described in the next subsection.
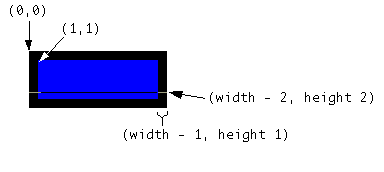
Each component has its own integer coordinate system, ranging from (0, 0) to (width - 1, height - 1), with each unit representing the size of one pixel. As the following figure shows, the upper left corner of a component's painting area is (0, 0). The X coordinate increases to the right, and the Y coordinate increases downward.When painting a component, you must take into account not only the component's size but also the size of the component's border, if any. For example, a border that paints a one-pixel line around a component changes the top leftmost corner from (0,0) to (1,1) and reduces the width and the height of the painting area by two pixels each (one pixel per side). The following figure demonstrates this:
You get the width and height of a component using its getWidthandgetHeightmethods. To determine the border size, use thegetInsetsmethod. Here is some code that a component might use to determine the width and height available for custom painting:public void paintComponent(Graphics g) { ... Insets insets = getInsets(); int currentWidth = getWidth() - insets.left - insets.right; int currentHeight = getHeight() - insets.top - insets.bottom; ... .../* First painting occurs at (x,y), where x is at least insets.left, and y is at least insets.height. */... }To familiarize yourself with the coordinate system, you can play with the following applet. Wherever you click on or inside the framed area, a dot is painted, and the label below lists the click's coordinates. The dot is obscured if you click on the border because the component's border is painted after the component performs its custom painting. If we didn't want this effect, an easy solution would be to move the border from the component into a new
JPanelobject that contains the component.
The program is implemented in
This is a picture of the applet's GUI. To run the applet, click the picture. The applet will appear in a new browser window.CoordinatesDemo.java. Although we don't discuss this example's code anywhere, it's very similar to the code in theRectangleDemoprogram, which is discussed a little later in Painting Shapes.
Remember that calling a component'srepaintmethod requests that the component be scheduled to paint itself. When the painting system is unable to keep up with the pace of repaint requests, it might combine multiple requests into a single paint request to the component.The
repaintmethod has two useful forms:
void repaint()- Requests that the entire component be repainted.
void repaint(int, int, int, int)- Requests that only the specified part of the component be repainted. The arguments specify first the X and Y coordinates at the upper left of the area to be repainted, and then the area's width and height.
Although using the four-argument form of
repaintmethod often isn't practical, it can help painting performance significantly. The program in the following picture uses the four-argumentrepaintmethod when requesting frequent repaints to display the user's current selection area. Doing so avoids repainting the parts of the component that haven't changed since the last painting operation.The program is implemented in
This is a picture of the applet's GUI. To run the applet, click the picture. The applet will appear in a new browser window.SelectionDemo.java. Here is the code that calculates the area to be repainted and then paints it:As you can see, the custom component extendsclass SelectionArea extends JLabel { ... public SelectionArea(ImageIcon image, ...) { super(image); //Makes this component display an image. ... } ...//In a mouse-dragged event handler: Rectangle totalRepaint = rectToDraw.union(previousRectDrawn); repaint(totalRepaint.x, totalRepaint.y, totalRepaint.width, totalRepaint.height); ... public void paintComponent(Graphics g) { super.paintComponent(g); //paints the background and image ... //Paint a rectangle on top of the image. g.setColor(Color.white); g.drawRect(rectToDraw.x, rectToDraw.y, rectToDraw.width - 1, rectToDraw.height - 1); ... } ... }JLabelso that it inherits the ability to display an image. The user can select a rectangular area by dragging the mouse. The component continuously displays a rectangle indicating the size of the current selection. To improve rendering speed, the component's mouse-dragged event handler specifies a painting area to therepaintmethod.By limiting the area to be repainted, the event handlers avoid unnecessarily repainting the image outside of that area. For this small image there's no noticeable performance benefit to this strategy. However, for a large image there might be a real benefit. And if instead of painting an image from a file, you had to compute what to paint under the rectangle -- for example, computing shapes in a draw program -- then using knowledge of the paint area to limit the computation you perform might improve performance significantly.
The area specified to
repaintmust include not only the area to be painted, but also any area that needs to be erased. Otherwise, old painting remains visible until it happens to be erased by other painting. The preceding code calculates the total area to be repainted by taking the union of the rectangle to be painted with the rectangle that was previously painted.The painting area specified to
repaintis reflected in theGraphicsobject passed into thepaintComponentmethod. You can use thegetClipBoundsmethod to determine which rectangular area to paint. Here is an example of using the clip bounds:
public void paintComponent(Graphics g) {
    Rectangle clipRect = g.getClipBounds();
    if (clipRect != null) {
	//If it's more efficient, draw only the area
	//specified by clipRect.
	//Top-leftmost point = (clipRect.x, clipRect.y)
	//Width, height = clipRect.width, clipRect.height
    } else {
	//Paint the entire component.
    }
}
TheGraphicsobject passed into the
paintComponentmethod provides both a context for painting and methods for performing the painting. The methods, which we discuss in detail a little later, have names such asdrawImage,drawString,drawRect, andfillRect.The graphics context consists of state such as the current painting color, the current font, and (as you've already seen) the current painting area, The color and font are initialized to the foreground color and font of the component just before the invocation of
paintComponent. You can get them using thegetColorandgetFontmethods, and set them using thesetColorandsetFontmethods.You can safely ignore the current painting area, if you like. It has no effect on the component's coordinate system, and any painting outside the area is ignored. However, if your painting code involves complex operations that can be simplified if the painting area is reduced, then you should use your knowledge of the painting area to help you improve painting performance. As shown by the previous code example, you get the painting area's rectangular bounds from the
Graphicsobject by invoking thegetClipBoundsmethod.You can reduce the painting area in two ways. The first is to specify
repaintwith arguments whenever possible. The other is to implementpaintComponentso that it invokes theGraphicsobject'ssetClipmethod. If you usesetClip, be sure to restore the original painting area before returning. Otherwise, the component could be painted improperly. Here's an example of reducing and then restoring the painting area:Rectangle oldClipBounds = g.getClipBounds(); Rectangle clipBounds = new Rectangle(...); g.setClip(clipBounds); ...//Perform custom painting... g.setClip(oldClipBounds);When writing your painting code, keep in mind that you can't depend on any graphics context except what's provided by the
Graphicsobject. For example, you can't rely on the painting area you specify withrepaintbeing exactly the same as the painting area used in the subsequent call topaintComponent. For one thing, multiple repaint requests can be coalesced into a singlepaintComponentcall, with the painting area adjusted accordingly. For another, the painting system occasionally callspaintComponenton its own, without any repaint request from your program. As an example, the painting system invokes a component'spaintComponentmethod when it first shows the component's GUI. Also, when the GUI is covered by another window and then becomes uncovered, the painting system invokes thepaintComponentmethod with the painting area equal to the newly uncovered area.
ThepaintComponentmethod is one of three methods thatJComponentobjects use to paint themselves. The three methods are invoked in this order:
paintComponent-- The main method for painting. By default, it first paints the background if the component is opaque. Then it performs any custom painting.paintBorder-- Tells the component's border (if any) to paint. Do not invoke or override this method.paintChildren-- Tells any components contained by this component to paint themselves. Do not invoke or override this method.
Note: Don't override or invoke the method that calls thepaintXxxmethods: thepaintmethod, Although overridingpaintwas legitimate in pre-Swing components, it's generally not a good thing to do in components that descend fromJComponent. Unless you're careful, overridingpaintwould likely confuse the painting system, which relies on theJComponentimplementation of thepaintmethod for correct painting, performance enhancements, and features such as double buffering.The standard Swing components delegate their look-and-feel-specific painting to an object called a UI delegate. When such a component's
paintComponentmethod is called, the method asks the UI delegate to paint the component. Generally, the UI delegate first checks whether the component is opaque and, if so, paints the entire background of the component. Then the UI delegate performs any look-and-feel-specific painting.The reason that we recommend extending
JPanelinstead ofJComponentis that theJComponentclass doesn't currently set up a UI delegate -- only its subclasses do. This means that if you extendJComponent, your component's background won't be painted unless you paint it yourself. When you extendJPaneland invokesuper.paintComponentat the top of yourpaintComponentmethod, however, then the panel's UI delegate paints the component's background if the component is opaque.If you need more information about painting, see Painting in AWT and Swing. It's an article in The Swing Connection that discusses in depth the intricacies of painting.
|
|
Start of Tutorial > Start of Trail > Start of Lesson | Search |