

 |
 |
This article is an introduction to animation using Persistence of Vision ray tracing to create a mailbox that doesn't just sit there.
by Andy Vaught
Silicon Graphics workstations come with a mail notification program called ``mailbox'', that informs the window system user if any mail awaits. Instead of displaying a simple bitmap like the xbiff program, mailbox draws a real-looking mailbox with a red flag which smoothly rises when it detects new mail. When the user clicks the mouse in the window, the door of the mailbox opens to reveal either empty space or waiting letters. In the latter case, the user's favorite mail program is run.
In this article, I will trace part of the development of a free version of mailbox--building and animating the mailbox. Since SGI workstations contain special graphics-processing chips, the images generated by mailbox are calculated on the fly. On lesser endowed machines, the solution is to generate and store the frames beforehand and simply write them sequentially to the screen. Other examples of similar animations can be found in most of the more popular browsers as well as many web pages.
The natural tool to use is a ray tracing program. While using a paint program will certainly do the job, it would take quite a bit of work to produce smooth animation as well as consistent sizes of the various objects in what is really a very simple scene. The Persistence Of Vision (POV) ray tracing program is one of the oldest free ray tracers around. Its development parallels that of Linux in that it has also been written by a large, unpaid and widely scattered development team.
Ray tracing gets its name from the method it uses to construct an image. For each pixel in the image, a line is calculated in space back along the path of light to see where the light composing that pixel came from, and from there what color it must be. If the ray being traced backwards intersects, say, a mirror surface, then another ray is traced to see where the reflected ray came from. If a ray comes from a solid object, then another calculation is done to see how that spot is illuminated by the surrounding light sources.
From this simple description, one can see that ray tracing involves many mathematical operations for each pixel being rendered. Math coprocessors found on 486DX systems and beyond will increase performance by a factor of about thirty. As distributed, POV comes with X and SVGALIB versions. One of the great advantages of running POV under Linux as opposed to one of the other operating systems (DOS, Windows or Macintosh) is the ability to do something else while waiting for the finished image. When running POV under XFree86, start your server in a 16-bit color mode using the command:
startx -- -bpp 16You won't regret it. If you are running another program that uses lots of colors, 8-bit mode will end up looking really bad.
POV produces an image by interpreting a simple programming language. Since its only purpose is to define various properties of objects and lights, there are no subroutines, loops or if-tests. While the sparseness of the POV language may seem restrictive, it has the effect of keeping the design of the program focused on ray tracing rather than its extension language. A wide variety of third-party programs exist whose ultimate output is a POV-readable text file.
This article describes POV version 3.0, which although still in beta test as of this writing, has nifty features that make simple things much easier to do as well as providing more support for animation. POV 2 came with a good tutorial that has gotten better in 3.0, which now even comes with an HTML version. Rather than try to top the POV tutorial, I will simply present the source code used to construct the mailbox animations.
Running POV without arguments produces on-line help on standard error--130 lines of it, so a pipe to less is needed. All POV's arguments can be specified in a file called povray.ini. Command-line arguments override this initialization file. A ``+'' before an argument turns that option on, ``-'' turns it off. The most frequently used arguments are D, which displays the image as it is being rendered; P, which pauses when the image is done; and +Ifilename, which causes filename to be interpreted by POV. POV can output files in PPM, PNG and its own Targa format. These formats are common enough to allow conversion to other formats.
POV works by interpreting a text file supplied by the user. The file describes the positions and sizes of objects, what their surfaces look like and where the lights and the camera are positioned. The structure of the language is a keyword followed by modifiers enclosed in curly braces. Some keywords require specific modifiers, while others don't require any. Sometimes a modifier will have modifiers of its own, also enclosed in curly braces ({ }).
The amount of planning needed to build an image is directly related to its complexity. Complex images should be built in the same manner as a complex program--by first getting a broad outline to work, and then filling in the details. In our case, the mailbox is fairly simple. We define the z direction to be height above the ground, which is at z=0. The post the mailbox rests on will be located at x=0 and y=0 to make things easy. See Figure 1 for a simple plan of the mailbox.
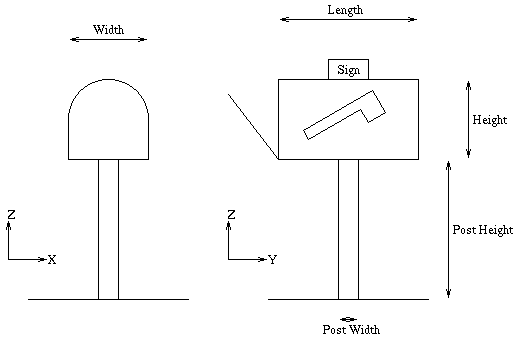
The first part of the mailbox program has the following lines:
#include "colors.inc"
#include "shapes.inc"
#include "textures.inc"

declare POST_WIDTH = 1.5
declare POST_HEIGHT = 10.0
declare MB_WIDTH = 3.0
declare MB_LENGTH = 6.0
declare MB_HEIGHT = 3.0
If you program in C, you know that the #include followed by a filename causes that file to be inserted in lieu of the #include. POV comes with many include files that provide predefined things. In this case, we're loading color definitions with symbolic names that are easy to use. We include the shapes file, because it contains the definition for the cylinder we need for the top of the mailbox, and the texture file, which allows us to specify the surface appearance.
The include files are mainly composed of comments and declare directives, which attach a symbolic name to a POV construct. The only thing we're using them for at the moment is to define a couple of constants that give the dimensions of our mailbox in POV's three-dimensional space. This makes changing the dimensions of the mailbox very easy to do. Later, we'll declare the sides and ends of the mailbox, so that we can reuse them easily.
We define the lights and camera next:
light_source { <10.0, 0.0, 25.0> color White }
light_source { <0.0, 0.0, POST_HEIGHT+0.95*MB_HEIGHT> Gray50 }

camera {
 location <7.0, 7.0, 13.0>
 sky z
 look_at <0.0, 0.0, POST_HEIGHT+MB_HEIGHT/2>
}
In our image, we have two lights. The first one is well above the
mailbox and off to one side, the same side as the camera is
positioned. The light_source keyword is followed
by the position and color of the light. The second light is actually inside the
mailbox, near the top. Since the only other light doesn't shine into
the interior of the box, the interior ends up being a black cave
unless we put a light there. Since we want a very small light, we
choose the color Gray50 which is halfway (50%) between black and
white.
The two main parameters that specify the camera are its location and its point of view. In our case, the camera is at about the same height as the box and off at an angle, so that we can see an end and a side at the same time. The sky keyword specifies which direction is up, i.e., at the top of the image. By default, POV assumes the y-direction is up. The z here is actually a shorthand way of specifying the vector <0,0,1>--you can define any direction as up.
Now that lights and camera have been defined, we can start putting things into our little world:
background { color SkyBlue }
plane {
 z,0
 color Green
}
The background keyword is used to specify what color is generated if a
light ray does not end up intersecting any object at all. We define
this to be a color named SkyBlue. POV is capable of generating
much more complicated backgrounds with varying shades of blue, clouds
and fog effects.
The plane keyword specifies an infinite plane--in our case, the ground. The orientation of a plane can be specified by what is called its normal vector. A normal is the direction sticking straight out of the plane, which for this picture is the z direction. The second parameter is a single number that specifies how far from the origin (the point <0,0,0>) the plane is. Since the ground is at z=0, this parameter is zero.
Building from the ground up, the first object is a wooden post:
box {
 < -POST_WIDTH/2.0, -POST_WIDTH/2.0, 0.0 >,
 < POST_WIDTH/2.0, POST_WIDTH/2.0, POST_HEIGHT >
 pigment { DMFWood4 }
}
A box is specified by two positions of two opposite corners. The box
is always lined up with the x, y and z axes--to get other
orientations, the box must be rotated. To get the wood surface, we
specify a predefined pigment found in the textures.inc file. The
color of a surface is technically part of a pigment which includes
more information about the surface, but POV lets us omit the
pigment
keyword when just specifying a color.
Now that we've reached the mailbox itself, we shift the plane a bit to make things easier. Instead of building the mailbox on top of the post (z=POST_HEIGHT), we'll build the mailbox on the ground (z=0), and move the completed box on top of the post later.
declare mb_side = polygon { 5,
 < 0.0, -MB_LENGTH/2.0, 0.0 >,
 < 0.0, MB_LENGTH/2.0, 0.0 >,
 < 0.0, MB_LENGTH/2.0, MB_HEIGHT/2.0 >,
 < 0.0, -MB_LENGTH/2.0, MB_HEIGHT/2.0 >,
 < 0.0, -MB_LENGTH/2.0, 0.0 >
}
declare mb_bottom = polygon { 5,
 < -MB_WIDTH/2.0, -MB_LENGTH/2.0, 0.0 >,
 < MB_WIDTH/2.0, -MB_LENGTH/2.0, 0.0 >,
 < MB_WIDTH/2.0, MB_LENGTH/2.0, 0.0 >,
 < -MB_WIDTH/2.0, MB_LENGTH/2.0, 0.0 >,
 < -MB_WIDTH/2.0, -MB_LENGTH/2.0, 0.0 >
}
As we mentioned earlier, we're declaring the pieces with the
intention of putting them together later. Polygon is a Greek word
meaning ``many sides''. The first number tells POV how many points in
space specify the polygon. For some reason, POV requires that the
first point equal the last point. If it doesn't, POV will close the
polygon automatically and issue a warning.
The discerning reader will notice we've left out a pigment/color specification. It will be added at the end, so that all of the sides get the same pigment and we don't have to retype the same specification.
Now that we've done some simple shapes, we can do some more complicated things, like the ends of the mailbox:
declare mb_end = union {
polygon { 5,
 < -MB_WIDTH/2.0, 0.0, 0.0 >,
 < MB_WIDTH/2.0, 0.0, 0.0 >,
 < MB_WIDTH/2.0, 0.0, MB_HEIGHT/2.0 >,
 < -MB_WIDTH/2.0, 0.0, MB_HEIGHT/2.0 >,
 < -MB_WIDTH/2.0, 0.0, 0.0 >
}
disc {
 < 0.0, 0.0, MB_HEIGHT/2.0 >, y, MB_HEIGHT/2.0
}
}
A POV union is a collection of one or more objects bound together
into a single object. In the case of the mailbox ends, we have a
rectangle and a disc that overlap each other. The position of the disc is
specified by the location of its center. The orientation is
determined by its normal vector (think of it as the direction of an
axis). The last parameter is the radius of the disc. Since they
overlap perfectly, the disc and rectangle come together seamlessly.
The most complicated object to build is the half-cylinder that forms the top of the mailbox:
declare mb_top = intersection {
 box {
  < -2,-1, 0 >
  < 2, 1, 2 >
  pigment { color red 1.0 green 1.0 blue 1.0
	filter 1.0 }
 }
 Cylinder_Y
 scale <MB_WIDTH/2.0, MB_LENGTH/2.0, MB_WIDTH/2.0>
}
An intersection works similarly to a union,
except the final result consists of a surface that is common
to all elements of the section. If we'd
said intersection instead of union for the
mailbox ends, we would have ended up with a half-disc. In the current
problem, we want half of a cylinder.
Cylinder_Y is actually defined in the shapes.inc in terms of the POV quadric primitive. The result is an infinite cylinder of radius 1.0 along the y-axis. We chop this off by intersecting the cylinder with a box. This works except for one final detail--the result is a solid half-cylinder as opposed to the outer surface. The opaque flat surfaces come from our bounding box.
The solution to this problem is possible only on a computer--we make the box invisible by giving it a special color. Instead of a predefined color name following the color keyword, we specify the amount of red, blue and green to use. The last keyword, filter, reverses the whole interpretation of the color so that instead of reflecting light, the surface passes light. If we were to change the command to color red 1.0 filter 1.0, we would end up with a surface that passed only red light. Since our color has the maximum values of red, green and blue, all light is passed.
When the final scene is rendered with the door open, a careful inspection reveals that the result is slightly less than perfect. If you're looking for it, the end of the cylinder is darker than the lower part. The reason for this is a tradeoff POV makes between speed and accuracy.
Recall that a pixel's color is calculated by bouncing a ray around from the viewer until it hits a light source. Inside the box, lots of bouncing is going on and at some point POV has to give up on hitting a source, since each bounce reduces the amount of light being transmitted. The problem is that our invisible surface is still counted as a surface and POV gives up too soon. This is remedied by setting the max_trace_level global variable higher. The optimum value can be determined by setting a very high value, then looking at the statistics printed by POV at the end of the run. In the current scene, a maximum of 16 bounces were needed, so we set it to 20 with the following line:
global_settings { max_trace_level 20 }
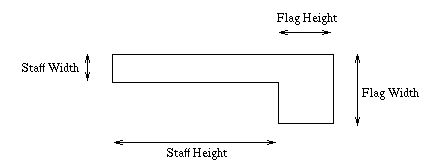
After the complicated half-cylinder, the flag of the mailbox seems
trivial by comparison. The dimensions of the various parts of the
flag are also in Figure 2.
declare STAFF_HEIGHT = 3.0
declare STAFF_WIDTH = 0.30
declare FLAG_HEIGHT = 1.0
declare FLAG_WIDTH = 1.5
declare mb_flag = polygon { 7,
 < 0.0, 0.0, 0.0 >,
 < 0.0, -STAFF_HEIGHT, 0.0 >,
 < 0.0, -STAFF_HEIGHT, -FLAG_WIDTH+STAFF_WIDTH >,
 < 0.0, -STAFF_HEIGHT+FLAG_HEIGHT,
	-FLAG_WIDTH+STAFF_WIDTH >,
 < 0.0, -STAFF_HEIGHT+FLAG_HEIGHT, -STAFF_WIDTH >,
 < 0.0, 0.0, -STAFF_WIDTH >,
 < 0.0, 0.0, 0.0 >
 pigment { color Red }
 finish { ambient 0.85 }
}
The mailbox flag has a different finish
than the rest of the mailbox, so we specify it here. The finish
determines how light bounces off of the surface in question. In
particular, the ambient parameter specifies how
much of the ambient light to reflect to the camera. Ambient light
is a global parameter that defaults to white light. The 0.85
specifies ``lots'', so we end up with a fluorescent
red flag that glows even when all other lights are turned off.
The last little piece of the mailbox is a sign on top giving the address.
declare sign = union {

text { ttf "timrom.ttf" "Andy" 0.05, 0.0
 pigment { Red }
 finish {
  ambient 0.5
  diffuse 0.5
 }
 translate <0.32, 0.175, 0.0>
}
polygon { 5,
 < 0.0, 0.0, 0.0 >,
 < 3.0, 0.0, 0.0 >,
 < 3.0, 1.0, 0.0 >,
 < 0.0, 1.0, 0.0 >,
 < 0.0, 0.0, 0.0 >
 pigment { White }
}
}
Again, we build the sign on the ground and move it into position
later. The main reason for this is that text objects are rendered at
a fixed place, which is flat on our ground (z=0). Before POV 3.0,
text had to be laboriously constructed from a union of polygons. POV
3.0 is capable of reading and displaying Adobe TrueType fonts. Most
letters are about one unit high and about half a unit wide. Since
POV's world is a three-dimensional world, text objects have a thickness,
which we've set to 0.05. This is big enough that the letters stick
out from the background rectangle, yet small enough that the
thickness is not obvious. The last parameter we've
set to zero is a number that specifies an offset between each
character beyond the usual spacing.
The downside of text objects is that centering and figuring out how large the text should be is a matter of trial and error. The translate keyword modifies an object by moving it in a particular direction, in this case to the center of the following rectangle.
Finally, we put the whole mailbox together. We place everything in a union so that we can translate the whole structure to the top of the post:
union {
 object { mb_bottom }
 object {
  mb_side translate < -MB_WIDTH/2.0, 0.0, 0.0>
 }
 object {
  mb_side translate < MB_WIDTH/2.0, 0.0, 0.0>
 }
 object {
  mb_end
  translate < 0.0, -0.5*MB_LENGTH, 0.0 >
 }
 object {
  mb_end
  rotate < -90.0*clock, 0.0, 0.0 >
  translate < 0.0, 0.475*MB_LENGTH, 0.0 >
 }
The first part of the union puts the bottom, sides and ends
together. The only new thing in this section is the rotate keyword
which rotates the front end of the mailbox. The vector after the
rotate keyword gives the rotation angle in degrees about the x, y and
z axes. The clock variable is a number between zero and one that is
used when a multiple-frame animation is being rendered. Instead of
rendering a single frame, the number of frames to be drawn is given on
the command line, and the variable clock is zero for the first frame
and one for the last. The result is a series of images with the door
smoothly rotating open. For a single frame, clock is set to zero.
object {
  mb_top
  translate < 0.0, 0.0, MB_HEIGHT/2.0 >
 }
 object {
  sign
  scale 0.9
  rotate <90, 0, -90>
  translate <0, 1.5, MB_HEIGHT>
 }
 object {
  mb_flag
  rotate <-90*clock, 0.0, 0.0>
  translate < 0.01+MB_WIDTH/2.0, MB_LENGTH/2.95,
	MB_HEIGHT/2.25 >
 }
 texture {
  pigment { color Silver }
  normal { bumps 0.1 scale 0.01 }
  finish {
   ambient 0.2
   brilliance 6.0
   reflection 0.5
  }
 }
 translate < 0.0, 0.0, POST_HEIGHT>
}
The last section places the mailbox's top, sign and flag into place.
The final texture keyword is used to give a texture to all the
surfaces that don't have one yet--surfaces that already have textures
are unaffected. The brilliance parameter controls how light reflects
from the surface as a function of the angle at which it strikes the
surface. Higher values make the surface appear more metallic, which
is what we want. The reflection keyword causes reflection to occur,
with 1.0 being a mirror surface and 0.0 being a black non-reflective
surface.
Of course, the last thing to do is actually run POV to render the images. Running POV in animation mode involves adding a command-line switch +KFFn where n is the number of frames to produce. The output filenames are appended with 01, 02, etc., corresponding to the frame number. For long animations, subsets of the entire sequence can easily be done.
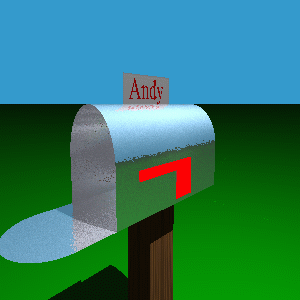
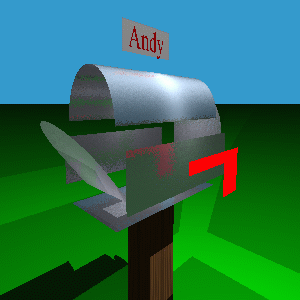
Although the real project isn't done yet, it helps to view the output as it really might be seen. Taking the easy way out, a short Tcl/Tk script is provided (Listing 1) that will display a simple animation forward and backward at a mouse click. Being interpreted, it isn't fast, but it was quick to write and it works. An alternative to this script is to use the GIFMerge program to merge separate GIF images into a single GIF that can be displayed by one of the major web browsers or by XAmin. POV does not write GIF files, but many converters are available.
A wealth of information exists on POV-Ray. The best place to start is the POV web site, http://www.povray.org/. Although the site has recently been downsized, follow the link to the back issues of POVZINE, a webzine devoted to POV. A POV CD-ROM is available, as well as several books on ray tracing, some specific to POV. GIFMerge has a really neat home page (containing compiled binaries) at http://www.iis.ee.ethz.ch/~kiwi/GIFMerge/.
Andy Vaught is currently a PhD candidate in computational physics at Arizona State University, and has been running Linux since 1.1. He enjoys flying with the Civil Air Patrol as well as skiing. He can be reached at andy@maxwell.la.asu.edu.