| Oracle® Database JDBC Developer's Guide and Reference 10g Release 1 (10.1) Part Number B10979-01 |
|


|
View PDF |
| Oracle® Database JDBC Developer's Guide and Reference 10g Release 1 (10.1) Part Number B10979-01 |
|
|
View PDF |
This chapter describes the following advanced JDBC topics:
This section discusses support in the Oracle JDBC OCI and Thin drivers for login authentication, data encryption, and data integrity—particularly with respect to features of the Oracle Advanced Security option.
Oracle Advanced Security, previously known as the "Advanced Networking Option" (ANO) or "Advanced Security Option" (ASO), includes features to support data encryption, data integrity, third-party authentication, and authorizations. Oracle JDBC supports most of these features; however, the JDBC Thin driver must be considered separately from the JDBC OCI driver.
|
Note: This discussion is not relevant to the server-side internal driver, given that all communication through that driver is completely internal to the server. |
Both the JDBC OCI drivers and the JDBC Thin driver support at least some of the features of Oracle Advanced Security. If you are using one of the OCI drivers, you can set relevant parameters in the same way that you would in any thick-client setting. The Thin driver supports Advanced Security features through a set of Java classes included with the JDBC classes JAR file, and supports security parameter settings through Java properties objects.
Included in your Oracle JDBC classes12.jar file is a JAR file containing classes that incorporate features of Oracle Advanced Security, and a JAR file containing classes whose function is to interface between the JDBC classes and the Advanced Security classes for use with the JDBC Thin driver.
If you are using one of the JDBC OCI drivers, which presumes you are running from a thick-client machine with an Oracle client installation, then support for Oracle Advanced Security and incorporated third-party features is, for the most part, no different from any Oracle thick-client situation. Your use of Advanced Security features is determined by related settings in the SQLNET.ORA file on the client machine, as discussed in the Oracle Advanced Security Administrator's Guide. Refer to that manual for information.
|
Important: The one key exception to the preceding, with respect to Java, is that SSL—Sun Microsystem's standard Secure Socket Layer protocol—is supported by the Oracle JDBC OCI drivers only if you use native threads in your application. This requires special attention, because green threads are generally the default. |
Because the Thin driver was designed to be downloadable with applets, one obviously cannot assume that there is an Oracle client installation and a SQLNET.ORA file where the Thin driver is used. This necessitated the design of a new, 100% Java approach to Oracle Advanced Security support.
Java classes that implement Oracle Advanced Security are included in your JDBC classes12.jar file. Security parameters for encryption and integrity, normally set in SQLNET.ORA, are set in a Java properties file instead.
For information about parameter settings, see "Thin Driver Support for Encryption and Integrity".
Basic login authentication through JDBC consists of user names and passwords, as with any other means of logging in to an Oracle server. Specify the user name and password through a Java properties object or directly through the getConnection() method call, as discussed in "Opening a Connection to a Database".
This applies regardless of which client-side Oracle JDBC driver you are using, but is irrelevant if you are using the server-side internal driver, which uses a special direct connection and does not require a user name or password.
The Oracle JDBC Thin driver implements Oracle O3LOGON challenge-response protocol to authenticate the user.
|
Note: Third-party authentication features supported by Oracle Advanced Security—such as those provided by RADIUS, Kerberos, or SecurID—are not supported by the Oracle JDBC Thin driver. For the Oracle JDBC OCI driver, support is the same as in any thick-client situation—refer to the Oracle Advanced Security Administrator's Guide. |
You can use Oracle Advanced Security data encryption and integrity features in your Java database applications, depending on related settings in the server.
When using an OCI driver in a thick-client setting, set parameters as you would in any Oracle client situation. When using the Thin driver, set parameters through a Java properties file.
Encryption is enabled or disabled based on a combination of the client-side encryption-level setting and the server-side encryption-level setting.
Similarly, integrity is enabled or disabled based on a combination of the client-side integrity-level setting and the server-side integrity-level setting.
Encryption and integrity support the same setting levels—REJECTED, ACCEPTED, REQUESTED, and REQUIRED. Table 23-1 shows how these possible settings on the client-side and server-side combine to either enable or disable the feature.
Table 23-1 Client/Server Negotiations for Encryption or Integrity
| Client Rejected | Client Accepted (default) | Client Requested | Client Required | |
|---|---|---|---|---|
| Server Rejected | OFF | OFF | OFF | connection fails |
| Server Accepted (default) | OFF | OFF | ON | ON |
| Server Requested | OFF | ON | ON | ON |
| Server Required | connection fails | ON | ON | ON |
This table shows, for example, that if encryption is requested by the client, but rejected by the server, it is disabled. The same is true for integrity. As another example, if encryption is accepted by the client and requested by the server, it is enabled. And, again, the same is true for integrity.
The general settings are further discussed in the Oracle Advanced Security Administrator's Guide. How to set them for a JDBC application is described in the following subsections.
|
Note: The term "checksum" still appears in integrity parameter names, as you will see in the following subsections, but is no longer used otherwise. For all intents and purposes, "checksum" and "integrity" are synonymous. |
If you are using one of the Oracle JDBC OCI drivers, which presumes a thick-client setting with an Oracle client installation, you can enable or disable data encryption or integrity and set related parameters as you would in any Oracle client situation, through settings in the SQLNET.ORA file on the client machine.
To summarize, the client parameters are shown in Table 23-2:
Table 23-2 OCI Driver Client Parameters for Encryption and Integrity
| Parameter Description | Parameter Name | Possible Settings |
|---|---|---|
| Client encryption level | SQLNET.ENCRYPTION_CLIENT |
REJECTED ACCEPTED REQUESTED REQUIRED |
| Client encryption selected list | SQLNET.ENCRYPTION_TYPES_CLIENT |
RC4_40 RC4_56 DES DES40
(see note below) |
| Client integrity level | SQLNET.CRYPTO_CHECKSUM_CLIENT |
REJECTED ACCEPTED REQUESTED REQUIRED |
| Client integrity selected list | SQLNET.CRYPTO_CHECKSUM_TYPES_CLIENT |
MD5 |
|
Note: For the Oracle Advanced Security domestic edition only, a setting ofRC4_128 is also possible. |
These settings, and corresponding settings in the server, are further discussed in Appendix A of the Oracle Advanced Security Administrator's Guide.
Thin driver support for data encryption and integrity parameter settings parallels the thick-client support discussed in the preceding section. Corresponding parameters exist under the oracle.net package and can be set through a Java properties object that you would then use in opening your database connection.
If you replace "SQLNET" in the parameter names in Table 23-2 with "oracle.net", you will get the parameter names supported by the Thin driver (but note that in Java, the parameter names are all-lowercase).
Table 23-3 lists the parameter information for the Thin driver. See the next section for examples of how to set these parameters in Java.
Table 23-3 Thin Driver Client Parameters for Encryption and Integrity
| Parameter Name | Parameter Type | Parameter Class | Possible Settings |
|---|---|---|---|
oracle.net.encryption_client |
string | static | REJECTED ACCEPTED REQUESTED REQUIRED |
oracle.net.encryption_types_client |
string | static | RC4_40 RC4_56 DES40C DES56C 3DES112 3DES168 |
oracle.net.crypto_checksum_client |
string | static | REJECTED ACCEPTED REQUESTED REQUIRED |
oracle.net.crypto_checksum_types_client |
string | static | MD5 |
|
Notes:
|
Use a Java properties object (java.util.Properties) to set the data encryption and integrity parameters supported by the Oracle JDBC Thin driver.
The following example instantiates a Java properties object, uses it to set each of the parameters in Table 23-3, and then uses the properties object in opening a connection to the database:
...
Properties prop = new Properties();
prop.put("oracle.net.encryption_client", "REQUIRED");
prop.put("oracle.net.encryption_types_client", "( DES40 )");
prop.put("oracle.net.crypto_checksum_client", "REQUESTED");
prop.put("oracle.net.crypto_checksum_types_client", "( MD5 )");

OracleDataSource ods = new OracleDataSource();ods.setProperties(prop);ods.setURL("jdbc:oracle:thin:@localhost:1521:main");Connection conn = ods.getConnection();
...
The parentheses around the parameter values in the encryption_types_client and crypto_checksum_types_client settings allow for lists of values. Currently, the Thin driver supports only one possible value in each case; however, in the future, when multiple values are supported, specifying a list will result in a negotiation between the server and the client that determines which value is actually used.
Example 23-1 is a complete class that sets data encryption and integrity parameters before connecting to a database to perform a query.
|
Note: in this example, the string "REQUIRED" is retrieved dynamically through functionality of theAnoServices and Service classes. You have the option of retrieving the strings in this manner or hardcoding them as in the previous examples |
Before running this example, you must turn on encryption in the sqlnet.ora file. For example, the following 4 lines will turn on DES40, DES, 2-DES-112 and 3-DES168 for the encryption and MD5 and SHA1 for the checksum:
SQLNET.ENCRYPTION_SERVER = ACCEPTED
  SQLNET.CRYPTO_CHECKSUM_SERVER = ACCEPTED
  SQLNET.CRYPTO_CHECKSUM_TYPES_SERVER= (MD5, SHA1)
  SQLNET.ENCRYPTION_TYPES_SERVER= (DES40, DES, 3DES112, 3DES168)
  SQLNET.CRYPTO_SEED = 12345678901234567890
Example 23-1 Setting Data Encryption and Integrity Parameters
import java.sql.*;
import java.sql.*;
import java.io.*;
import java.util.*;
import oracle.net.ns.*;
import oracle.net.ano.*;
import oracle.jdbc.*;
import oracle.jdbc.pool.*;

class Employee
{
  public static void main (String args [])
    throws Exception
  {

    Properties props = new Properties();

    try {
      FileInputStream defaultStream = new FileInputStream(args[0]);
      props.load(defaultStream);


      int level = AnoServices.REQUIRED;
      props.put("oracle.net.encryption_client", Service.getLevelString(level));
      props.put("oracle.net.encryption_types_client", "( 3DES168 )");
      props.put("oracle.net.crypto_checksum_client",
                 Service.getLevelString(level));
      props.put("oracle.net.crypto_checksum_types_client", "( MD5 )");
    } catch (Exception e) { e.printStackTrace(); }


    // You can put a database name after the @ sign in the connection URL.
    OracleDataSource ods = new OracleDataSource();
    ods.setURL("jdbc:oracle:thin:@host.example.com:1521:main");
    ods.setConnectionProperties(props);
    Connection conn = ods.getConnection();


    // Create a Statement
    Statement stmt = conn.createStatement ();

    // Select the ENAME column from the EMP table
    ResultSet rset = stmt.executeQuery ("select ENAME from EMP");

    // Iterate through the result and print the employee names
    while (rset.next ())
       System.out.println (rset.getString (1));

    conn.close();
  }

}
This section describes some of the basics of working with Oracle JDBC applets.
Aside being mindful of applet connection and security issues, there is essentially no difference between coding a JDBC applet and a JDBC application.
This section describes what you must do for the applet to connect to a database, including how to use the Oracle Connection Manager or signed applets if you are connecting to a database not running on the same host as the Web server. It also describes how your applet can connect to a database through a firewall. The section concludes with how to package and deploy the applet.
The following topics are covered:
For general information about connecting to the database, see "Opening a Connection to a Database".
The most common task of an applet using the JDBC driver is to connect to and query a database. Because of applet security restrictions, unless particular steps are taken an applet can open TCP/IP sockets only to the host from which it was downloaded (this is the host on which the Web server is running). This means that without these steps, your applet can connect only to a database that is running on the same host as the Web server.
If your database and Web server are running on the same host, then there is no issue and no special steps are required. You can connect to the database as you would from an application.
As with connecting from an application, there are two ways in which you can specify the connection information to the driver. You can provide it in the form of host:port:sid or in the form of a TNS keyword-value syntax.
For example, if the database to which you want to connect resides on host prodHost, at port 1521, and SID ORCL, and you want to connect with user name scott with password tiger, then use either of the two following connect strings:
using host:port:sid syntax:
String connString="jdbc:oracle:thin:@prodHost:1521:ORCL";

OracleDataSource ods = new OracleDataSource();
ods.setURL(connString);
ods.setUser("scott");
ods.setPassword("tiger");
Connection conn = ods.getConnection();
using TNS keyword-value syntax:
String connString = "jdbc:oracle:thin:@(description=(address_list=
   (address=(protocol=tcp)(port=1521)(host=prodHost)))
OracleDataSource ods = new OracleDataSource();

ods.setURL(connString);
ods.setUser("scott");
ods.setPassword("tiger");
Connection conn = ods.getConnection();
   (connect_data=(INSTANCE_NAME=ORCL)))";
If you use the TNS keyword-value pair to specify the connection information to the JDBC Thin driver, then you must declare the protocol as TCP.
However, a Web server and an Oracle database server both require many resources; you seldom find both servers running on the same machine. Usually, your applet connects to a database on a host other than the one on which the Web server runs. There are two possible ways in which you can work around the security restriction:
or:
You can use a signed applet to connect to the database directly.
These options are discussed in the next section, "Connecting to a Database on a Different Host Than the Web Server".
If you are connecting to a database on a host other than the one on which the Web server is running, then you must overcome applet security restrictions. You can do this by using either the Oracle Connection Manager or signed applets.
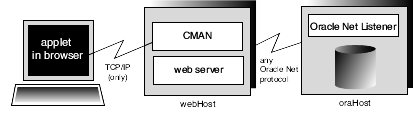
The Oracle Connection Manager is a lightweight, highly-scalable program that can receive Oracle Net packets and re-transmit them to a different server. To a client running Oracle Net, the Connection Manager looks exactly like a database server. An applet that uses the JDBC Thin driver can connect to a Connection Manager running on the Web server host and have the Connection Manager redirect the Oracle Net packets to an Oracle server running on a different host.
Figure 23-1 illustrates the relationship between the applet, the Oracle Connection Manager, and the database.
Figure 23-1 Applet, Connection Manager, and Database Relationship
Using the Oracle Connection Manager requires two steps:
Install and run the Connection Manager.
Write the connection string that targets the Connection Manager.
There is also discussion of how to connect using multiple connection managers.
You must install the Connection Manager, available on the Oracle distribution media, onto the Web server host. You can find the installation instructions in the Oracle Net Services Administrator's Guide.
On the Web server host, create a CMAN.ORA file in the [ORACLE_HOME]/NET8/ADMIN directory. The options you can declare in a CMAN.ORA file include firewall and connection pooling support.
Here is an example of a very simple CMAN.ORA file. Replace web-server-host with the name of your Web server host. The fourth line in the file indicates that the Connection Manager is listening on port 1610. You must use this port number in your connect string for JDBC.
cman = (ADDRESS_LIST =
       (ADDRESS = (PROTOCOL=TCP)
       (HOST=web-server-host)
       (PORT=1610)))

cman_profile = (parameter_list =
       (MAXIMUM_RELAYS=512)
       (LOG_LEVEL=1)
   (TRACING=YES)
       (RELAY_STATISTICS=YES)
       (SHOW_TNS_INFO=YES)
       (USE_ASYNC_CALL=YES)
       (AUTHENTICATION_LEVEL=0)
       )
Note that the Java Oracle Net version inside the JDBC Thin driver does not have authentication service support. This means that the AUTHENTICATION_LEVEL configuration parameter in the CMAN.ORA file must be set to 0.
After you create the file, start the Connection Manager at the operating system prompt with this command:
cmctl start
To use your applet, you must now write the connect string for it.
This section describes how to write the URL in your applet so that the applet connects to the Connection Manager, and the Connection Manager connects with the database. In the URL, you specify an address list that lists the protocol, port, and name of the Web server host on which the Connection Manager is running, followed by the protocol, port, and name of the host on which the database is running.
The following example describes the configuration illustrated in Figure 23-1. The Web server on which the Connection Manager is running is on host webHost and is listening on port 1610. The database to which you want to connect is running on host oraHost, listening on port 1521, and SID ORCL. You write the URL in TNS keyword-value format:
String myURL =
   "jdbc:oracle:thin:@(description=(address_list=
   (address=(protocol=tcp)(port=1610)(host=webHost))
   (address=(protocol=tcp)(port=1521)(host=oraHost)))
   (connect_data=(INSTANCE_NAME=orcl))
   (source_route=yes))";
   OracleDataSource ods = new OracleDataSource();   ods.setURL(myURL);   ods.setUser("scott");   ods.setPassword("tiger");   Connection conn = ods.getConnection();
The first element in the address_list entry represents the connection to the Connection Manager. The second element represents the database to which you want to connect. The order in which you list the addresses is important.
When your applet uses a URL such as the one above, it will behave exactly as if it were connected directly to the database on the host oraHost.
For more information on the parameters that you specify in the URL, see the Oracle Net Services Administrator's Guide.
Your applet can reach its target database even if it first has to go through multiple Connection Managers (for example, if the Connection Managers form a "proxy chain"). To do this, add the addresses of the Connection Managers to the address list, in the order that you plan to access them. The database listener should be the last address on this list. See the Oracle Net Services Administrator's Guide for more information about source_route addressing.
In a JDK 1.2.x-based or higher browser, an applet can request socket connection privileges and connect to a database running on a different host than the Web server host. In Netscape 4.0, you perform this by signing your applet (that is, writing a signed applet). You must follow these steps:
Sign the applet. For information on the steps you must follow to sign an applet, see Sun Microsystem's Signed Applet Example at:
http://java.sun.com/security/signExample/index.html
Include applet code that asks for appropriate permission before opening a socket.
If you are using Netscape, then your code would include a statement like this:
netscape.security.PrivilegeManager.enablePrivilege("UniversalConnect");
OracleDataSource ods = new OracleDataSource();
ods.setURL("jdbc:oracle:thin:scott/tiger@dlsun511:1721:orcl");
Connection conn = ods.getConnection();
You must obtain an object-signing certificate. See Netscape's Object-Signing Resources page at:
http://developer.netscape.com/software/signedobj/index.html
This site provides information on obtaining and installing a certificate.
For more information on writing applet code that asks for permissions, see Netscape's Introduction to Capabilities Classes at:
http://developer.netscape.com/docs/manuals/signedobj/capabilities/contents.htm
For information about the Java Security API, including signed applet examples, see the following Sun Microsystems site:
http://java.sun.com/security
Under normal circumstances, an applet that uses the JDBC Thin driver cannot access the database through a firewall. In general, the purpose of a firewall is to prevent unauthorized clients from reaching the server. In the case of applets trying to connect to the database, the firewall prevents the opening of a TCP/IP socket to the database.
Firewalls are rule-based. They have a list of rules that define which clients can connect, and which cannot. Firewalls compare the client's hostname with the rules, and based on this comparison, either grant the client access, or not. If the hostname lookup fails, the firewall tries again. This time, the firewall extracts the IP address of the client and compares it to the rules. The firewall is designed to do this so that users can specify rules that include hostnames as well as IP addresses.
You can solve the firewall issue by using an Oracle Net-compliant firewall and connection strings that comply with the firewall configuration. Oracle Net-compliant firewalls are available from many leading vendors; a more detailed discussion of these firewalls is beyond the scope of this manual.
An unsigned applet can access only the same host from which it was downloaded. In this case, the Oracle Net-compliant firewall must be installed on that host. In contrast, a signed applet can connect to any host. In this case, the firewall on the target host controls the access.
Connecting through a firewall requires two steps, described in the following sections:
The instructions in this section assume that you are running an Oracle Net-compliant firewall.
Java applets do not have access to the local system—that is, they cannot get the hostname or environment variables locally—because of security limitations. As a result, the JDBC Thin driver cannot access the hostname on which it is running. The firewall cannot be provided with the hostname. To allow requests from JDBC Thin clients to go through the firewall, you must do the following two things to the firewall's list of rules:
Add the IP address (not the hostname) of the host on which the JDBC applet is running.
Ensure that the hostname "__jdbc__" never appears in the firewall's rules. This hostname has been hard-coded as a false hostname inside the driver to force an IP address lookup. If you do enter this hostname in the list of rules, then every applet using Oracle's JDBC Thin driver will be able to go through your firewall.
By not including the Thin driver's hostname, the firewall is forced to do an IP address lookup and base its access decision on the IP address, instead of the hostname.
To write a URL that allows you to connect through a firewall, you must specify the name of the firewall host and the name of the database host to which you want to connect.
For example, if you want to connect to a database on host oraHost, listening on port 1521, with SID ORCL, and you are going though a firewall on host fireWallHost, listening on port 1610, then use the following URL:
OracleDataSource ods = new OracleDataSource();
ods.setURL("jdbc:oracle:thin:" +
      "@(description=(address_list=" +
      (address=(protocol=tcp)(host=<firewall-host>)(port=1610))" +
      "(address=(protocol=tcp)(host=oraHost)(port=1521)))" +
      "(source_route=yes)" +
      "(connect_data=(INSTANCE_NAME=orcl)))");
);
ods.setUser("scott");
ods.setPassword("tiger");
Connection conn = ods.getConnection();
|
Note: To connect through a firewall, you cannot specify the URL inhost:port:sid syntax. For example, a URL specified as follows will not work:
String connString =
"jdbc:oracle:thin:@ixta.us.oracle.com:1521:orcl";

OracleDataSource ods = new OracleDataSource();
ods.setURL(connString);
ods.setUser("scott");
ods.setPassword("tiger");
Connection conn = ods.getConnection();
|
The first element in the address_list represents the connection to the firewall. The second element represents the database to which you want to connect. Note that the order in which you specify the addresses is important.
Notice that you can also write the preceding URL in this format:
String connString =
      "jdbc:oracle:thin:@(description=(address_list=
      (address=(protocol=tcp)(port=1600)(host=fireWallHost))
      (address=(protocol=tcp)(port=1521)(host=oraHost)))
      (connect_data=(INSTANCE_NAME=orcl))
      (source_route=yes))";
OracleDataSource ods = new OracleDataSource();
ods.setURL(connString);
ods.setUser("scott");
ods.setPassword("tiger");
Connection conn = ods.getConnection();
When your applet uses a URL similar to the one above, it will behave as if it were connected to the database on host oraHost.
|
Note: All the parameters shown in the preceding example are required. In theaddress_list, the firewall address must precede the database server address. |
For more information on the parameters used in the above example, see the Oracle Net Services Administrator's Guide. For more information on how to configure a firewall, please see your firewall's documentation or contact your firewall vendor.
After you have coded your applet, you must package it and make it available to users. To package an applet, you will need your applet class files and the JDBC driver class files contained in classes12.jar.
Follow these steps:
Move the JDBC driver classes file classes12.jar to an empty directory.
If your applet will connect to a database with a non-US7ASCII and non-WE8ISO8859P1 character set, then also move the orai18n.jar file to the same directory.
Add your applet classes files to the directory, and any other files the applet might require.
Zip the applet classes and driver classes together into a single ZIP or JAR file. The single zip file should contain the following:
class files from classes12.jar (and required class files from orai18n.jar if the applet requires Globalization Support)
your applet classes
Additionally, if you are using DatabaseMetaData entry points in your applet, include the oracle/jdbc/driver/OracleDatabaseMetaData.class file. Note that this file is very large and might have a negative impact on performance. If you do not use DatabaseMetaData methods, omit this file.
Ensure that the ZIP or JAR file is not compressed.
You can now make the applet available to users. One way to do this is to add the APPLET tag to the HTML page from which the applet will be run. For example:
<APPLET WIDTH=500 HEIGHT=200 CODE=JdbcApplet ARCHIVE=JdbcApplet.zip
      CODEBASE=Applet_Samples
</APPLET>
You can find a description of the APPLET, CODE, ARCHIVE, CODEBASE, WIDTH, and HEIGHT parameters in the next section.
The APPLET tag specifies an applet that runs in the context of an HTML page. The APPLET tag can have these parameters: CODE, ARCHIVE, CODEBASE, WIDTH, and HEIGHT to specify the name of the applet and its location, and the height and width of the applet display area. These parameters are described in the following sections.
The HTML page that runs the applet must have an APPLET tag with an initial width and height to specify the size of the applet display area. You use the HEIGHT and WIDTH parameters to specify the size, measured in pixels. This size should not count any windows or dialogs that the applet opens.
The APPLET tag must also specify the name of the file that contains the applet's compiled Applet subclass—specify the file name with the CODE parameter. Any path must be relative to the base URL of the applet—the path cannot be absolute.
In the following example, JdbcApplet.class is the name of the applet's compiled applet subclass:
<APPLET CODE="JdbcApplet" WIDTH=500 HEIGHT=200>
</APPLET>
If you use this form of the CODE tag, then the classes for the applet and the classes for the JDBC Thin driver must be in the same directory as the HTML page.
Notice that in the CODE specification, you do not include the file name extension ".class".
The CODEBASE parameter is optional and specifies the base URL of the applet; that is, the name of the directory that contains the applet's code. If it is not specified, then the document's URL is used. This means that the classes for the applet and the JDBC Thin driver must be in the same directory as the HTML page. For example, if the current directory is my_Dir:
<APPLET WIDTH=500 HEIGHT=200 CODE=JdbcApplet CODEBASE="."
</APPLET>
The entry CODEBASE="." indicates that the applet resides in the current directory (my_Dir). If the value of codebase was set to Applet_Samples, for example:
CODEBASE="Applet_Samples"
This would indicate that the applet resides in the my_Dir/Applet_Samples directory.
The ARCHIVE parameter is optional and specifies the name of the archive file (either a .zip or .jar file), if applicable, that contains the applet classes and resources the applet needs. Oracle recommends using a .zip file or .jar file, which saves many extra roundtrips to the server.
The .zip (or .jar) file will be preloaded. If you have more than one archive in the list, separate them with commas. In the following example, the class files are stored in the archive file JdbcApplet.zip:
<APPLET CODE="JdbcApplet" ARCHIVE="JdbcApplet.zip" WIDTH=500 HEIGHT=200>
</APPLET>
|
Note: Version 3.0 browsers do not support theARCHIVE parameter. |
This section covers the following topics:
Connecting to the Database with the Server-Side Internal Driver
Exception-Handling Extensions for the Server-Side Internal Driver
Session and Transaction Context for the Server-Side Internal Driver
Server-Side Character Set Conversion of oracle.sql.CHAR Data
This driver is intrinsically tied to the Oracle database and to the Java virtual machine (JVM). The driver runs as part of the same process as the database. It also runs within the default session—the same session in which the JVM was invoked.
The server-side internal driver is optimized to run within the database server and provide direct access to SQL data and PL/SQL subprograms on the local database. The entire JVM operates in the same address space as the database and the SQL engine. Access to the SQL engine is a function call; there is no network. This enhances the performance of your JDBC programs and is much faster than executing a remote Oracle Net call to access the SQL engine.
The server-side internal driver supports the same features, APIs, and Oracle extensions as the client-side drivers. This makes application partitioning very straightforward. For example, if you have a Java application that is data-intensive, you can easily move it into the database server for better performance, without having to modify the application-specific calls.
For general information about the Oracle Java platform server-side configuration or functionality, see the Oracle Database Java Developer's Guide.
As described in the preceding section, the server-side internal driver runs within a default session. You are already "connected". There are two methods you can use to access the default connection:
Use the OracleDataSource.getConnection() method, with either jdbc:oracle:kprb or jdbc:default:connection as the URL string.
Use the Oracle-specific defaultConnection() method of the OracleDriver class.
Using defaultConnection() is generally recommended.
|
Note: You are no longer required to register theOracleDriver class for connecting with the server-side internal driver. |
The oracle.jdbc.OracleDriver class defaultConnection() method is an Oracle extension and always returns the same connection object. Even if you invoke this method multiple times, assigning the resulting connection object to different variable names, just a single connection object is reused.
You do not need to include a connect string in the defaultConnection() call. For example:
import java.sql.*;
import oracle.jdbc.*;

class JDBCConnection
{
  public static Connection connect() throws SQLException
  {
    Connection conn = null;
    try {
      // connect with the server-side internal driver
         OracleDriver ora = new OracleDriver();
         conn = ora.defaultConnection();
      }

    } catch (SQLException e) {...}
    return conn;
  }
}
Note that there is no conn.close() call in the example. When JDBC code is running inside the target server, the connection is an implicit data channel, not an explicit connection instance as from a client. It should typically not be closed.
If you do call the close() method, be aware of the following:
All connection instances obtained through the defaultConnection() method, which actually all reference the same connection object, will be closed and unavailable for further use, with state and resource cleanup as appropriate. Executing defaultConnection() afterward would result in a new connection object.
Even though the connection object is closed, the implicit connection to the database will not be closed.
To connect to the internal server connection from code that is running within the target server, you can use the OracleDataSource.getConnection() method with either of the following URLs:
OracleDataSource ods = new OracleDataSource();
ods.setURL("jdbc:oracle:kprb:");
Connection conn = ods.getConnection();
or:
OracleDataSource ods = new OracleDataSource();
ods.setURL("jdbc:default:connection:");
Connection conn = ods.getConnection();
Any user name or password you include in the URL is ignored in connecting to the server default connection.
The OracleDataSource.getConnection() method returns a new Java Connection object every time you call it. Note that although the method is not creating a new physical connection (only a single implicit connection is used), it is returning a new object.
The fact that OracleDataSource.getConnection() returns a new connection object every time you call it is significant if you are working with object maps (or "type maps"). A type map is associated with a specific Connection object and with any state that is part of the object. If you want to use multiple type maps as part of your program, then you can call getConnection() to create a new Connection object for each type map.
The server-side internal driver, in addition to having standard exception-handling capabilities such as getMessage(), getErrorCode(), and getSQLState() (as described in "Processing SQL Exceptions"), offers extended features through the oracle.jdbc.driver.OracleSQLException class. This class is a subclass of the standard java.sql.SQLException class and is not available to the client-side JDBC drivers or the server-side Thin driver.
When an error condition occurs in the server, it often results in a series of related errors being placed in an internal error stack. The JDBC server-side internal driver retrieves errors from the stack and places them in a chain of OracleSQLException objects.
You can use the following methods in processing these exceptions:
SQLException getNextException() (standard method)
This method returns the next exception in the chain (or null if no further exceptions). You can start with the first exception you receive and work through the chain.
int getNumParameters() (Oracle extension)
Errors from the server usually include parameters, or variables, that are part of the error message. These may indicate what type of error occurred, what kind of operation was being attempted, or the invalid or affected values.
This method returns the number of parameters included with this error.
Object[] getParameters() (Oracle extension)
This method returns a Java Object[] array containing the parameters included with this error.
Following is an example of server-side error processing:
try
{
   // should get "ORA-942: table or view does not exist"
   stmt.execute("drop table no_such_table");
}
catch (OracleSQLException e)
{
   System.out.println(e.getMessage());
   // prints "ORA-942: table or view does not exist"

   System.out.println(e.getNumParameters());
   // prints "1"

   Object[] params = e.getParameters();
   System.out.println(params[0]);
   // prints "NO_SUCH_TABLE"
}
The server-side driver operates within a default session and default transaction context. The default session is the session in which the JVM was invoked. In effect, you are already connected to the database on the server. This is different from the client side where there is no default session: you must explicitly connect to the database.
Auto-commit mode is disabled in the server. You must manage transaction COMMIT and ROLLBACK operations explicitly by using the appropriate methods on the connection object:
conn.commit();
or:
conn.rollback();
Almost any JDBC program that can run on a client can also run on the server. All the programs in the samples directory can be run on the server with only minor modifications. Usually, these modifications concern only the connection statement.
Consider the following code fragment which gets a connection to a database:
ods.setUrl(
"jdbc:oracle:oci:@(DESCRIPTION=
  (ADDRESS=(PROTOCOL=TCP)(HOST=cluster_alias)
    (PORT=1521))
    (CONNECT_DATA=(SERVICE_NAME=service_name)))");
ods.setUser("scott");
ods.setPassword("tiger");
Connection conn = ods.getConnection();
We can modify this code fragment for use in the server-side internal driver. In the server-side internal driver, no user, password, or database information is necessary. For the connection statement, you simply use:
ods.setUrl(
"jdbc:oracle:kprb:@");
Connection conn = ods.getConnection();
However, the most convenient way to get a connection is to call the static OracleDriver.defaultConnection() method, as shown below:
Connection conn = OracleDriver.defaultConnection();
When loading an application into the server, you can load .class files that you have already compiled on the client, or you can load .java source files and have them compiled automatically in the server.
In either case, use the Oracle loadjava client-side utility to load your files. You can either specify source file names on the command line (note that the command line understands wildcards), or put the files into a JAR file and specify the JAR file name on the command line. The loadjava utility is discussed in detail in the Oracle Database Java Developer's Guide.
The loadjava script, which runs the actual utility, is in the bin subdirectory under your [Oracle Home] directory. This directory should already be in your path once Oracle has been installed.
|
Note: Theloadjava utility supports compressed files. |
Consider a case where you have three class files in your application: Foo1.class, Foo2.class, and Foo3.class. The following three examples demonstrate: 1) specifying the individual class file names; 2) specifying the class file names using a wildcard; and 3) specifying a JAR file that contains the class files.
Each class is written into its own class schema object in the server.
These three examples use the default OCI driver in loading the files:
loadjava -user scott/tiger Foo1.class Foo2.class Foo3.class
or:
loadjava -user scott/tiger Foo*.class
or:
loadjava -user scott/tiger Foo.jar
Or use the following command to load with the Thin driver (specifying the -thin option and an appropriate URL):
loadjava -thin -user scott/tiger@localhost:1521:ORCL Foo.jar
(Whether to use an OCI driver or the Thin driver to load classes depends on your particular environment and which performs better for you.)
|
Note: Because the server-side embedded JVM uses JDK 1.2.x, it is advisable to compile classes under JDK 1.2.x if they will be loaded into the server. This will catch incompatibilities during compilation, instead of at runtime (for example, JDK 1.1.x artifacts such as leftover use of theoracle.jdbc2 package). |
If you enable the loadjava -resolve option in loading a .java source file, then the server-side compiler will compile your application as it is loaded, resulting in both a source schema object for the original source code, and one or more class schema objects for the compiled output.
If you do not specify -resolve, then the source is loaded into a source schema object without any compilation. In this case, however, the source is implicitly compiled the first time an attempt is made to use a class defined in the source.
For example, run loadjava as follows to load and compile Foo.java, using the default OCI driver:
loadjava -user scott/tiger -resolve Foo.java
Or use the following command to load with the Thin driver (specifying the -thin option and an appropriate URL):
loadjava -thin -user scott/tiger@localhost:1521:ORCL -resolve Foo.java
Either of these will result in appropriate class schema objects being created in addition to the source schema object.
|
Note: Oracle generally recommends compiling source on the client whenever possible, and loading the.class files instead of the source files into the server. |
The server-side internal driver performs character set conversions for oracle.sql.CHAR in C. This is a different implementation than for the client-side drivers, which perform character set conversions for oracle.sql.CHAR in Java, and offers better performance. For more information on the oracle.sql.CHAR class, see "Class oracle.sql.CHAR".
|
 Copyright © 1999, 2003, Oracle Corporation All Rights Reserved. |
|

