| Oracle® Database Advanced Security Administrator's Guide 10g Release 1 (10.1) Part Number B10772-01 |
|
|
View PDF |
| Oracle® Database Advanced Security Administrator's Guide 10g Release 1 (10.1) Part Number B10772-01 |
|
|
View PDF |
Configuring advanced security features for an Oracle database includes configuring encryption, integrity (checksumming), and strong authentication methods for Oracle Net Services. Strong authentication method configuration can include third-party software, as is the case for Kerberos or RADIUS, or it may entail configuring and managing a public key infrastructure, as is required for Secure Sockets Layer (SSL). In addition, an Oracle database can be configured to interoperate with an LDAP directory, such as Oracle Internet Directory, to enable Enterprise User Security, a feature that enables you to store and manage database users in a centralized directory.
Such diverse advanced security features require a diverse set of tools with which to configure and administer them. This chapter introduces the tools used to configure and administer advanced security features for an Oracle database in the following topics:
Oracle Net Services can be configured to encrypt data using standard encryption algorithms, and for strong authentication methods, such as Kerberos, RADIUS, and SSL. The following sections introduce the Oracle tools you can use to configure these advanced security features for an Oracle Database:
Oracle Net Manager is a graphical user interface tool, primarily used to configure Oracle Net Services for an Oracle home on a local client or server host.
Although you can use Oracle Net Manager to configure Oracle Net Services, such as naming, listeners, and general network settings, it also enables you to configure the following Oracle Advanced Security features, which use the Oracle Net protocol:
This section introduces you to the features of Oracle Net Manager that are used to configure Oracle Advanced Security. It contains the following topics:
See Also:
|
You can start Oracle Net Manager by using Oracle Enterprise Manager Console or as a standalone application. However, you must use the standalone application to access the Oracle Advanced Security Profile where you can configure Oracle Advanced Security features.
To start Oracle Net Manager as a standalone application:
/bin, enter the following at the command line:
netmgr
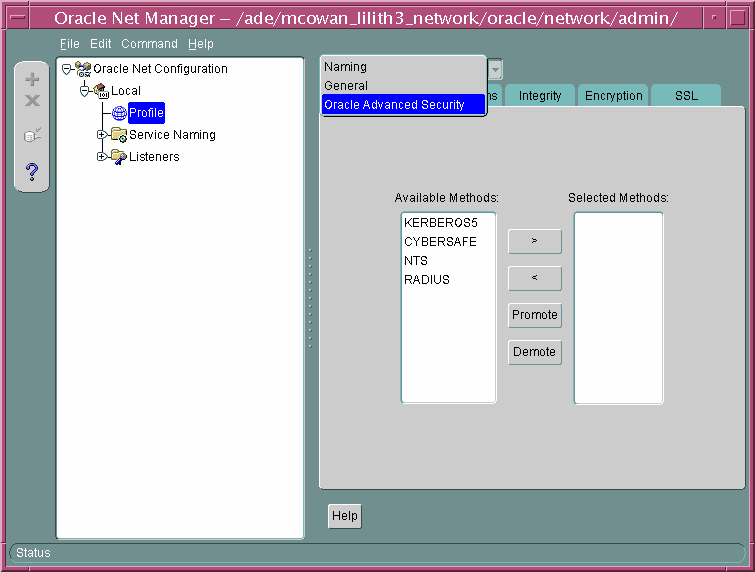
The Oracle Net Manager interface window contains two panes: the navigator pane and the right pane, which displays various property sheets that enable you to configure network components. When you select a network object in the navigator pane, its associated property sheets displays in the right pane. To configure Oracle Advanced Security features, choose the Profile object in the navigator pane, and then select Oracle Advanced Security from the list in the right pane, as shown in Figure 2-1.
Text description of the illustration ntmgrpro.gif
The Oracle Advanced Security Profile contains the following property sheets, which are described in the following sections:
Use this property sheet to select a strong authentication method, such as Kerberos Version 5 (KERBEROS5), Windows NT native authentication (NTS), or RADIUS.
Use this property sheet to set other parameters for the authentication method you selected on the Authentication property sheet.
Use this property sheet to enable checksumming on the client or the server and to select an encryption algorithm for generating secure message digests.
Use this property sheet to select one or more cipher suites to encrypt client or server connections with native encryption algorithms.
Use this property sheet to configure Secure Sockets Layer (SSL), including the wallet location and cipher suite, on a client or server.
The Oracle Advanced Security Kerberos adapter provides three command-line utilities that enable you to obtain, cache, display, and remove Kerberos credentials. The following table briefly describes these utilities:
| Utility Name | Description |
|---|---|
|
|
Obtains Kerberos tickets from the key distribution center (KDC) and caches them in the user's credential cache |
|
|
Displays a list of Kerberos tickets in the specified credential cache |
|
|
Removes Kerberos credentials from the specified credential cache |
| See Also:
"Utilities for the Kerberos Authentication Adapter" for complete descriptions of these utilities, their syntax, and available options. |
The security provided by a public key infrastructure (PKI) depends on how effectively you store, manage, and validate your PKI credentials. The following Oracle tools are used to manage certificates, wallets, and certificate revocation lists so your PKI credentials can be stored securely and your certificate validation mechanisms kept current:
Oracle Wallet Manager is an application that wallet owners and security administrators use to manage and edit the security credentials in their Oracle wallets. A wallet is a password-protected container that is used to store authentication and signing credentials, including private keys, certificates, and trusted certificates needed by SSL. You can use Oracle Wallet Manager to perform the following tasks:
|
|
| |
The following topics introduce the Oracle Wallet Manager user interface:
| See Also:
Chapter 8, "Using Oracle Wallet Manager" for detailed information about using this application |
To start Oracle Wallet Manager:
/bin, enter the following at the command line:
owm
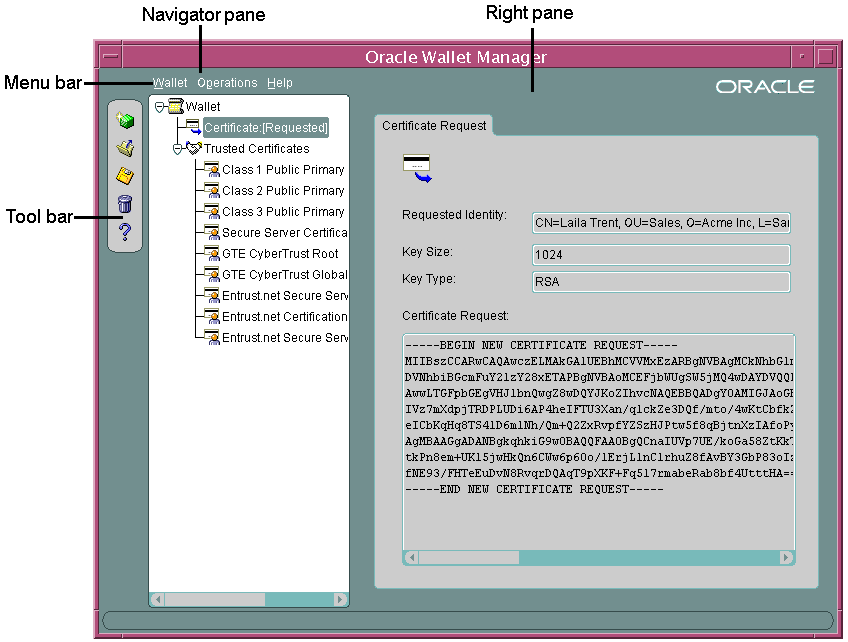
The Oracle Wallet Manager interface includes two panes, a toolbar, and various menu items as shown in Figure 2-2.
Text description of the illustration owmntrfc.gif
The navigator pane provides a graphical tree view of the certificate requests and certificates stored in the Oracle home where Oracle Wallet Manager is installed. You can use the navigator pane to view, modify, add, or delete certificates and certificate requests.
The navigator pane functions the same way as it does in other Oracle graphical user interface tools, enabling you to
When you expand a wallet, you see a nested list of user and trusted certificates. When you select a wallet or certificate in the navigator pane, details about your selection display in the adjacent right pane of Oracle Wallet Manager. Table 2-1 lists the main objects that display in the navigator pane.
| Object | Description |
|---|---|
|
Wallet |
Password-protected container that is used to store authentication and signing credentials |
|
Certificate RequestFoot 1 |
A PKCS #10-encoded message containing the requester's distinguished name (DN), a public key, the key size, and key type. See also certificate request. |
|
CertificateFootref 1 |
An X.509 data structure containing the entity's DN, public key, and is signed by a trusted identity (certificate authority). See certificate |
|
Trusted CertificatesFootref 1 |
Sometimes called a root key certificate, is a certificate from a third party identity that is qualified with a level of trust. See trusted certificate |
| 1 These objects display only after you create a wallet, generate a certificate request, and import a certificate into the wallet. |
The right pane displays information about an object that is selected in the navigator pane. The right pane is read-only.
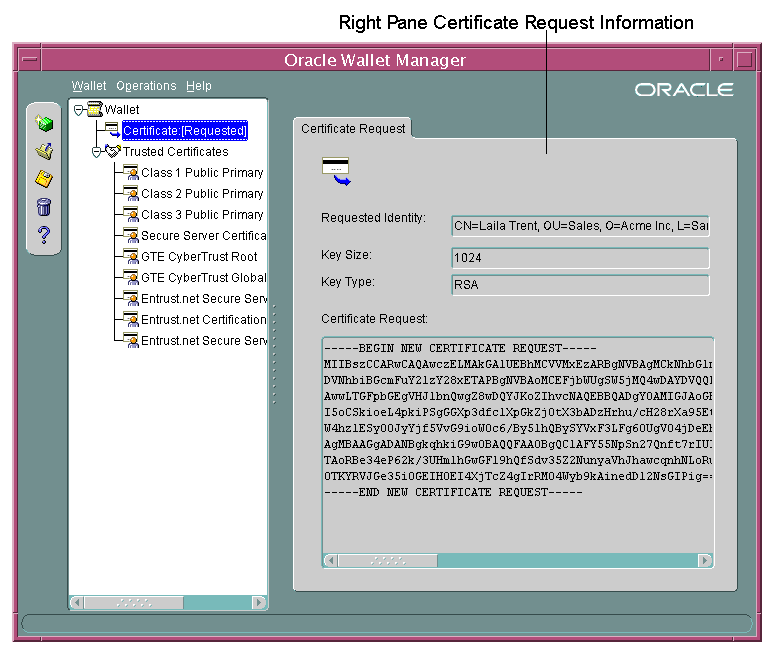
Figure 2-3 shows what is displayed in the right pane when a certificate request object is selected in the navigator pane. Information about the request and the requester's identity display in the Requested Identity, Key Size, and Key Type fields. The PKCS #10-encoded certificate request displays in the Certificate Request text box. To request a certificate from a certificate authority, you can copy this request into an e-mail or export it into a file.
Text description of the illustration owmrtpan.gif
The toolbar contains buttons that enable you to manage your wallets. Move the mouse cursor over a toolbar button to display a description of the button's function. The toolbar buttons are listed and described in Table 2-2.
You use Oracle Wallet Manager menus to manage your wallets and the credentials they contain. The following sections describe the options that are available under each menu.
Table 2-3 describes the contents of the Wallet menu.
| Option | Description |
|---|---|
|
New |
Creates a new wallet |
|
Open |
Opens an existing wallet |
|
Close |
Closes the currently open wallet |
|
Upload Into The Directory Service |
Uploads a wallet to a specified LDAP directory server. You must supply a directory password, hostname, and port information |
|
Download From The Directory Service |
Downloads a wallet from a specified LDAP directory server. You must supply a directory password, hostname, and port information. |
|
Save |
Saves the currently open wallet in the current working directory. |
|
Save As |
Enables you to browse your file system to choose a directory location in which to save the currently open wallet. |
|
Save In System Default |
Saves the currently open wallet in the system default location: |
|
Delete |
Deletes the wallet in the current working directory. You must supply the wallet password. |
|
Change Password |
Changes the password for the currently open wallet. You must supply the old password before you can create a new one. |
|
Auto Login |
Sets the auto login feature for the currently open wallet. See auto login wallet |
|
Exit |
Exits the Oracle Wallet Manager application |
Table 2-4 describes the contents of the Operations menu.
| Option | Description |
|---|---|
|
Add Certificate Request |
Generates a certificate request for the currently open wallet that you can use to request a certificate from a certificate authority (CA). |
|
Import User Certificate |
Imports the user certificate issued to you from the CA. You must import the issuing CA's certificate as a trusted certificate before you can import the user certificate. |
|
Import Trusted Certificate |
Imports the CA's trusted certificate. |
|
Remove Certificate Request |
Deletes the certificate request in the currently open wallet. You must remove the associated user certificate before you can delete a certificate request. |
|
Remove User Certificate |
Deletes the user certificate from the currently open wallet. |
|
Remove Trusted Certificate |
Removes the trusted certificate that is selected in the navigator pane from the currently open wallet. You must remove all user certificates that the trusted certificate signs before you can remove it. |
|
Export User Certificate |
Exports the user certificate in the currently open wallet to save in a file system directory. |
|
Export Certificate Request |
Exports the certificate request in the currently open wallet to save in a file. |
|
Export Trusted Certificate |
Exports the trusted certificate that is selected in the navigator pane to save in another location in your file system. |
|
Export All Trusted Certificates |
Exports all trusted certificates in the currently open wallet to save in another location in your file system. |
|
Export Wallet |
Exports the currently open wallet to save as a text file. |
Table 2-5 describes the contents of the Help menu.
The orapki utility is a command line tool that you can use to manage certificate revocation lists (CRLs), create and manage Oracle wallets, and to create signed certificates for testing purposes.
The basic syntax for this utility is as follows:
orapki module command -option_1 argument ... -option_n argument
For example, the following command lists all CRLs in the CRL subtree in an instance of Oracle Internet Directory that is installed on machine1.us.acme.com and that uses port 389:
orapki crl list -ldap machine1.us.acme.com:389
See Also:
|
Enterprise users are database users who are stored and centrally managed in an LDAP directory, such as Oracle Internet Directory. Table 2-6 provides a summary of the tools that are used to configure and manage Enterprise User Security. The following subsections introduce and describe these tools.
| Tool | Task |
|---|---|
|
Register and un-register databases in Oracle Internet Directory | |
|
Enterprise Security Manager and Enterprise Security Manager Console |
|
|
Oracle Internet Directory Self-Service Console (Delegated Administration Service) |
Manage identity management realms in Oracle Internet Directory For information about this tool, refer to Oracle Internet Directory Administrator's Guide. |
|
Configure databases Oracle home for directory usage over the network | |
|
Manage Oracle wallets for Enterprise User Security | |
|
Perform bulk migrations of database users to Oracle Internet Directory |
Database Configuration Assistant is a wizard-based tool which is used to create and configure Oracle databases.
Use Database Configuration Assistant to register a database with the directory. When you register a database with the directory, Database Configuration Assistant creates a distinguished name (DN) for the database and the corresponding entry and subtree in Oracle Internet Directory
To start Database Configuration Assistant:
/bin, enter the following at the command line:
dbca
See Also:
|
Oracle Advanced Security employs Enterprise Security Manager and Enterprise Security Manager Console to administer enterprise users, administrative groups, enterprise domains, and enterprise roles that are stored in Oracle Internet Directory. (Enterprise Security Manager Console can be accessed through the Enterprise Security Manager Operations menu. See "Enterprise Security Manager Console Overview" for details.)
Enterprise users are users who are provisioned and managed centrally in an LDAP-compliant directory, such as Oracle Internet Directory, for database access. Enterprise domains are directory constructs that contain databases and enterprise roles, the access privileges that are assigned to enterprise users.
| See Also:
Chapter 11, "Getting Started with Enterprise User Security" for a discussion of Enterprise User Security administrative groups, enterprise domains, enterprise roles, enterprise users, shared schemas, and user-schema mappings. |
This section discusses the following topics:
The following tasks provide an overview of the initial Enterprise Security Manager installation and configuration:
Enterprise Security Manager is automatically installed by the Oracle Database Enterprise Edition server installation process.
|
Note: Use only the version of Enterprise Security Manager that installs with Oracle Database 10g Release 1 (10.1). |
Enterprise User Security uses Oracle Internet Directory in which to store enterprise users. Enterprise Security Manager uses Oracle Internet Directory Delegated Administration Services to provide an administrative GUI (Enterprise Security Manager Console), and OracleAS Single Sign-On server to authenticate administrators when they log in to the console. Consequently, Oracle Internet Directory and OracleAS Single Sign-On server, which are part of the Oracle Identity Management infrastructure, must be properly installed and configured before Enterprise Security Manager can be used to manage Enterprise User Security. The following elements of Oracle Identity Management infrastructure configuration must be completed before proceeding:
See Also:
|
To launch Enterprise Security Manager, use the following steps:
$ORACLE_HOME/bin, enter the following at the command line:
esm
Choose Start > Programs > Oracle - HOME_NAME > Integrated Management Tools > Enterprise Security Manager
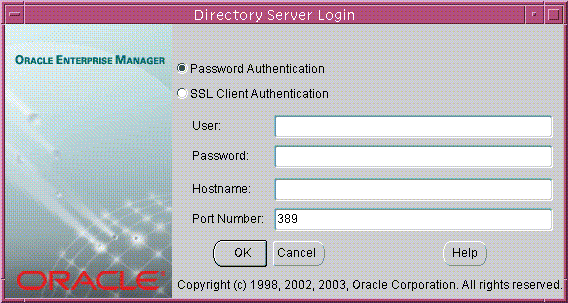
The directory server login window appears:
Text description of the illustration esm0001.gif
| Authentication Method | Description |
|---|---|
|
Password Authentication |
Uses simple authentication requiring a distinguished name (DN) or a known directory user name and passwordFoot 1. |
|
SSL Client Authentication |
Uses two-way SSL authentication in which both the client and server use Oracle Wallets containing digital certificates (that is, the user name and certificate). The subsequent connection is encrypted. |
| 1 Known directory user name and password can be used only for the default identity management realm in the directory. |
The Enterprise Security Manager user interface includes two panes, a toolbar, and various menu items as shown in Figure 2-5.
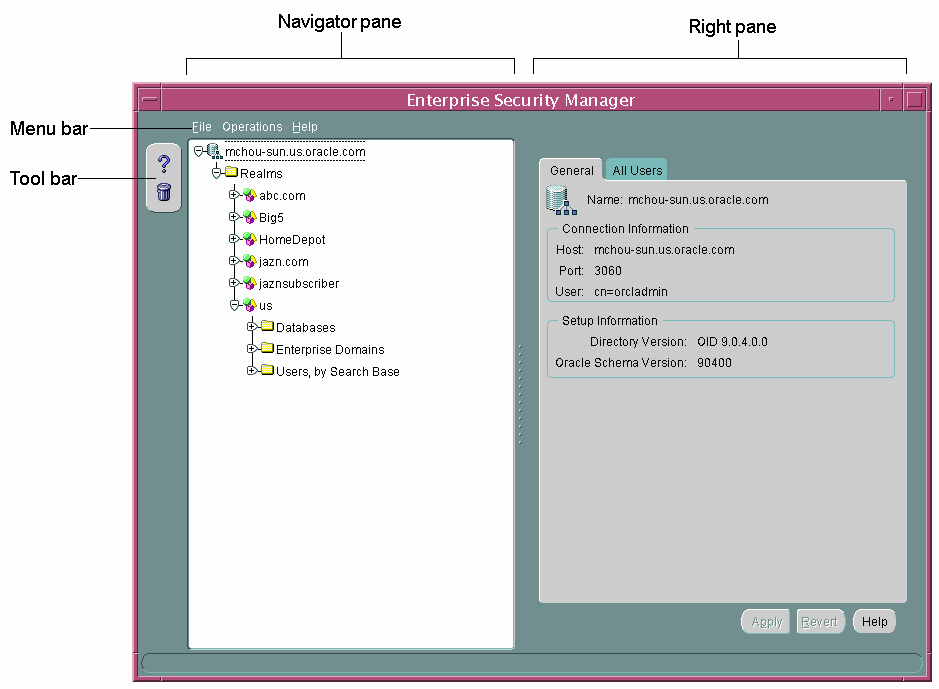
Text description of the illustration esmuintr.gif
The navigator pane provides a graphical tree view of your directory's identity management realms and the databases, enterprise domains, and users they contain. You can use the navigator pane to view, modify, add, or delete enterprise domains and the objects they contain.
The navigator pane enables you to
When you expand an identity management realm, you see a nested list of folders that contain enterprise user security objects. Expanding these folders enables you to view the individual objects as described in Table 2-8.
The right pane displays read-only information about an object that is selected in the navigator pane, or it displays tabbed windows that enable you to configure enterprise domains, enterprise roles, and user-schema mappings. For example, when you select an enterprise domain in the navigator pane, you can add databases to it by using the Databases tabbed window that is shown in Figure 2-6.
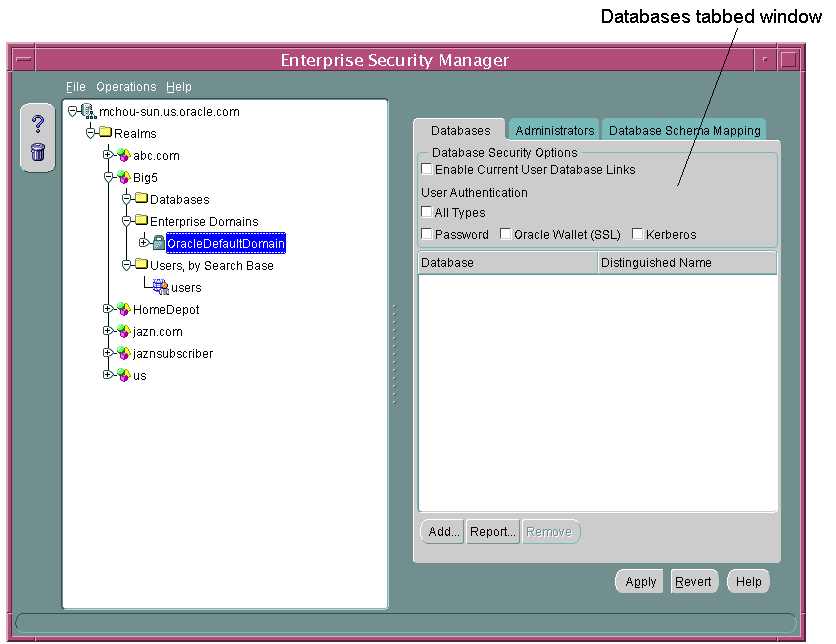
Text description of the illustration esmrtpan.gif
The Databases tabbed window also enables you to set security options for databases which are members of an enterprise domain. See "Defining Database Membership of an Enterprise Domain" for a discussion of configuring enterprise domains by using the Databases tabbed window.
The toolbar contains two buttons that enable you to access the Enterprise Security Manager online help and to delete directory objects.
You use Enterprise Security Manager menus to create or remove enterprise domains and to manage objects within the domains, such as enterprise roles or database membership. The following sections describe the options that are available under each menu.
Table 2-9 describes the contents of the File menu.
| Option | Description |
|---|---|
|
Change Directory Connection |
Causes the Directory Server Login window to reappear (see Figure 2-4), enabling you to log in to another directory server. |
|
Directory Search Options |
For user searches in the directory, this menu option enables you to configure the maximum number of displayed search results, the maximum search duration, or an LDAP filter. |
|
ESM Console URL |
Enables you to specify the URL for your installation of Enterprise Security Manager Console. (See "Enterprise Security Manager Console Overview") |
|
Exit |
Exits the Enterprise Security Manager application. |
Table 2-10 describes the contents of the Operations menu.
Table 2-11 describes the contents of the Help menu.
Enterprise Security Manager uses a directory management console, Enterprise Security Manager Console, to administer enterprise users and groups, and to configure an identity management realm for Enterprise User Security. By default, when you log in to a directory server with Enterprise Security Manager it uses port 7777 with the fully qualified domain name of that directory server to construct an Enterprise Security Manager Console URL. Then, when you need to launch the console, Enterprise Security Manager uses this URL to connect to it over HTTP.
For example, if an Acme Company administrator logs into an instance of Oracle Internet Directory that is hosted on a machine named machine123, then Enterprise Security Manager would use the following URL to connect to Enterprise Security Manager Console:
http://machine123.us.acme.com:7777/
After launching the console, administrators must log in by using their OracleAS Single Sign-On username and password pairs.
If you can use the URL that is constructed by default to access an instance of Enterprise Security Manager Console, then use the following steps to log in to the console.
The Enterprise Security Manager Console login page appears, as shown in Figure 2-7.
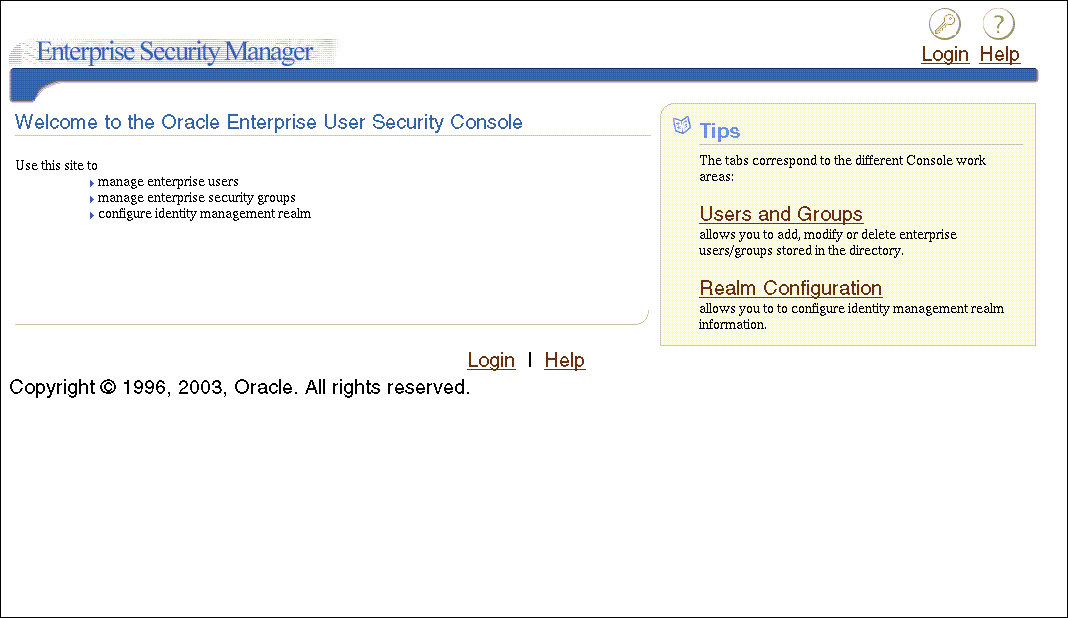
Text description of the illustration esmconso.gif
After providing your OracleAS Single Sign-On credentials, you are returned to the console home page.
If you cannot use the default URL to connect to the Enterprise Security Manager Console, then you must enter the appropriate URL before you can launch the console.

Text description of the illustration esmcnso2.gif
This saves the URL information in Enterprise Security Manager so you can launch the console again without reconfiguring the URL.
By default, Enterprise Security Manager Console user interface does not display the field where you can configure Kerberos principal names. The first time you create Kerberos-authenticated users in the directory, you must configure this tool to display the krbPrincipalName attribute in its Create User window by using the following steps:
orclCommonKrbPrincipalAttribute in your identity management realm) and perform the following steps on this page:
The Enterprise Security Manager Console user interface is browser-based and uses tabbed windows instead of a navigator pane. Figure 2-9 shows the layout of the console user interface. The tabbed windows can be accessed by selecting one of the tabs at the top of the application or by selecting one of the links in the Tips box on the right. You can also access the tabbed windows by selecting one of the corresponding links at the bottom of the page.
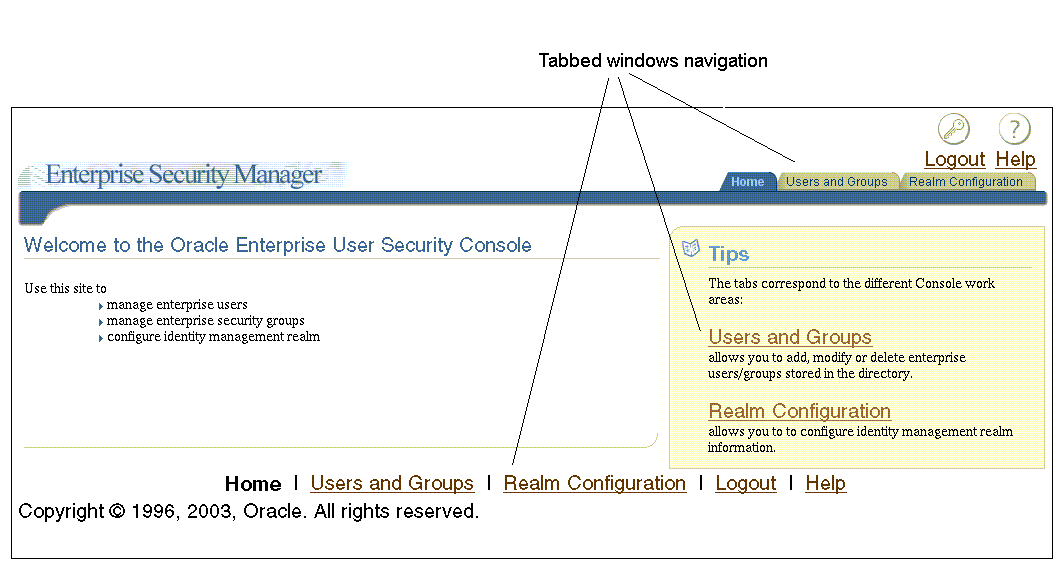
Text description of the illustration esmcnso3.gif
The tabbed windows are explained in the following sections:
The Home page is your entry point to the console. You can access each tabbed window and read a brief summary of what you can do with this tool. The Home tabbed window is shown in Figure 2-9.
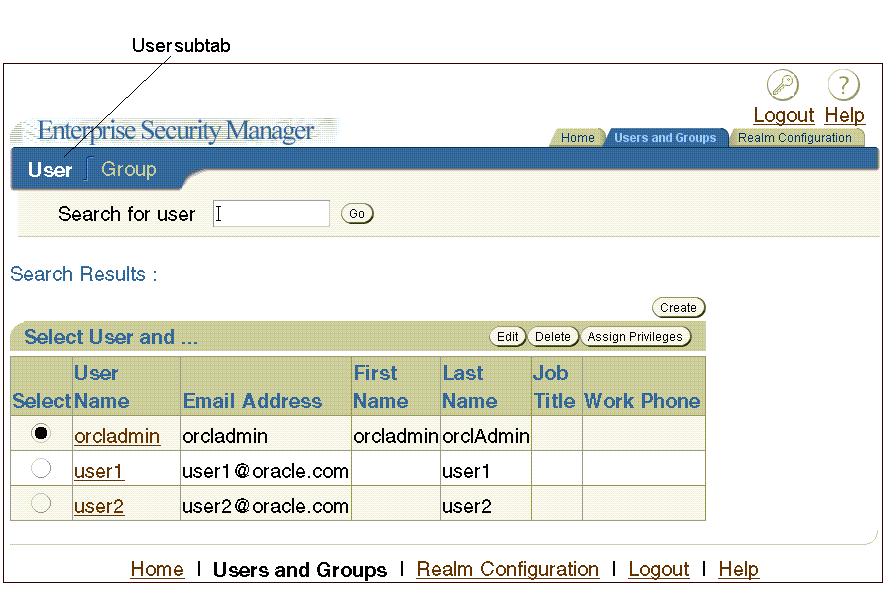
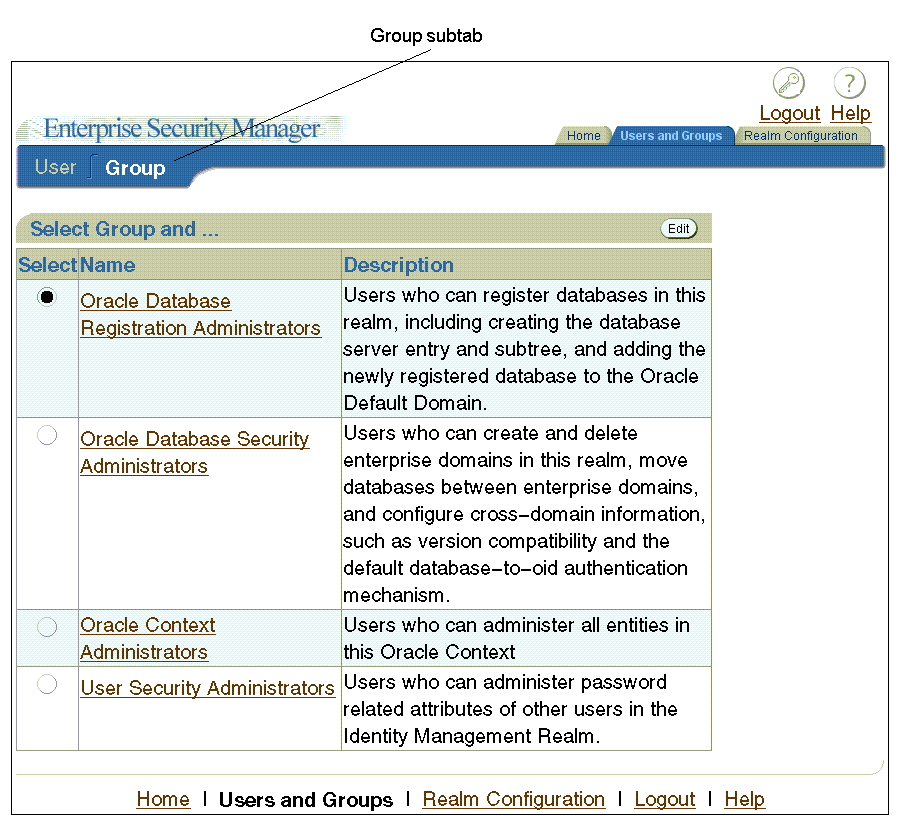
This tabbed window contains two subtabs: the Users subtab (shown in Figure 2-10) and the Groups subtab (shown in Figure 2-11).
Text description of the illustration usrssub.gif
The Users subtab (Figure 2-10) enables you to search for users in the directory by using the Search for user field at the top of the page. After you locate users that match your search criteria, you can select specific users and perform tasks with the buttons that are listed in Table 2-12. This subtab also enables you to create new users.
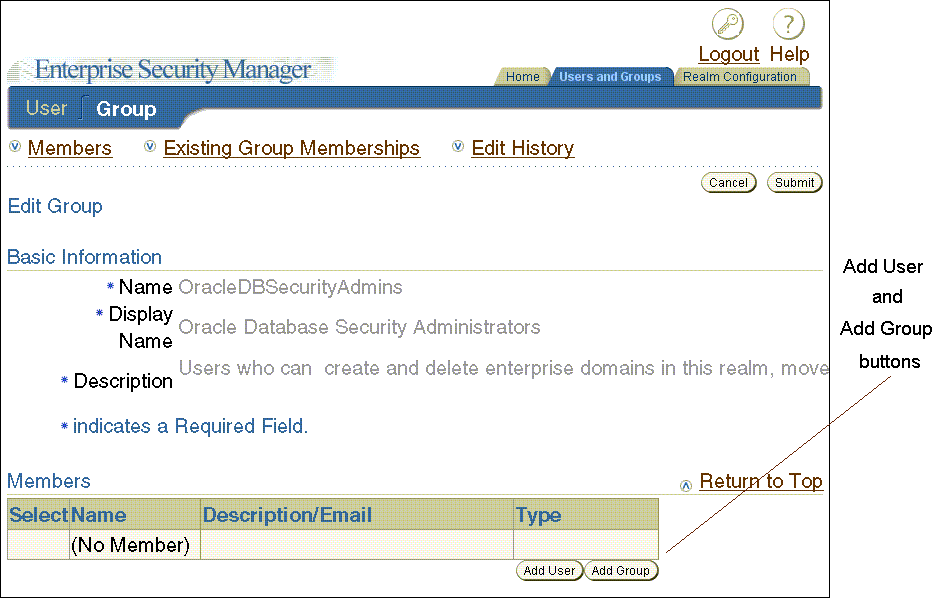
The Group subtab (shown in Figure 2-11) enables you to view, or to add new users or groups to the Enterprise User Security directory administrative groups. To view or edit an administrative group, select the adjacent radio button, and click Edit in the upper right corner of the page. When you click Edit, an Edit Group page for the specified group appears, displaying the following information:
You can add members or other groups to a specified Enterprise User Security directory administrative group by clicking either Add User or Add Group in the Member region of the Edit Group page, which is shown in Figure 2-12.
Text description of the illustration grpsbtab.gif
Text description of the illustration esmedusr.gif
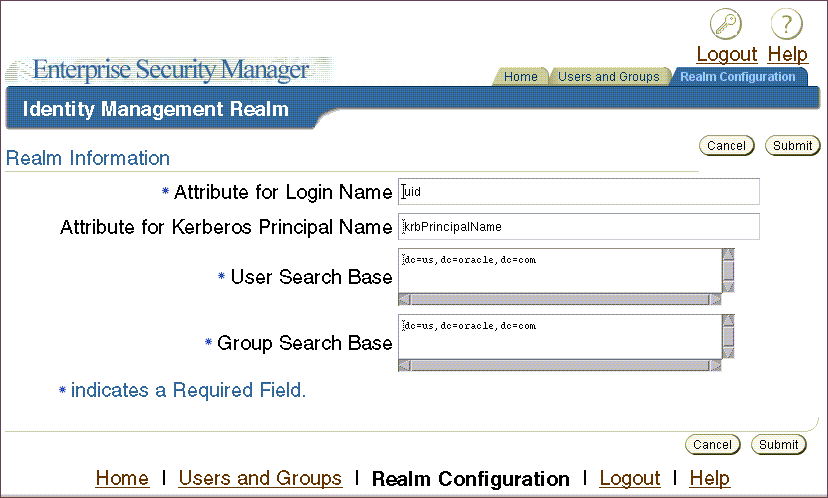
The Realm Configuration tabbed window, which is shown in Figure 2-13, enables you to configure identity management realm attributes that pertain to Enterprise User Security. The fields that you can edit on this page are described in Table 2-13.
Text description of the illustration esmcorea.gif
| Field | Description |
|---|---|
|
Attribute for Login Name |
Name of the directory attribute used to store login names. |
|
Attribute for Kerberos Principal Name |
Name of the directory attribute used to store Kerberos principal names. See also: "Configuring Enterprise Security Manager Console for Kerberos-Authenticated Enterprise Users" |
|
User Search Base |
Full distinguished name (DN) for the node under which enterprise users are stored for this realm. |
|
Group Search Base |
Full DN for the node at which user groups (not Enterprise User Security administrative groups) are stored in the directory. |
Enterprise Security Manager provides a command-line utility, which can be used to perform the most common tasks that the graphical user interface tool performs. Enter all Enterprise Security Manager command-line utility commands from the Oracle Enterprise Manager Oracle home.
The basic syntax for this utility is as follows:
esm -cmd [operation] [-option_1 -option_2 -option_3 ... -option_n]
For example, the following command searches for users in a directory that is installed on a host machine named machine1.us.acme.com:
esm -cmd search -U SIMPLE -D orcladmin -w Y4ilbqve -h machine1.us.acme.com

-p 3060 -dn dc=us,dc=acme,dc=com -objectType user
The following table describes each option used in this example:
To view a full list of operations and options you can use with this utility, enter the following at the command line:
esm -cmd
To view help on a specific operation, enter the following at the command line:
esm -cmd help [operation]
See Also:
|
Oracle Net Configuration Assistant is a wizard-based tool that has a graphical user interface. It is primarily used to configure basic Oracle Net network components, such as listener names and protocol addresses. It also enables you to configure your Oracle home for directory server usage. The latter use is what makes this tool important for configuring Enterprise User Security.
If you use Domain Name System (DNS) discovery (automatic domain name lookup) to locate Oracle Internet Directory on your network, then this tool is not necessary. Note that using DNS discovery is the recommended configuration. See Oracle Internet Directory Administrator's Guide for information about this configuration.
If you have not configured DNS discovery of Oracle Internet Directory on your network, then you must use Oracle Net Configuration Assistant to create an ldap.ora file for your Oracle home before you can register a database with the directory. Your database uses the ldap.ora file to locate the correct Oracle Internet Directory server on your network. This configuration file contains the hostname, port number, and identity management realm information for your directory server.
To start Oracle Net Configuration Assistant:
/bin, enter the following at the command line:
netca
After you start this tool, you will be presented with the opening page that is shown in Figure 2-14.
Choose the Directory Usage Configuration option on this page, click Next, and choose the directory server where you wish to store your enterprise users. Then click Finish to create a properly configured ldap.ora file for your Oracle home.
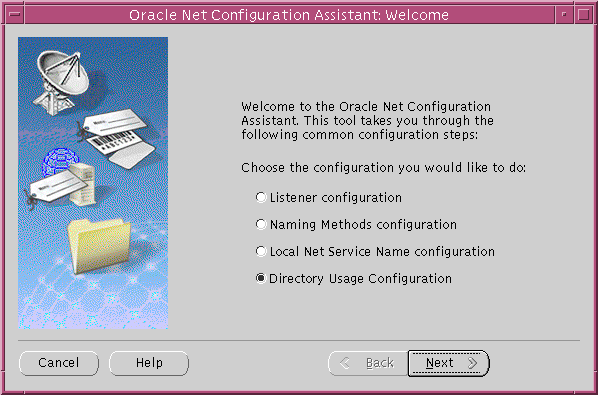
Text description of the illustration netca1.gif
See Also:
|
User Migration Utility is a command-line tool that enables you to perform bulk migrations of database users to Oracle Internet Directory where they are stored and managed as enterprise users. This tool performs a bulk migration in two phases: In phase one, it populates a table with database user information. During phase two, the database user information is migrated to the directory.
This tool is automatically installed in the following location when you install an Oracle Database client:
$ORACLE_HOME/rdbms/bin/umu
The basic syntax for this utility is as follows:
umu parameter_keyword_1=value1:value2

parameter_keyword_2=value
parameter_keyword_3=value1:value2:value3
.
.
.
parameter_keyword_n=value
Note that when a parameter takes multiple values, they are separated with colons (:).
| See Also:
Appendix G, "Using the User Migration Utility" for complete instructions (including usage examples) for using this tool to migrate database users to a directory and its parameters. |
Most of the tasks of a security administrator involve ensuring that the connections to and from Oracle databases are secure. Table 2-14 lists the primary tasks of security administrators, the tools used to perform the tasks, and links to where the tasks are documented.
| Task | Tools Used | See Also |
|---|---|---|
|
Configure encrypted Oracle Net connections between database servers and clients |
Oracle Net Manager |
|
|
Configure checksumming on Oracle Net connections between database servers and clients |
Oracle Net Manager |
|
|
Configure database clients to accept RADIUS authentication |
Oracle Net |
|
|
Configure a database to accept RADIUS authentication |
Oracle Net |
|
|
Create a RADIUS user and grant them access to a database session |
SQL*Plus |
|
|
Configure Kerberos authentication on a database client and server |
Oracle Net Manager |
|
|
Create a Kerberos database user |
||
|
Manage Kerberos credentials in the credential cache |
||
|
Create a wallet for a database client or server |
||
|
Request a user certificate from a certificate authority (CA) for SSL authentication |
||
|
Import a user certificate and its associated trusted certificate (CA certificate) into a wallet |
||
|
Configuring SSL connections for a database client |
||
|
Configuring SSL connections for a database server |
||
|
Enabling certificate validation with certificate revocation lists |
Enterprise User Security administrators plan, implement, and administer enterprise users. Table 2-15 lists the primary tasks of Enterprise User Security administrators, the tools used to perform the tasks, and links to where the tasks are documented.
| Task | Tools Used | See Also |
|---|---|---|
|
Create an identity management realm in Oracle Internet Directory |
Oracle Internet Directory Self-Service Console (Delegated Administration Service) |
Oracle Internet Directory Administrator's Guide for information about how to perform this task |
|
Upgrade an identity management realm in Oracle Internet Directory |
Oracle Internet Directory Configuration Assistant |
Oracle Internet Directory Administrator's Guide and the online help for this tool |
|
Set up DNS to enable automatic discovery of Oracle Internet Directory over the network. Note that this is the recommended configuration. |
Oracle Internet Directory Configuration Assistant |
Oracle Internet Directory Administrator's Guide (Domain Name System server discovery) and the online help for this tool |
|
Create an |
Oracle Net Configuration Assistant |
"Task 5: (Optional) Configure your Oracle home for directory usage" |
|
Register a database in the directory |
Database Configuration Assistant |
|
|
Configure password authentication for Enterprise User Security |
"Configuring Enterprise User Security for Password Authentication" | |
|
Configure Kerberos authentication for Enterprise User Security |
"Configuring Enterprise User Security for Kerberos Authentication" | |
|
Configure SSL authentication for Enterprise User Security |
"Configuring Enterprise User Security for SSL Authentication" | |
|
Create or modify user entries and Oracle administrative groups in the directory |
Enterprise Security Manager Console |
|
|
Create or modify enterprise roles and domains in the directory |
Enterprise Security Manager |
|
|
Create or modify wallets for directory, databases, and clients |
Oracle Wallet Manager |
|
|
Change a user's database or directory password |
Enterprise Security Manager Console |
|
|
Change a database's directory password |
Database Configuration Assistant |
|
|
Manage user wallets on the local system or update database and directory user passwords |
Oracle Wallet Manager |
|
|
Request initial Kerberos ticket when KDC is not part of the operating system, such as Kerberos V5 from MIT |
|
"Task 10: Get an Initial Ticket for the Kerberos/Oracle User" |
|
Migrate large numbers of local or external database users to the directory for Enterprise User Security |
User Migration Utility |