| Oracle® Database 2 Day DBA 10g Release 1 (10.1) Part Number B10742-02 |
|


|
View PDF |
| Oracle® Database 2 Day DBA 10g Release 1 (10.1) Part Number B10742-02 |
|
|
View PDF |
For users to access your database, you must create user accounts and grant appropriate database access privileges to those accounts. Some user accounts are automatically included in the preconfigured database, but for security reasons, most of these accounts are locked and expired.
This chapter describes how to create and manage user accounts.
This chapter contains the following topics:
Before users are allowed to connect to the database, they must have user accounts created for them. A user account is identified by a username and defines the user's attributes, including the following:
How the user is to be authenticated
Password (encrypted) for database authentication
Tablespaces the user can access and quotas on them
Whether the account is locked or not
These accounts are usually created by a database administrator or a person specifically assigned to create accounts and administer security.
After a user account is created, at least basic privileges must be granted to the account to enable the user to connect to the database and view and create database objects, known as schema objects.
Certain user accounts are automatically included when you create your database. All databases created by the Database Configuration Assistant include the SYS, SYSTEM, SYSMAN, and DBSNMP user accounts, but other accounts are included depending upon what features or options that are installed.
Most of the included accounts are administrative accounts, but user scott and Sample Schema accounts will also be present. User scott has long been used by Oracle in documentation to present examples that allow users to experiment with their databases. However, the use of scott is gradually being phased out in favor of using the Sample Schemas.
The Oracle Database Sample Schemas are a set of interlinked schemas. This set of schemas provides a layered approach to complexity:
A simple schema (Human Resources, HR) is useful for introducing basic topics. An extension to this schema supports Oracle Internet Directory demos.
A second schema (Order Entry, OE) is useful for dealing with matters of intermediate complexity. Many datatypes are available in this schema, including nonscalar datatypes.
The Online Catalog (OC) subschema is a collection of object-relational database objects built inside the OE schema.
The Product Media schema (PM) is dedicated to multimedia datatypes.
A set of schemas gathered under the main schema name IX (Information Exchange) can demonstrate Oracle Advanced Queuing capabilities.
The Sales History schema (SH) is designed to allow for demos with large amounts of data. An extension to this schema provides support for advanced analytic processing.
The administrative accounts provided by Oracle should be used only by authorized individuals. To protect these accounts from being used by unauthorized persons familiar with their Oracle supplied passwords, these accounts are initially locked with their passwords expired. As the database administrator, you are responsible for the unlocking and resetting of these accounts as described in "Unlocking Accounts and Resetting Passwords". Table 7-1 contains descriptions of some of these accounts.
Table 7-1 Administrative User Accounts Provided by Oracle
| Username | Password | Description | See Also |
|---|---|---|---|
| CTXSYS | CTXSYS | The Oracle Text account | Oracle Text Reference |
| DBSNMP | DBSNMP | The account used by the Management Agent component of Oracle Enterprise Manager to monitor and manage the database | Oracle Enterprise Manager Grid Control Installation and Basic Configuration |
| MDDATA | MDDATA | The schema used by Oracle Spatial for storing Geocoder and router data | Oracle Spatial User's Guide and Reference |
| MDSYS | MDSYS | The Oracle Spatial and Oracle interMedia Locator administrator account | Oracle Spatial User's Guide and Reference |
| DMSYS | DMSYS | The data mining account. DMSYS performs data mining operations. | Oracle Data Mining Administrator's Guide
|
| OLAPSYS | MANAGER | The account used to create OLAP metadata structures. It owns the OLAP Catalog (CWMLite). | Oracle OLAP Application Developer's Guide |
| ORDPLUGINS | ORDPLUGINS | The Oracle interMedia user. Plugins supplied by Oracle and third party format plugins are installed in this schema. | Oracle interMedia User's Guide |
| ORDSYS | ORDSYS | The Oracle interMedia administrator account | Oracle interMedia User's Guide |
| OUTLN | OUTLN | The account that supports plan stability. Plan stability enables you to maintain the same execution plans for the same SQL statements. OUTLN acts as a role to centrally manage metadata associated with stored outlines. | Oracle Database Performance Tuning Guide |
| SI_INFORMTN_SCHEMA | SI_INFORMTN_SCHEMA | The account that stores the information views for the SQL/MM Still Image Standard | Oracle interMedia User's Guide |
| SYS | CHANGE_ON_INSTALL | The account used to perform database administration tasks | Oracle Database Administrator's Guide |
| SYSMAN | CHANGE_ON_INSTALL | The account used to perform Oracle Enterprise Manager database administration tasks. Note that SYS and SYSTEM can also perform these tasks. |
Oracle Enterprise Manager Grid Control Installation and Basic Configuration |
| SYSTEM | MANAGER | Another account used to perform database administration tasks. | Oracle Database Administrator's Guide |
|
See Also: Oracle Database Sample Schemas for a description of the Sample Schemas that are used for an example base in Oracle documentation and educational materials |
Two user accounts are automatically created when Oracle Database is installed:
When you create an Oracle Database, the user SYS is automatically created and granted the DBA role. All base tables and views for the database data dictionary are stored in the schema SYS. These base tables and views are critical for the operation of Oracle Database. To maintain the integrity of the data dictionary, tables in the SYS schema are manipulated only by the database. They should never be modified by any user or database administrator, and no one should create any tables in the schema of user SYS. (However, you can change the storage parameters of the data dictionary settings if necessary.) Ensure that most database users are never able to connect to Oracle Database using the SYS account.
When you create an Oracle Database, the user SYSTEM is also automatically created and granted the DBA role.
The SYSTEM username is used to create additional tables and views that display administrative information, and internal tables and views used by various Oracle Database options and tools. Never use the SYSTEM schema to store tables of interest to nonadministrative users.
A predefined DBA role is automatically created with every Oracle Database installation. This role contains most database system privileges. Therefore, the DBA role should be granted only to actual database administrators. The DBA role does not include the SYSDBA or SYSOPER system privileges.
Administrative privileges that are required for an administrator to perform basic database operations, such as creating the database and instance startup and shutdown, are granted through two special system privileges, SYSDBA and SYSOPER. You must have one of these privileges granted to you, depending upon the level of authorization you require.
|
Note: TheSYSDBA and SYSOPER system privileges allow access to a database instance even when the database is not open. Control of these privileges is totally outside of the database itself. |
The SYSDBA and SYSOPER privileges can also be thought of as types of connections that enable you to perform certain database operations for which privileges cannot be granted in any other fashion. For example, you if you have the SYSDBA privilege, you can connect to the database by specifying CONNECT AS SYSDBA.
|
See Also: Oracle Database Administrator's Guide for more the operations authorized with each privilege and an example |
System privileges, object privileges, and roles provide a basic level of database security. They are designed to control user access to data and to limit SQL statements that users can execute.
Privileges and roles can be granted to other users by users who possess the privilege to do so. The granting of roles and privileges starts at the administrator level. At database creation, the administrative user SYS is created and granted all system privileges and predefined Oracle roles. User SYS can then grant privileges and roles to other users, and also grant those users the right to grant specific privileges to others.
The following are descriptions and examples of privileges and roles:
| Privilege or Role | Description | Examples |
|---|---|---|
| System privilege | An Oracle-defined privilege usually granted only to and by administrators. System privileges allow users to perform specific database operations. | These are examples of system privileges that can be granted to users:
|
| Object privilege | An object privilege controls access to a specific object. | These are examples of object privileges that can be granted to users:
|
| Role | Roles are used to group privileges and other roles together, making them easier to manage as a group. | These are some examples of Oracle defined roles. You can create your own roles if you are granted the option to do so.
|
|
See Also: Oracle Database SQL Reference for a list of Oracle-defined privileges and roles |
You can use Enterprise Manager to view existing roles as follows:
From the Administration home page shown in Figure 5-2, click the Roles link shown under the security heading.

The Roles page is displayed. From this page you can create, edit, view, or delete roles.
The structure and functionality of the Roles page is similar to that of the Users page shown in Figure 7-1.
Select the CONNECT role in the Select column. Click View. The View page appears and you can see all of the privileges and roles associated with the CONNECT role.
You can create a secure application role with all privileges necessary to run an application. You can then grant the role to other roles or users. A user can require several different roles, each granted a different set of privileges that allow for more or less data access while using the application.
To create a new role:
From the Administration Page, click Roles under the Security heading.
Click Create.
On the Create Role page, enter the name of your new role. Enter APDEV to create a new role for application developers in your organization. Click OK. A page appears with a list of all roles. You can now modify this new role by adding the required privileges.
You can add roles, privileges, and consumer groups to roles.
To modify the APDEV role:
From the Administration Page, click Roles under the Security heading.
Click APDEV. The Edit Role: APDEV page appears. This has links to the following property pages: Roles, System Privileges, Object Privileges, and Consumer Groups. Click Roles.
Click Modify.
In the Available Roles list, double click CONNECT to add the CONNECT role to the APDEV role. Click OK.
You are returned to the Edit Role: APDEV page. Click System Privileges.
Click Modify.
In the Available System Privileges list, double click EXECUTE ANY PROCEDURE and SELECT ANY TABLE to add these privileges to the APDEV role. Click OK.
You are returned to the Edit Role: APDEV page. Click Object Privileges.
From the Select Object Type pulldown list, select Table. Click Add.
From the Select Table Objects box, click the browse button (flashlight). Select the HR schema in the pulldown list. To see a list of all tables in the selected schema, clear the search box and click Go. Select the JOBS table. You are returned to the Add Table Object Privileges page.
Double click DELETE to add the DELETE privilege to the APDEV role for the HR.JOBS table. Click OK. To learn how to grant this role to a user, see "Granting Roles" in this chapter.
A user profile establishes the password management policy for a user and defines and limits the user's access to certain database resources. When you create the user in "Creating Users", you specify that the user be assigned the Oracle-supplied default profile. This default profile is quite liberal in its resource specifications and does not provide tight restrictions on password usage. Until you are more familiar with your database and its users, it is not necessary to be concerned about creating new profiles.
Follow these steps to view the attributes of the default profile:
From the Administration home page shown in Figure 5-2, click the Profiles link shown under the security heading.

The Profiles page is displayed. From this page you can create, edit, view, or delete profiles.
The structure and functionality of the Profiles page is similar to that of the Users page shown in Figure 7-1.
Select the DEFAULT profile in the Select column. Click View. The View page appears and you can see all of the attributes associated with the DEFAULT profile.
Database resource usage and limits are managed by the Database Resource Manager, which is not a subject of this book. You can read about the Database Resource manager in online help and view its pages when you click the links under the Resource Manager heading on the Database Administration page.
|
See Also: Oracle Database Administrator's Guide for a description of the Database Resource Manager and its use |
To create new users or administer existing ones select the Administration property page on the Database Home page (Figure 5-2).
From the Database Administration page, click Users shown under the Security heading.

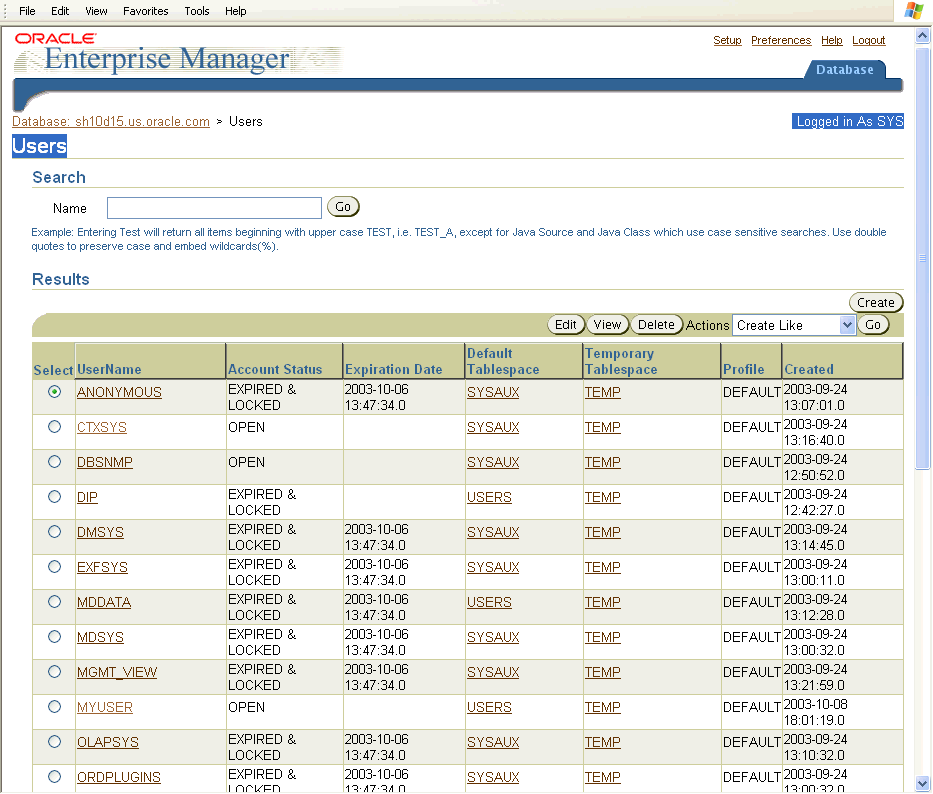
The Users page shown in Figure 7-1 is displayed. From this page you can view, add, edit, or delete database users.
In this section, you create a user named MYUSER, set the password, and assign MYUSER to the USERS tablespace. This enables MYUSER to log in to the database
Later, you will learn how to edit and assign roles to this user.
To create a database user, do the following as user SYS or SYSTEM:
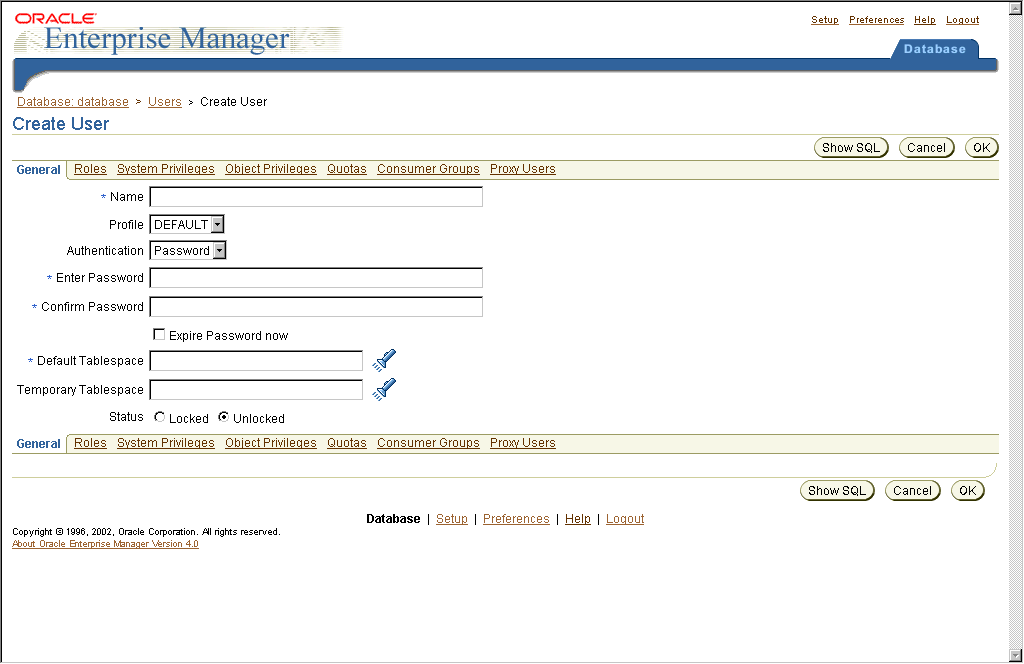
Click Create on the right hand side of the Users page. The Create Users General page shown in Figure 7-2 is displayed.
The General page is one of a series of pages in the Users property page.
Enter a user Name. For example: MYUSER
Leave Profile set to DEFAULT. The profile specifies the resource limit
Note that this profile does not allow the user to log in to Enterprise Manager. To do so, the user needs to be assigned the DBA role. For more information, see "Administering Roles".
Leave Authentication set to password. For advanced authentication schemes, see Oracle Database Security Guide.
Enter the password of your choice in the Enter Password and Confirm Password boxes.
Do not check Expire Password now. If the account status to set to expired, then the user or the database administrator must then change the password before the user can log in to the database.
For the Default Tablespace field, click the browse button (flashlight) and select the USERS tablespace. While users can specify different defaults for each user, it is easiest to define a default permanent tablespace and a default temporary tablespace at the database level, instead of the user level. For more information on the USERS tablespace, see "Some Tablespaces in the Database".
For the Temporary Tablespace field, click the browse button (flashlight) and select the TEMP tablespace. For more information on the TEMP tablespace, see "Some Tablespaces in the Database".
For Status, select Unlocked. For suspicious users who you do not necessarily want to delete, you can lock them out using this.
Click OK. The Users page is displayed, and you can now see an entry for the new user, MYUSER.
The Users General page has links to several other property pages. For example, you can specify user roles, privileges, quotas, consumer groups, and proxy users. Consumer groups are groups of users, or sessions, that are grouped together based on their processing needs.
|
Note: This section creates a regular database user. If you want to grant the user system administrator privileges, you need to complete additional steps described in Chapter 3, " Getting Started with Oracle Enterprise Manager " |
|
See Also: Oracle Database Administrator's Guide and Oracle Database Security Guide for more information on roles, privileges, quotas, consumer groups and proxy authentication |
If you later want to create other users similar to user MYUSER, or another user, Oracle provides a shortcut for doing so. On the Users page, you can create a user with the same attributes as another user as follows:
Select the user that you want to duplicate.
From the Actions menu, select Create Like.
Click Go. The Create User General page appears for a new user with the same attributes as the duplicated user.
The Actions box also provides shortcuts for other actions, as well as providing a means to display the SQL DDL used to create a user.
You can change the attributes of users by clicking Edit on the Users page (Figure 7-1) and selecting the properties page with the attributes that you want to change. The following procedure changes the tablespace quotas assigned to user MYUSER.
From the Users page, select MYUSER in the results list, then click Edit. The Edit User General page is displayed.
Click the Quotas property page to display the Quotas page.
You can see that this user has 0 Mbytes quota on all tablespaces. This means that he has no quota in any tablespace. Since MYUSER belongs to the users tablespace, he must have quota to create tables and other schema objects in this tablespace.
Pull down the box in the Quota column for tablespace users. Select Value.
In the corresponding Value column, enter 100.
Click Apply.
User MYUSER can now create objects in the users tablespace.
Click the Database property page to return to the Administration home page.
Locked accounts cannot be accessed. During installation, you were provided the opportunity to unlock and reset the Oracle supplied database user accounts. If you did not choose to unlock those accounts at that time, you can do so now as follows:
From the Users page shown in Figure 7-1, in the Select column of the table, mark a user whose Account Status is shown as EXPIRED AND LOCKED and that you want to unlock and reset.
From the pull down menu in the Actions pull-down menu, select Unlock User and click Go. Click Yes to the confirmation message.
This unlocks the user account (the Account Status is now EXPIRED), but does not reset the password. The user would still be unable to log in to the database.
From the Users page, again mark the user in the Select column, then click Edit.
The Edit User General page is displayed. You can also display this page for a user by clicking the username in the UserName column.
Use the General page to change the password for the account. Note that you can also use this page to unlock the account.
You must follow the preceding steps individually for each account that you want to unlock and reset.
Locking and account is similar. You select the user and then choose Lock User from the Actions pull-down menu. Locking an account denies access to the account.
To better understand the ramifications of unlocking and resetting accounts, see the other property pages available on the Edit user page. Specifically, if you explore the Roles, System Privileges, and Object Privileges property pages, you can see the privileges of the user whose account you are enabling.
As a system administrator, you can use Enterprise Manager to grant roles to users. For example, you can grant a user the DBA role, which allows the user to administer the database. You can also grant user-created roles, such as the APDEV role you created in "Creating a New Role".
To grant the DBA role to MYUSER:
From the Administration Page, click Users under the Security heading.
From the list of users, select MYUSER and click Edit. The Edit User: MYUSER page appears.
In the top navigation bar, click Roles. A page appears with the list of roles for MYUSER.
Click Modify on the right hand side of the page. The Modify Roles page appears.
In the Available Roles list, select the DBA role and click Move to make it part of the Selected Roles list. You can also select the APDEV role you created earlier in this chapter.
Click OK. Then click Apply.
You can also revoke roles from users. To revoke the DBA role from MYUSER:
From the Administration page, click Users under the Security heading.
From the list of users, select MYUSER and click Edit. The Edit User: MYUSER page appears.
In the top navigation bar, click Roles. A page appears with the list of roles for MYUSER.
Click Modify on the right hand side of the page. The Modify Roles page appears.
In the Available Roles list, select the DBA role and click Remove to make it part of the Available Roles list.
Click OK. Then click Apply.
Enterprise Manager enables you to drop users. However, you must excerise caution when doing so, since dropping user will drop all schema objects owned by the user including tables and indexes. If you want to deny user access to the database, it is better to lock the user account or expire the user password. See "Unlocking Accounts and Resetting Passwords".
To drop a user such as MYUSER:
From the Administration page, click Users under the Security heading.
Select the MYUSER user, and click Delete. At the confirmation page, click Yes.
Oracle by Example (OBE) has a series on the Oracle Database 2 Day DBA book. This OBE steps you through the tasks in this chapter and includes annotated screen shots.
To view the Users OBE, point your browser to the following location:
http://otn.oracle.com/obe/2day_dba/users/users.htm