| Oracle® Data Guard Concepts and Administration 10g Release 1 (10.1) Part Number B10823-01 |
|


|
View PDF |
| Oracle® Data Guard Concepts and Administration 10g Release 1 (10.1) Part Number B10823-01 |
|
|
View PDF |
This chapter describes how to manage physical standby databases. This chapter contains the following topics:
The topics in this chapter describe how to use SQL statements, initialization parameters, and views to manage physical standby databases.
See Oracle Data Guard Broker to use the Data Guard broker to automate the management tasks described in this chapter.
This section describes the SQL*Plus statements used to start up and shut down a physical standby database.
To start a physical standby database, use SQL*Plus to connect to the database with administrator privileges, and then use either the SQL*Plus STARTUP or STARTUP MOUNT statement. When used on a physical standby database:
STARTUP statement starts the database, mounts the database as a physical standby database, and opens the database for read-only access.STARTUP MOUNT statement starts and mounts the database as a physical standby database, but does not open the database.
Once mounted, the database can receive archived redo data from the primary database. You then have the option of either starting Redo Apply or opening the database for read-only access. Typically, you start Redo Apply. The following example shows how to start a physical standby database:
SQL> STARTUP MOUNT;
To start Redo Apply, issue the following statement:
SQL> ALTER DATABASE RECOVER MANAGED STANDBY DATABASE
  2> DISCONNECT FROM SESSION;
To start real-time apply, issue the following statement:
SQL> ALTER DATABASE RECOVER MANAGED STANDBY DATABASE
  2> USING CURRENT LOGFILE;
On the primary database, query the RECOVERY_MODE column in the V$ARCHIVED_DEST_STATUS view, which displays the standby database's operation as MANAGED_RECOVERY for Redo Apply and MANAGED REAL TIME APPLY for real-time apply.
See Section 6.3 for information about Redo Apply, Section 6.2.1 for information about real-time apply, and Section 8.2 for information about opening a standby database for read-only access.
To shut down a physical standby database and stop log apply services, use the SQL*Plus SHUTDOWN IMMEDIATE statement. Control is not returned to the session that initiates a database shutdown until shutdown is complete.
If the primary database is up and running, defer the destination on the primary database and perform a log switch before shutting down the standby database.
To stop log apply services before shutting down the database, use the following steps:
SQL> SELECT PROCESS, STATUS FROM V$MANAGED_STANDBY;
SQL> ALTER DATABASE RECOVER MANAGED STANDBY DATABASE CANCEL;
SQL> SHUTDOWN;
When a standby database is open for read-only access, users can query the standby database but cannot update it. Thus, you can reduce the load on the primary database by using the standby database for reporting purposes. You can periodically open the standby database for read-only access and perform ad hoc queries to verify log apply services are updating the standby database correctly. (Note that for distributed queries, you must first issue the ALTER DATABASE SET TRANSACTION READ ONLY statement before you can issue a query on the read-only database.)
Figure 8-1 shows a standby database open for read-only access.
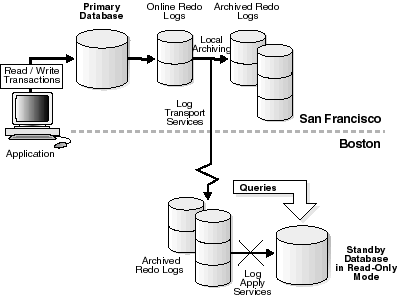
Text description of the illustration sbr81099.gif
This section contains the following topics:
As you decide whether or not to open a physical standby database for read-only access, consider the following:
When configuring more than one standby database on the same system, consider using the DEPENDENCY attribute of the LOG_ARCHIVE_DEST_n initialization parameter to define one archival destination to receive redo data on behalf of all of the destinations, rather than transmitting redo data to each individual destination. See Section 5.7.5 for more information.
You can alternate between having a physical standby database open for read-only access and performing Redo Apply using the following procedures.
Start, mount, and open the database for read-only access using the following statement:
SQL> STARTUP;
SQL> ALTER DATABASE RECOVER MANAGED STANDBY DATABASE CANCEL;
SQL> ALTER DATABASE OPEN;
You do not need to shut down the instance to open it for read-only access.
SQL> ALTER DATABASE RECOVER MANAGED STANDBY DATABASE
  2> DISCONNECT FROM SESSION;
To start real-time apply, issue the following statement:
SQL> ALTER DATABASE RECOVER MANAGED STANDBY DATABASE
  2> USING CURRENT LOGFILE;
You do not need to shut down the instance to start either of these apply modes.
Before you open your standby database for read-only access, consider the following topics regarding sorting operations:
To perform queries that sort a large amount of data on a standby database that is open for read-only access, the Oracle database must be able to perform on-disk sorting. You cannot allocate space for sorting in tablespaces that cause Oracle software to write to the data dictionary.
Temporary tablespaces allow you to add tempfile entries when the database is open for read-only access for the purpose of making queries without affecting dictionary files or generating redo entries. Therefore, you can use temporary tablespaces as long as you follow these requirements for creating them:
If you did not have a temporary tablespace on the primary database when you created the physical standby database, perform the following steps on the primary database:
SQL> CREATE TEMPORARY TABLESPACE temp1
     TEMPFILE '/disk1/oracle/oradata/payroll/temp1.dbf'
     SIZE 20M REUSE
     EXTENT MANAGEMENT LOCAL UNIFORM SIZE 16M;
SQL> ALTER SYSTEM SWITCH LOGFILE;
The redo data that is generated on the primary database automatically creates the temporary tablespace in the standby control file after the archived redo log file is applied to the physical standby database. However, even if the temporary tablespace existed on the primary database before you created the physical standby database, you must use the ADD TEMPFILE clause to actually create the disk file on the standby database.
On the physical standby database, perform the following steps:
SQL> ALTER DATABASE RECOVER MANAGED STANDBY DATABASE
  2> DISCONNECT FROM SESSION;
To start real-time apply, issue the following statement:
SQL> ALTER DATABASE RECOVER MANAGED STANDBY DATABASE
  2> USING CURRENT LOGFILE;
V$ARCHIVED_LOG view to verify all of the archived redo log files have been applied:
SQL> SELECT SEQUENCE#,APPLIED FROM V$ARCHIVED_LOG
  2> ORDER BY SEQUENCE#;
SEQUENCE# APP
--------- ---
        8 YES
        9 YES
       10 YES
       11 YES
4 rows selected.
SQL> ALTER DATABASE RECOVER MANAGED STANDBY DATABASE CANCEL;
SQL> ALTER DATABASE OPEN;
Opening the physical standby database for read-only access enables you to add a temporary file. Because adding a temporary file does not generate redo data, it is allowed for a database that is open for read-only access.
SQL> ALTER TABLESPACE temp1
       ADD TEMPFILE '/disk1/oracle/oradata/payroll/s_temp1.dbf'
       SIZE 10M REUSE;
If a temporary file does not exist on the standby database, or if the standby database is not open and you attempt to sort a large amount of data, an error is returned, as shown in the following example.
SQL> SELECT * FROM V$PARAMETER;

select * from v$parameter

              *

ERROR at line 1:

ORA-01220: file based sort illegal before database is open
Note that you can, however, sort small amounts of data if the SORT_AREA_SIZE parameter is set to a sufficient value in your server parameter file. (The SORT_AREA_SIZE parameter is a static parameter. See Oracle Database Reference for information about setting this initialization parameter.)
To prevent possible problems, you must be aware of events in the primary database that affect a standby database and learn how to respond to them. This section describes these events and the recommended responses to these events.
In some cases, the events or changes that occur on a primary database are automatically propagated through archived redo log files to the standby database and thus require no extra action on the standby database. In other cases, you might need to perform maintenance tasks on the standby database.
Table 8-1 indicates whether or not a change made on the primary database requires additional intervention by the database administrator (DBA) to be propagated to the standby database. It also briefly describes how to respond to these events. Detailed descriptions of the responses are described in the section references provided.
The following events are automatically administered by log transport services and log apply services, and therefore require no intervention by the database administrator:
ALTER DATABASE statement is issued with the ENABLE THREAD or DISABLE THREAD clause.STANDBY_FILE_MANAGEMENT initialization parameter is set to AUTO.
The initialization parameter, STANDBY_FILE_MANAGEMENT, enables you to control whether or not adding a datafile to the primary database is automatically propagated to the standby database, as follows:
STANDBY_FILE_MANAGEMENT initialization parameter in the standby database server parameter file (SPFILE) to AUTO, any new datafiles created on the primary database are automatically created on the standby database as well.STANDBY_FILE_MANAGEMENT initialization parameter or if you set it to MANUAL, then you must manually copy the new datafile to the standby database when you add a datafile to the primary database.Note that if you copy an existing datafile from another database to the primary database, then you must also copy the new datafile to the standby database and re-create the standby control file, regardless of the setting of STANDBY_FILE_MANAGEMENT initialization parameter.
The following sections provide examples of adding a datafile to the primary and standby databases when the STANDBY_FILE_MANAGEMENT initialization parameter is set to AUTO and MANUAL, respectively.
The following example shows the steps required to add a new datafile to the primary and standby databases when the STANDBY_FILE_MANAGEMENT initialization parameter is set to AUTO.
SQL> CREATE TABLESPACE new_ts DATAFILE '/disk1/oracle/oradata/payroll/t_db2.dbf'
  2> SIZE 1m AUTOEXTEND ON MAXSIZE UNLIMITED;
SQL> ALTER SYSTEM ARCHIVE LOG CURRENT;
SQL> SELECT NAME FROM V$DATAFILE;
NAME
----------------------------------------------------------------------
/disk1/oracle/oradata/payroll/t_db1.dbf
/disk1/oracle/oradata/payroll/t_db2.dbf
SQL> SELECT NAME FROM V$DATAFILE;
NAME
----------------------------------------------------------------------
/disk1/oracle/oradata/payroll/s2t_db1.dbf
/disk1/oracle/oradata/payroll/s2t_db2.dbf
The following example shows the steps required to add a new datafile to the primary and standby database when the STANDBY_FILE_MANAGEMENT initialization parameter is set to MANUAL. You must set the STANDBY_FILE_MANAGEMENT initialization parameter to MANUAL when the standby datafiles reside on raw devices.
SQL> CREATE TABLESPACE new_ts DATAFILE '/disk1/oracle/oradata/payroll/t_db2.dbf'
  2> SIZE 1m AUTOEXTEND ON MAXSIZE UNLIMITED;
SQL> SELECT NAME FROM V$DATAFILE;
NAME

----------------------------------------------------------------------
/disk1/oracle/oradata/payroll/t_db1.dbf
/disk1/oracle/oradata/payroll/t_db2.dbf
SQL> ALTER TABLESPACE new_ts OFFLINE;
cp command:
% cp /disk1/oracle/oradata/payroll/t_db2.dbf
/disk1/oracle/oradata/payroll/s2t_db2.dbf
SQL> ALTER TABLESPACE new_ts ONLINE;
rcp command:
%rcp /disk1/oracle/oradata/payroll/s2t_db2.dbf standby_location
SQL> ALTER SYSTEM ARCHIVE LOG CURRENT;
SQL> SELECT PROCESS, STATUS FROM V$MANAGED_STANDBY;
SQL> SELECT NAME FROM V$DATAFILE;
NAME

----------------------------------------------------------------------
/disk1/oracle/oradata/payroll/s2t_db1.dbf
/disk1/oracle/oradata/payroll/s2t_db2.dbf
When you delete one or more datafiles or drop one or more tablespaces in the primary database, you also need to delete the corresponding datafiles in the standby database. The following sections provide examples of dropping a datafile to the primary and standby databases when the STANDBY_FILE_MANAGEMENT initialization parameter is set to AUTO and MANUAL. To verify any deleted datafiles are no longer part of the database, query the V$DATAFILE view.
The following procedure works whether the STANDBY_FILE_MANAGEMENT initialization parameter is set to either MANUAL or AUTO, as follows:
SQL> DROP TABLESPACE tbs_4;
SQL> ALTER SYSTEM SWITCH LOGFILE;
SQL> SELECT PROCESS, STATUS FROM V$MANAGED_STANDBY;
Optionally, you can query the V$DATAFILE view to verify any deleted datafiles are no longer part of the database.
% rm /disk1/oracle/oradata/payroll/s2tbs_4.dbf
% rm /disk1/oracle/oradata/payroll/tbs_4.dbf
You can issue the SQL DROP TABLESPACE INCLUDING CONTENTS AND DATAFILES statement on the primary database to delete the datafiles on both the primary and standby databases. To use this statement, the STANDBY_FILE_MANAGEMENT initialization parameter must be set to AUTO. For example, to drop the tablespace at the primary site:
SQL> DROP TABLESPACE NCLUDING CONTENTS AND DATAFILES tbs_4;
SQL> ALTER SYSTEM SWITCH LOGFILE;
You can use the Oracle transportable tablespaces feature to move a subset of an Oracle database and plug it in to another Oracle database, essentially moving tablespaces between the databases.
To move or copy a set of tablespaces when a physical standby is being used, perform the following steps:
The datafiles must be to the directory defined by the DB_FILE_NAME_CONVERT initialization parameter. If DB_FILE_NAME_CONVERT is not defined, then issue the ALTER DATABASE RENAME FILE statement to modify the standby control file after the redo data containing the transportable tablespace was applied and failed. The STANDBY_FILE_MANAGEMENT initialization parameter must be set to AUTO.
Invoke the Data Pump utility to plug the set of tablespaces into the primary database. Redo data will be generated and applied at the standby site to plug the tablespace into the standby database.
For more information about transportable tablespaces, see Oracle Database Administrator's Guide.
When you rename one or more datafiles in the primary database, the change is not propagated to the standby database. Therefore, if you want to rename the same datafiles on the standby database, you must manually make the equivalent modifications on the standby database because the modifications are not performed automatically, even if the STANDBY_FILE_MANAGEMENT initialization parameter is set to AUTO.
The following steps describe how to rename a datafile in the primary database and manually propagate the changes to the standby database. If you do not want the standby database to have the same physical structure as the primary database, then these steps are not required.
SQL> ALTER TABLESPACE tbs_4 OFFLINE;
mv command, to rename the datafile on the primary system:
% mv /disk1/oracle/oradata/payroll/tbs_4.dbf
/disk1/oracle/oradata/payroll/tbs_x.dbf
SQL> ALTER TABLESPACE tbs_4 RENAME DATAFILE
  2> '/disk1/oracle/oradata/payroll/tbs_4.dbf'
  3>  TO '/disk1/oracle/oradata/payroll/tbs_x.dbf';
SQL> ALTER TABLESPACE tbs_4 ONLINE;
V$ARCHIVED_LOG view to verify all of the archived redo log files are applied, and then stop Redo Apply:
SQL> SELECT SEQUENCE#,APPLIED FROM V$ARCHIVED_LOG ORDER BY SEQUENCE#;
SEQUENCE# APP
--------- ---
8 YES
9 YES
10 YES
11 YES
4 rows selected.

SQL> ALTER DATABASE RECOVER MANAGED STANDBY DATABASE CANCEL;
SQL> SHUTDOWN;
mv command:
% mv /disk1/oracle/oradata/payroll/tbs_4.dbf
/disk1/oracle/oradata/payroll/tbs_x.dbf
SQL> STARTUP MOUNT;
STANDBY_FILE_MANAGEMENT initialization parameter must be set to MANUAL.
SQL> ALTER DATABASE RENAME FILE '/disk1/oracle/oradata/payroll/tbs_4.dbf'
  2> TO '/disk1/oracle/oradata/payroll/tbs_x.dbf';
SQL> ALTER DATABASE RECOVER MANAGED STANDBY DATABASE
  2> DISCONNECT FROM SESSION;
If you do not rename the corresponding datafile at the standby system, and then try to refresh the standby database control file, the standby database will attempt to use the renamed datafile, but it will not find it. Consequently, you will see error messages similar to the following in the alert log:
ORA-00283: recovery session canceled due to errors
ORA-01157: cannot identify/lock datafile 4 - see DBWR trace file
ORA-01110: datafile 4: '/Disk1/oracle/oradata/payroll/tbs_x.dbf'
Changing the size and number of the online redo log files is sometimes done to tune the database. You can add online redo log file groups or members to the primary database without affecting the standby database. Similarly, you can drop log file groups or members from the primary database without affecting your standby database. However, these changes do affect the performance of the standby database after switchover.
|
Caution: Whenever you add an online redo log file to the primary database, you must add a corresponding standby redo log file to the standby database. |
For example, if the primary database has 10 online redo log files and the standby database has 2, and then you switch over to the standby database so that it functions as the new primary database, the new primary database is forced to archive more frequently than the original primary database.
Consequently, when you add or drop an online redo log file at the primary site, it is important that you synchronize the changes in the standby database by following these steps:
STANDBY_FILE_MANAGEMENT initialization parameter is set to AUTO, change the value to MANUAL.STANDBY_FILE_MANAGEMENT initialization parameter and the Redo Apply options to their original states.Using the SQL CREATE CONTROLFILE statement with the RESETLOGS option on your primary database will force the primary database to reset the online redo log file the next time the primary database is opened, thereby invalidating the standby database.
If you invalidated the control file for the standby database, re-create the file using the procedure provided in Section 4.2.3.3.
If you invalidated the standby database, you must re-create the standby database using the procedures in Chapter 4.
When you perform a DML or DDL operation using the NOLOGGING or UNRECOVERABLE clause, the standby database is invalidated and might require substantial DBA administrative activities to repair. You can specify the SQL ALTER DATABASE or SQL ALTER TABLESPACE statement with the FORCELOGGING clause to override the NOLOGGING setting. However, this statement will not repair an already invalidated database.
If you perform an unrecoverable operation (such as a direct path load), you will see a performance improvement on the primary database; but there is no corresponding recovery process performance improvement on the standby database, and you will have to move the data manually to the standby database.
See Section 10.7 for information about recovering after the NOLOGGING clause is used.
This section describes backup strategies using Oracle Recovery Manager utility (RMAN) with Data Guard and physical standby databases. RMAN is an easy-to-use tool that can take backups with minimal effect on the primary database and quickly recover from the loss of individual datafiles, or the entire database. RMAN and Data Guard can be used together to simplify the administration of a Data Guard configuration.
|
Note: Because a logical standby database is not a block-for-block copy of the primary database, you cannot use a logical standby database to back up the primary database. |
In a standby environment, backing up datafiles and archived redo log files taken on the primary or standby system are usable on either system for recovery. Although some files such as the control file and SPFILE must be backed up on the primary database, the process of backing up datafiles and archived redo log files can be off-loaded to the standby system, to minimize the impact of backup operations on the production system.
Only those archived redo log files that were created by the standby instance can be backed up at the standby site. If there were any archived redo log files generated before the standby database was started, they must be backed up on the primary database. For example, if the first log sent from the primary database to the standby is log sequence 100 thread 1, then the backup of archived redo log files whose log sequence is less than 100 must be done on the primary database.
If the flash recovery area is configured, Oracle software deletes the files from flash recovery area on an on-demand basis. The flash recovery area acts as disk cache for tape backups.
This section assumes the flash recovery area is configured (see Section 5.2.3) and other RMAN persistent configurations are set. On the primary database, use the following RMAN commands to make a current backup of the control file and SPFILE, and back up files in the flash recovery area created by the primary instance to tape:
BACKUP DEVICE TYPE DISK CURRENT CONTROLFILE;
BACKUP RECOVERY AREA;
Issue these commands (or use them in a script) every day or once a week, depending on how much application of redo data can be tolerated in the event of the loss of all current control files (see Section 8.4.2.4).
On the physical standby database, use the following commands every day to roll forward a level 0 copy of the database. These commands apply the level 1 incremental taken a day before, create a new level 1 incremental, back up archived redo log files to the flash recovery area, and back up files created by the standby instance from flash recovery area to tape:
RECOVER COPY OF DATABASE WITH TAG 'OSS';
BACKUP DEVICE TYPE DISK INCREMENTAL LEVEL 1 FOR RECOVER OF COPY WITH TAG 'OSS'
DATABASE;
BACKUP DEVICE TYPE DISK ARCHIVELOG ALL NOT BACKED UP 2 TIMES;
BACKUP RECOVERY AREA;
If all backups are written directly to tape, configure the default device type to SBT using the RMAN command CONFIGURE DEFAULT DEVICE TYPE TO SBT.
On the primary database, use the following RMAN commands to back up the current control file and copy auto backups created by the primary instance to tape:
BACKUP AS BACKUPSET CURRENT CONTROLFILE;
BACKUP RECOVERY AREA;
Issue these commands every day or once a week, depending on how much application of redo data can be tolerated in the event of loss of all current control files (refer to Section 8.4.2.4).
Assuming that a complete database backup is taken every Sunday, the following commands can be executed on the standby database to take a level 0 database backup:
BACKUP AS BACKUPSET INCREMENTAL LEVEL 0 DATABASE PLUS ARCHIVELOG NOT BACKED UP 2 TIMES;
On the other days of the backup cycle, run the following commands to create a level 1 incremental backup of the database and all archived redo log files that have not already been backed up 2 times:
BACKUP AS BACKUPSET INCREMENTAL LEVEL 1 DATABASE PLUS ARCHIVELOG NOT BACKED UP 2 TIMES;
All the archived redo log files that were generated after the last backup on the system where backups are done must be manually cataloged using the RMAN CATALOG ARCHIVELOG 'archivelog_name_complete_path'command after any of the following events:
If the new archived redo log files are not cataloged, RMAN will not back them up.
The examples in the following sections assume you are restoring files from tape to the same system on which the backup was created. If you need to restore files to a different system, you may need to change media configuration, or specify different PARMS on the RMAN channels during restore, or both. See the Media Management documentation for more information about how to access RMAN backups from different systems.
Execute the following RMAN commands to restore and recover datafiles. You must be connected to both the primary and recovery catalog databases.
RESTORE DATAFILE <n,m...>;
RECOVER DATAFILE <n,m...>;
Execute the following RMAN commands to restore and recover tablespaces. You must be connected to both the primary and recovery catalog databases.
RESTORE TABLESPACE <tbs_name1, tbs_name2, ...>
RECOVER TABLESPACE <tbs_name1, tbs_name2, ...>
To recover the standby database after the loss of one or more datafiles, you must restore the lost files to the standby database from the backup using the RMAN RESTORE DATAFILE command. If all the archived redo log files required for recovery of damaged files are accessible on disk by the standby, restart Redo Apply.
If the archived redo log files required for recovery are not accessible on disk, use RMAN to recover the restored datafiles to an SCN/log sequence greater than the last log applied to the standby database, and then restart Redo Apply to continue the application of redo data, as follows:
UNTIL_SCN column, as follows:
SQL> SELECT MAX(NEXT_CHANGE#)+1 UNTIL_SCN FROM V$LOG_HISTORY LH, V$DATABASE
DB WHERE LH.RESETLOGS_CHANGE#=DB.RESETLOGS_CHANGE# AND LH.RESETLOGS_TIME =
DB.RESETLOGS_TIME;
UNTIL_SCN
------- ----------------
967786
TARGET keyword to connect to standby instance):
RESTORE DATAFILE <n,m,...>;
RECOVER DATABASE UNTIL SCN 967786;
To restore a tablespace, use the RMAN 'RESTORE TABLESPACE <tbs_name1, tbs_name2, ...>' command.
Oracle software allows multiplexing of the standby control file. To ensure the standby control file is multiplexed, check the CONTROL_FILES initialization parameter, as follows:
SQL> SHOW PARAMETER CONTROL_FILES
NAME                                 TYPE        VALUE
 ------------------------------------ ----------- ------------------------------
control_files                        string      <cfilepath1>,<cfilepath2>
If one of the multiplexed standby control files is lost or not accessible, Oracle software stops the instance and writes the following messages to the alert log:
ORA-00210: cannot open the specified controlfile
ORA-00202: controlfile: '/ade/banand_hosted6/oracle/dbs/scf3_2.f'
ORA-27041: unable to open file
You can copy an intact copy of the control file over the lost copy, then restart the standby instance using the following SQL statements:
STARTUP MOUNT;
ALTER DATABASE RECOVER MANAGED STANDBY DATABASE DISCONNECT FROM SESSION;
If all standby control files are lost, then you must create a new control file from the primary database, copy it to all multiplexed locations on the standby database, and restart the standby instance and Redo Apply. The created control file loses all information about archived redo log files generated before its creation. Because RMAN looks into the control file for the list of archived redo log files to back up, all the archived redo log files generated since the last backup must be manually cataloged, as described in Section 8.4.2.
Oracle software allows multiplexing of the control file on the primary database. If one of the control files cannot be updated on the primary database, the primary database instance is shut down automatically. As described in Section 8.4.2.3, you can copy an intact copy of the control file and restart the instance without having to perform restore or recovery operations.
If you lose all of your control files, you can choose among the following procedures, depending on the amount of downtime that is acceptable.
If all control file copies are lost, you can create a new control file using the NORESETLOGS option and open the database after doing media recovery. An existing standby database instance can generate the script to create a new control file by using the SQL ALTER DATABASE BACKUP CONTROLFILE TO TRACE NORESETLOGS statement. Note that, if the database filenames are different in the primary and standby databases, then you must edit the generated script to correct the filenames. This statement can be used periodically to generate a control file creation script. If you are going to use control file creation as part of your recovery plan, then you should use this statement after any physical structure change, such as adding or dropping a datafile, tablespace, or redo log member.
It should be noted that the created control file loses all information about the archived redo log files generated before control file creation time. If archived redo log file backups are being done on the primary database, all the archived redo log files generated since the last archived redo log file backup must be manually cataloged.
If you are unable to create a control file using the previous procedure, then you can use a backup control file, perform complete recovery, and open the database with the RESETLOGS option.
To restore the control file and recover the database, use the following RMAN commands after connecting to the primary instance (in NOMOUNT state) and catalog database:
RESTORE CONTROLFILE;
ALTER DATABASE MOUNT;
RECOVER DATABASE;
ALTER DATABASE OPEN RESETLOGS;
Beginning with Oracle Release 10.1.0.1, all the backups before a RESETLOGS operation can be used for recovery. Hence, it is not necessary to back up the database before making it available for production.
Oracle recommends multiplexing the online redo log files. The loss of all members of an online redo log group causes Oracle software to terminate the instance. If only some members of a log file group cannot be written, they will not be used until they become accessible. The views V$LOGFILE and V$LOG contain more information about the current status of log file members in the primary database instance.
When Oracle software is unable to write to one of the online redo log file members, the following alert messages are returned:
ORA-00313: open failed for members of log group 1 of thread 1
ORA-00312: online log 1 thread 1: '/ade/banand_hosted6/oracle/dbs/t1_log1.f'
ORA-27037: unable to obtain file status
SVR4 Error: 2: No such file or directory
Additional information: 3
If the access problem is temporary due to a hardware issue, correct the problem and processing will continue automatically. If the loss is permanent, a new member can be added and the old one dropped from the group.
To add a new member to a redo log group, use the SQL ALTER DATABASE ADD LOGFILE MEMBER 'log_file_name' REUSE TO GROUP n statement. You can do this even when the database is open, without affecting database availability.
If all the members of an inactive group that has been archived are lost, the group can be dropped and re-created.
In all other cases (loss of all online log members for the current ACTIVE group, or an inactive group which has not yet been archived), you must fail over to the standby database. Refer to Chapter 7 for the procedure.
Incomplete recovery of the primary database is normally done in cases such as when the database is logically corrupted (by some user or an application) or when a tablespace or datafile was accidentally dropped from database.
Depending on the current database checkpoint SCN on the standby database instances, you can use one of the following procedures to perform incomplete recovery of the database. All the procedures are in order of preference, starting with the one that is the least time consuming.
Using Flashback Database is the recommended procedure when the flashback feature is enabled on the primary database, none of the database files are lost, and the point-in-time recovery is greater than the oldest flashback SCN or the oldest flashback time. See Section 10.4 for the procedure to use Flashback Database to do point-in-time recovery.
This is the recommended procedure when the standby database is behind the desired incomplete recovery time, and Flashback Database is not enabled on the primary or standby databases:
RECOVER DATABASE UNTIL TIME '<time>';
Alternatively, incomplete recovery time can be specified using the SCN or log sequence number:
RECOVER DATABASE UNTIL SCN incomplete recovery SCN'
RECOVER DATABASE UNTIL LOGSEQ incomplete recovery log sequence number THREAD
thread number
Open the standby database in read-only mode to verify the state of database.
If the state is not what is desired, use the LogMiner utility to look at the archived redo log files to find the right target time or SCN for incomplete recovery. Alternatively, you can start by recovering the standby to a point that you know is before the target time, and then open the database in read-only mode to examine the state of the data. Repeat this process until the state of the database is verified to be correct. Note that if you recover the database too far (that is, past the SCN where the error occurred) you cannot return it to an earlier SCN.
ALTER DATABASE ACTIVATE STANDBY DATABASE statement. This converts the standby database to a primary database, creates a new reset logs branch, and opens the database. See Section 8.5 to learn how the standby database reacts to the new reset logs branch.If all of the standby database instances have already been recovered past the desired point in time and Flashback Database is enabled on the primary or standby database, then this is your only option.
Use the following procedure to perform incomplete recovery on the primary database:
RESETLOGS option (after connecting to catalog database and primary instance that is in MOUNT state):
RUN
{
SET UNTIL TIME '<time>';
RESTORE DATABASE;
RECOVER DATABASE;
}
ALTER DATABASE OPEN RESETLOGS;
After this process, all standby database instances must be reestablished in the Data Guard configuration.
The following sections describe how to modify the backup procedures for other configurations, such as when the standby and primary databases cannot share backup files; the standby instance is only used to remotely archive redo log files; or the standby database filenames are different than the primary database.
In this case, the backups taken on a standby system are not easily accessible by the primary system or other standby systems. Perform a complete backup of the database on all systems to perform recovery operations. The flash recovery area can reside locally on the primary and standby systems (for example, the flash recovery area is not the same for the primary and standby databases).
In this scenario, you can still use the general strategies described in Section 8.4.2, with the following exceptions:
RESTORE operations that tag must be used to restrict RMAN from selecting backups taken on the same host. In other words, the BACKUP command must use the TAG node name option when creating backups; the RESTORE command must use the FROM TAG node name option; and the RECOVER command must use FROM TAG node name ARCHIVELOG TAG node name option.NOMOUNT state using the same parameter files with which the standby was operating earlier.ALTER DATABASE CREATE STANDBY CONTROLFILE AS filename statement, and use the created control file to mount the standby instance.RESTORE DATABASE FROM TAG '<node name>' RECOVER DATABASE FROM TAG '<node name>' ARCHIVELOG TAG '<node name>'
The standby instance will fetch the remaining archived redo log files as described in Section 5.8.
Use the same procedure described in Section 8.4.1, with the exception that the RMAN commands that back up database files cannot be run against the FAL server. The FAL server can be used as a backup source for all archived redo log files, thus off-loading backups of archived redo log files to the FAL server.
If the database filenames are not the same on primary and standby database, the RESTORE and RECOVER commands you use will be slightly different. To obtain the actual datafile names on the standby database, query the V$DATAFILE view and specify the SET NEWNAME option for all the datafiles in the database:
RUN
{
SET NEWNAME FOR DATAFILE 1 TO '<existing file location for file#1 from V$DATAFILE>';
SET NEWNAME FOR DATAFILE 2 TO '<existing file location for file#2 from V$DATAFILE>';
...
...
 SET NEWNAME FOR DATAFILE n TO '<existing file location for file#n from V$DATAFILE>';
 RESTORE {DATAFILE <n,m,...> | TABLESPACE <tbs_name_1, 2, ...| DATABASE};
SWITCH DATAFILE ALL;
RECOVER DATABASE {NOREDO};
}
Similarly, the RMAN DUPLICATE command should also use the SET NEWNAME option to specify new filenames during the standby database creation.
By default, archived redo log files in a flash recovery area that were backed up to a tertiary device or made obsolete (as defined by the RMAN retention policy) are eligible for deletion. The archived redo log files that are backed up or obsolete can eventually be deleted automatically to make space if the disk space in the flash recovery area becomes full. However, you can change this default deletion policy using the following RMAN command:
CONFIGURE ARCHIVELOG DELETION POLICY TO [CLEAR | NONE | APPLIED ON STANDBY];
This section describes the command qualifiers and provides examples for setting up a deletion policy. See Oracle Database Backup and Recovery Advanced User's Guide for more information about how Oracle software manages disk space in the flash recovery area.
Use the APPLIED ON STANDBY clause so that archived redo log files that have been applied on all mandatory standby destinations will be deleted. The actions taken when you specify this clause are described in the following table:
See Appendix C for more information about cascaded redo log destinations.
Use the CLEAR clause to disable the deletion policy that was previously set up with the RMAN CONFIGURE ARCHIVELOG DELETION POLICY command. The Oracle database will resume the default deletion policy behavior, which is to delete archived redo log files that are backed up or obsolete to make space if disk space in the flash recovery area becomes full.
Use the NONE clause so that archived redo logs in flash recovery area that were backed up or obsolete as per the RMAN retention policy are eligible for deletion. This is the default configuration. Archived redo log files that are backed up or obsolete are deleted to make space if the disk space in the flash recovery area becomes full.
When backups of archived redo log files are taken on the standby database:
CONFIGURE ARCHIVELOG DELETION POLICY TO APPLIED ON STANDBY;
CONFIGURE ARCHIVELOG DELETION POLICY TO NONE;
When backups of archived redo log files are taken on the primary database:
CONFIGURE ARCHIVELOG DELETION POLICY TO APPLIED ON STANDBY;
CONFIGURE ARCHIVELOG DELETION POLICY TO NONE;
After a switchover or failover, you may need to reissue the RMAN CONFIGURE ARCHIVELOG DELETION POLICY command on each database. If the backup site for archived redo log files remains the same, then do nothing. Otherwise, you must switch the archivelog deletion policy by issuing the CONFIGURE ARCHIVELOG DELETION POLICY TO APPLIED ON STANDBY statement on the database where backups are not taken, and issuing the CONFIGURE ARCHIVELOG DELETION POLICY TO NONE statement on the database where backups are taken.
To see the current setting (APPLIED ON STANDBY, CLEAR, NONE) for a database, issue the following query:
SELECT NAME, VALUE FROM V$RMAN_CONFIGURATION WHERE
NAME LIKE '%ARCHIVELOG DELETION POLICY%';

NAME                              VALUE
-----------------------------     --------------
ARCHIVELOG DELETION POLICY        TO APPLIED ON STANDBY
You can also find the existing configuration using the RMAN SHOW ARCHIVELOG DELETION POLICY command:
RMAN> SHOW ARCHIVELOG DELETION POLICY
RMAN configuration parameters are:
CONFIGURE ARCHIVELOG DELETION POLICY TO APPLIED ON STANDBY;
Data Guard allows recovery on a physical standby database to continue after the primary database has been opened with the RESETLOGS option. When an ALTER DATABASE OPEN RESETLOGS statement is issued on the primary database, the incarnation of the database changes, creating a new branch of redo data.
When a physical standby database receives a new branch of redo data, Redo Apply stops and the managed recovery process (MRP) on the standby database terminates. At this point, you can resynchronize the standby database with the primary database branch, as described in the following table:
| If the standby database. . . | Then. . . | Perform these steps. . . |
|---|---|---|
|
Has not applied redo data past the new resetlogs SCN (past the start of the new branch of redo data) |
Restarting media recovery will automatically recover the standby database into the new branch. |
Restart Redo Apply to continue applying redo data. The MRP automatically resynchronizes the standby database with the new branch of redo data. |
|
Has applied redo data past the new resetlogs SCN (past the start of the new branch of redo data) and Flashback Database is enabled on the standby database |
The standby database is recovered in the future of the new branch of redo data. |
The MRP automatically resynchronizes the standby database with the new branch. |
|
Has applied redo data past the new resetlogs SCN (past the start of the new branch of redo data) and Flashback Database is not enabled on the standby database |
The primary database has diverged from the standby on the indicated primary database branch. |
Re-create the physical standby database following the procedures in Chapter 3. |
|
Is missing intervening archived redo log files from the new branch of redo data |
The MRP cannot continue until the missing log files are retrieved. |
Locate and register missing archived redo log files from each branch. |
|
Is missing archived redo log files from the end of the previous branch of redo data. |
The MRP cannot continue until the missing log files are retrieved. |
Locate and register missing archived redo log files from the previous branch. |
See Oracle Database Backup and Recovery Advanced User's Guide for more information about database incarnations, recovering through an OPEN RESETLOGS operation, and Flashback Database.
This section gives you a general overview on where to find information for monitoring the primary and standby databases in a Data Guard environment.
This section contains the following topics:
Table 8-2 summarizes common events that occur on the primary database and pointers to the files and views where you can monitor these events on the primary and standby sites.
The database alert log is a chronological record of messages and errors. In addition to providing information about the Oracle database, it also includes information about operations specific to Data Guard, including the following:
ALTER DATABASE RECOVER MANAGED STANDBY, STARTUP, SHUTDOWN, ARCHIVE LOG, and RECOVERThe alert log also provides pointers to the trace or dump files generated by a specific process.
The Oracle database contains a set of underlying views. These views are often called dynamic performance views because they are continuously updated while a database is open and in use, and their contents relate primarily to performance. These views are also called fixed views because they cannot be altered or removed by the database administrator.
These view names are prefixed with either V$ or GV$, for example, V$ARCHIVE_DEST or GV$ARCHIVE_DEST.
Standard dynamic performance views (V$ fixed views) store information about the local instance. In contrast, global dynamic performance views (GV$ fixed views), store information about all open instances. Each V$ fixed view has a corresponding GV$ fixed view. Selects on GV$ fixed views use parallel query slaves to obtain information on all instances. See Chapter 14, "Views Relevant to Oracle Data Guard" and Oracle Database Reference for additional information about view columns.
This section shows some samples of the types of views discussed in Section 8.6.2 for monitoring recovery progress in a Data Guard environment. It contains the following examples:
You can obtain information about Redo Apply on a standby database by monitoring the activities performed by the following processes:
| Reference Name | System Process Names |
|---|---|
|
ARCH |
ARC0,ARC1,ARC2,... |
|
MRP |
MRP, MRP0 |
|
RFS |
ORACLE{SID} |
The V$MANAGED_STANDBY view on the standby database site shows you the activities performed by both log transport and log apply processes in a Data Guard environment. The CLIENT_P column in the output of the following query identifies the corresponding primary database process.
SQL> SELECT PROCESS, CLIENT_PROCESS, SEQUENCE#, STATUS FROM V$MANAGED_STANDBY;

PROCESS CLIENT_P  SEQUENCE# STATUS
------- -------- ---------- ------------
ARCH    ARCH              0 CONNECTED
ARCH    ARCH              0 CONNECTED
MRP0    N/A             204 WAIT_FOR_LOG
RFS     LGWR            204 WRITING
RFS     N/A               0 RECEIVING
The V$ARCHIVE_DEST_STATUS view on either a primary or standby database site provides you information such as the online redo log files that were archived, the archived redo log files that are applied, and the log sequence numbers of each. The following query output shows the standby database is two archived redo log files behind in applying the redo data received from the primary database.
SQL> SELECT ARCHIVED_THREAD#, ARCHIVED_SEQ#, APPLIED_THREAD#, APPLIED_SEQ#
  2> FROM V$ARCHIVE_DEST_STATUS;

ARCHIVED_THREAD# ARCHIVED_SEQ# APPLIED_THREAD# APPLIED_SEQ#
---------------- ------------- --------------- ------------
1                947           1               945
Query the V$ARCHIVED_LOG view on the standby database to find additional information about the archived redo log. Some information you can get includes the location of the archived redo log, which process created the archived redo log, redo log sequence number of each archived redo log file, when each log file was archived, and whether or not the archived redo log file was applied. For example:
SQL> SELECT NAME, CREATOR, SEQUENCE#, APPLIED, COMPLETION_TIME
  2> FROM V$ARCHIVED_LOG;

NAME                                            CREATOR SEQUENCE# APP COMPLETIO
----------------------------------------------  ------- --------- --- ---------
H:\ORACLE\ORADATA\PAYROLL\STANDBY\ARC00198.001  ARCH         198 YES 30-MAY-02
H:\ORACLE\ORADATA\PAYROLL\STANDBY\ARC00199.001  ARCH          199 YES 30-MAY-02
H:\ORACLE\ORADATA\PAYROLL\STANDBY\ARC00200.001  ARCH          200 YES 30-MAY-02
H:\ORACLE\ORADATA\PAYROLL\STANDBY\ARC00201.001  LGWR          201 YES 30-MAY-02
H:\ORACLE\ORADATA\PAYROLL\STANDBY\ARC00202.001  ARCH          202 YES 30-MAY-02
H:\ORACLE\ORADATA\PAYROLL\STANDBY\ARC00203.001  LGWR          203 YES 30-MAY-02

6 rows selected.
Query the V$DATABASE_INCARNATION view on the standby database to monitor database incarnations and RESETLOGS IDs.
The following queries were issued on the standby database before an OPEN RESETLOGS statement was issued on the primary database:
SQL> SELECT INCARNATION#, RESETLOGS_ID, STATUS FROM V$DATABASE_INCARNATION ;

INCARNATION# RESETLOGS_ID STATUS
------------ ------------ -------
           1    509191005 PARENT
           2    509275501 CURRENT

SQL> SELECT RESETLOGS_ID,SEQUENCE#,STATUS,ARCHIVED FROM V$ARCHIVED_LOG
  2  ORDER BY RESETLOGS_ID,SEQUENCE# ;

RESETLOGS_ID  THREAD#  SEQUENCE# S ARC
------------  -------  --------- - ----
   509275501        1          1 A YES
   509275501        1          2 A YES
   509275501        1          3 A YES
   509275501        1          4 A YES
   509275501        1          5 A YES

5 rows selected.
The following queries were issued on the standby database after an OPEN RESETLOGS statement was issued on the primary database and the standby database started to receive redo data on the new branch of redo:
SQL> SELECT INCARNATION#, RESETLOGS_ID, STATUS FROM V$DATABASE_INCARNATION ;

INCARNATION# RESETLOGS_ID STATUS
------------ ------------ -------
           1    509191005 PARENT
           2    509275501 PARENT
           3    509278970 CURRENT

SQL> SELECT RESETLOGS_ID,SEQUENCE#,STATUS,ARCHIVED FROM V$ARCHIVED_LOG
  2  ORDER BY RESETLOGS_ID,SEQUENCE# ;

RESETLOGS_ID  THREAD#  SEQUENCE# S ARC
------------  -------  --------- - ---
   509275501        1          1 A YES
   509275501        1          2 A YES
   509275501        1          3 A YES
   509275501        1          4 A YES
   509275501        1          5 A YES
   509278970        1          1 A YES
   509278970        1          2 A YES
   509278970        1          3 A YES
8 rows selected.
The V$LOG_HISTORY on the standby site shows you a complete history of the archived redo log, including information such as the time of the first entry, the lowest SCN in the log, the highest SCN in the log, and the sequence numbers for the archived redo log files.
SQL> SELECT FIRST_TIME, FIRST_CHANGE#, NEXT_CHANGE#, SEQUENCE# FROM V$LOG_HISTORY;

FIRST_TIM FIRST_CHANGE# NEXT_CHANGE#  SEQUENCE#
--------- ------------- ------------ ----------
13-MAY-02        190578       214480          1
13-MAY-02        214480       234595          2
13-MAY-02        234595       254713          3
.
.
.
30-MAY-02       3418615      3418874        201
30-MAY-02       3418874      3419280        202
30-MAY-02       3419280      3421165        203
203 rows selected.
Query the V$LOG_HISTORY view on the standby database, which records the latest log sequence number that was applied. For example, issue the following query:
SQL> SELECT THREAD#, MAX(SEQUENCE#) AS "LAST_APPLIED_LOG"
  2> FROM V$LOG_HISTORY
  3> GROUP BY THREAD#;

THREAD# LAST_APPLIED_LOG
------- ----------------
      1              967
In this example, the archived redo log file with log sequence number 967 is the most recently applied log file.
You can also use the APPLIED column in the V$ARCHIVED_LOG fixed view on the standby database to find out which log file was applied on the standby database. The column displays YES for the log file that was applied. For example:
SQL> SELECT THREAD#, SEQUENCE#, APPLIED FROM V$ARCHIVED_LOG;
   THREAD#  SEQUENCE# APP
---------- ---------- ---
         1          2 YES
         1          3 YES
         1          4 YES
         1          5 YES
         1          6 YES
         1          7 YES
         1          8 YES
         1          9 YES
         1         10 YES
         1         11 NO
10 rows selected.
Each archive destination has a destination ID assigned to it. You can query the DEST_ID column in the V$ARCHIVE_DEST fixed view to find out your destination ID. You can then use this destination ID in a query on the primary database to discover log files that were not sent to a particular standby site.
For example, assume the current local archive destination ID on your primary database is 1, and the destination ID of one of your remote standby databases is 2. To find out which log files were not received by this standby destination, issue the following query on the primary database:
SQL> SELECT LOCAL.THREAD#, LOCAL.SEQUENCE# FROM
  2> (SELECT THREAD#, SEQUENCE# FROM V$ARCHIVED_LOG WHERE DEST_ID=1) LOCAL
  3>  WHERE LOCAL.SEQUENCE# NOT IN
  5> (SELECT SEQUENCE# FROM V$ARCHIVED_LOG WHERE DEST_ID=2 AND
  6> THREAD# = LOCAL.THREAD#);
 THREAD#  SEQUENCE#
---------- ----------
  1        12
  1        13
  1        14
The preceding example shows the log files that were not received by standby destination 2.
|
 Copyright © 1999, 2003 Oracle Corporation All Rights Reserved. |
|

