| Oracle Network Manager Administrator's Guide | Library |
Product |
Contents |
Index |
| Oracle Network Manager Administrator's Guide | Library |
Product |
Contents |
Index |
![]()
![]()
When you generate the network definition, Network Manager generates the necessary configuration files for the components on the network. You must then distribute those files appropriately. There are several methods for doing so.
Note: Before you distribute the files for the SQL*Net V2.3 network, move or delete any configuration files that may be left over from a previous network.
Note: This chapter describes the generated files very briefly. For details about their contents and syntax, see the documentation for the applicable network products: SQL*Net, Oracle MultiProtocol Interchange, Oracle Names, Oracle SNMP Support, and Secure Network Services. See Appendix A of this Guide for examples of the generated configuration files.
Directories identified by node names and client profiles are easy to identify. (If your network includes node names or client profile names that are longer than the file or directory names your system allows, the generated directory names will be truncated to the size allowed by your system.) The directory structure also makes it easy to distribute the necessary files to the appropriate machines. To build a functional network, you just need to copy all the files for a node onto that node in your network. For the client files, you must either copy them to each of the client machines or, more likely, copy them to a central location to which all the client machines have access.
Figure 6 - 1 shows an example of the directory structure for a network that includes three client profiles, a node with a listener, and a different node containing an Interchange.
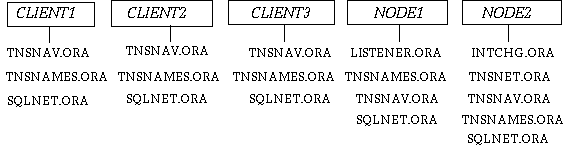
Figure 6 - 1. Sample Directory Structure 1
Note: The file names used here may be different on your operating system. Consult the Oracle operating system-specific documentation for your platform for further information.
For example, consider a network that has the following components:

Figure 6 - 2. Sample Directory Structure 2
TNSNAMES.ORA
This file, which contains a list of the service names of all databases and all the Interchanges in the local region, is required on every client, and on any server machine that will be performing distributed transactions (through database links). Every client requires access to the global file TNSNAMES.ORA to be able to specify database locations. All clients on a multi-tasking computer can share a single TNSNAMES.ORA file. In addition, where a network file system is available, such as Novell or UNIX NFS, this file may be placed on the file server and shared by multiple client machines.
Note: If you generate the files to Oracle Names and the file system, TNSNAMES.ORA is not created. Instead, NAMES.ORA contains a pointer to the network definition in the database, which the Names server uses to get the service names and address mappings it needs.
SQLNET.ORA
The SQLNET.ORA file contains diagnostic parameters (logging and tracing) for SQL*Net V2.1 clients, if a client requires non-standard diagnostics. By default, without the SQLNET.ORA file, all errors are logged to a file called SQLNET.LOG for each client. This provides adequate diagnostics for most failed connections. When it does not, the SQLNET.ORA file generated by the Oracle Network Manager can be used to specify additional diagnostics. You can distribute the file to individual clients, then edit it to include client-specific information. To edit it, use a text editor available on your platform. See your Oracle platform-specific documentation for more information.
The SQLNET.ORA file also contains client information about preferred Names servers, if your network uses Oracle Names. It may also contain optional parameters, which you add with a text editor. See Appendix A in Understanding SQL*Net for further details.
The TNSNAV.ORA file lists the local communities of the client profile or node. If there is an Interchange on the network, the TNSNAV.ORA file also allows the client to identify the location of the best Interchange to contact for connections across communities. Like TNSNAMES.ORA, this file can be shared by all clients from a single node and, in most cases, can be shared by all clients in a community (through a networked file system).
LISTENER.ORA
Every Oracle server requires the file LISTENER.ORA to start and run a network listener. This file is only valid for a single machine. If a server runs multiple listeners, they share a single LISTENER.ORA file allowing a single Listener Control Utility (LSNRCTL) to control all listeners on the server machine. If the LISTENER.ORA file contains one or more listener passwords that are not encrypted, the file should be readable only by people authorized to administer the listener. For information on how to change permissions on this file, see the operating system-specific documentation for the platform. For further information on the Listener Control Utility, see Chapter 5, "Using SQL*Net," in Understanding SQL*Net.
INTCHG.ORA
Every Interchange requires the INTCHG.ORA file to read its parameters. Each copy of this file is specific to a single Interchange.
TNSNET.ORA
Every Interchange requires the global file TNSNET.ORA, which describes the relationships of all the communities and Interchanges, for use during navigation across the network. This file is identical on every Interchange.
Figure 6 - 3 shows an example of the directory structure for a network similar to that shown in Figure 6 - 2, but with an Oracle Names server on the node with the Interchange.
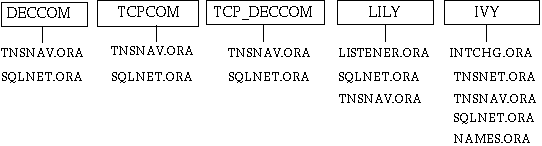
Figure 6 - 3. Sample Directory Structure Including Oracle Names
The remaining client type files and the Interchange files are the same as those described in the previous section. Any node that has a Names server requires a unique NAMES.ORA file.
NAMES.ORA
A screen similar to that shown in Figure 6 - 4 appears.
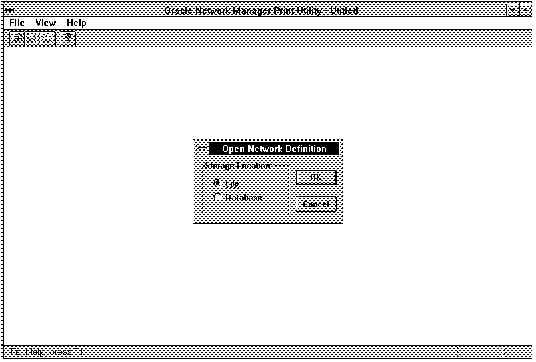 Figure 6 - 4. NETPRINT Window
Select the file or the database where the network definition is stored. Windows similar to the ones you are familiar with for describing the file location or database appear. Using your input, NETPRINT locates the network definition and displays it on the screen.
Figure 6 - 5 shows an example of part of a network definition displayed on the screen.
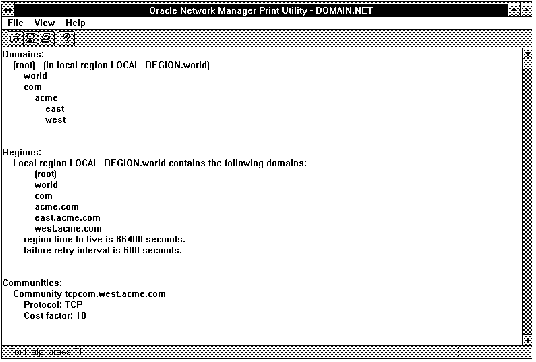 Figure 6 - 5. Sample NETPRINT Output
Use the scroll bar to scroll through the network definition display. You can use your standard window cut or copy and paste tools to put the information into a file or electronic mail message. You can also use the Save Printed Output option or Print to File option to save the network definition to a file.
If you are using some means of distribution other than SQL*Net, and if any of the nodes in the distribution has a different character set (as withIBM EBCDIC), be sure to convert the characters during the distribution. SQL*Net does this conversion automatically; you need to be concerned about this only if you are not yet using SQL*Net.
Example of NETFETCH
Suppose your network includes several personal computers that have client software, and two UNIX nodes, Tuna and Trout, that have Oracle Server software. Suppose further that you run Oracle Network Manager on one of the personal computers, but store the network definition in a database on the node called Tuna. All the clients share a single client profile, TCPCOM. The network is shown in Figure 6 - 6.
 Figure 6 - 6. Network with Network Definition Stored on a Database
The NETFETCH utility makes it easy to distribute the configuration files across the network. It enables you to go to the destination machines running Windows, or a file server for client machines, and pull the appropriate files into the desired directory.
Note: This utility is most useful for updating configuration files. Until the SQL*Net network is up and running, NETFETCH may not have the means to pull files across the network, although you can use a SQL*Net V1 connection if one is available. (If the network definition is saved to a file and you can access the file from the destination machine, you can use NETFETCH. If the network definition is saved to a database, however, the SQL*Net version 2 network must be up and running before you can use NETFETCH.)
A screen similar to that shown in Figure 6 - 7 appears.
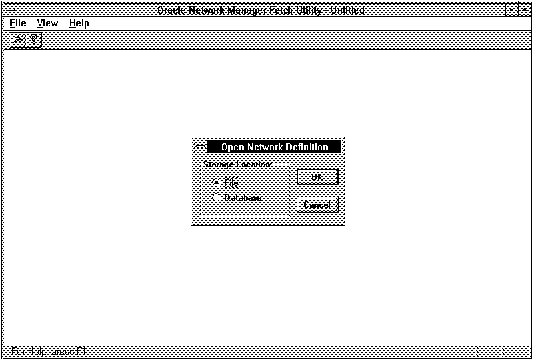 Figure 6 - 7. NETFETCH Window
When NETFETCH opens, it includes the usual window asking whether the network definition is stored in a file or a database. Depending on your response, other windows ask you to further describe the location of the network definition.
When NETFETCH has established the location of the network definition, it displays a window asking for the directory to which the configuration files should be exported. The window looks like that shown in Figure 6 - 8.
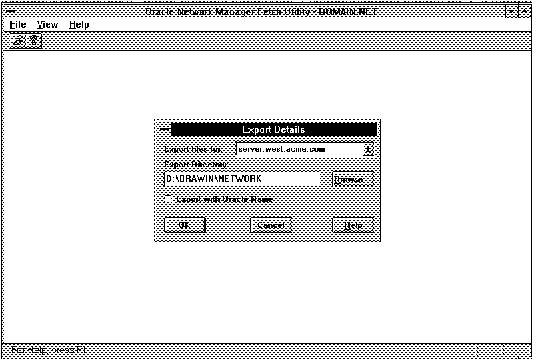 Figure 6 - 8. Export Window
Provide the following information in this window:
Destination Name
This list box contains all the directories of configuration files that could be created from this network definition. Select the directory of files you wish to export. For example, if you are on a node, select that node's directory. If you are on a machine that acts only as a client, select the appropriate client profile directory. For example, if you are on Tuna or Trout in the network described in Figure 6 - 6, you would select that name. If you were on one of the client machines, you would select TCPCOM.
Export Directory
Select the directory into which the files should be placed. By default, the export directory is the current working directory. If you want to export to a different directory, select the Browse button and choose from the list of directories available on this machine. Note that the export directory must already exist; the NETFETCH utility cannot create it.
Export with Oracle Names
Select this check box if the network includes Oracle Names. When you select this checkbox, a TNSNAMES file is not included among the exported files.
When you are satisfied with your responses, select OK to export the files to the chosen directory on the node. Otherwise, select Cancel to exit the NETFETCH utility.
To enable this capability , do the following:
Access the utility by entering its name on the command line in the same directory from which you would access Oracle Network Manager.
netfetch
This command calls NETFETCH.
netfetch.network_ name
Provide the name of the network definition. If the network definition is saved to a file system, include the full path and .net in its name. If it is stored on a database, do not include .net or a path.
netfetch.username
If the network definition is stored on a database, enter the username here.
netfetch.password
If the network definition is stored on a database, enter the password here.
netfetch.service
If the network definition is stored on a database, enter the service name here.
netfetch.node
If you are on a node, enter the fully qualified name of the node for which you want the files (for example, SPIRIT.WORLD).
netfetch.client_profile
If you are on a client, enter the fully qualified name of the client profile for which you want the files (for example, TCPCOM.WORLD).
Note: Include either the NETFETCH.NODE or the NETFETCH.CLIENT_PROFILE parameter; do not include both.
netfetch.export_dir
Enter the directory to which you wish the files to be placed on the local machine. You must select a directory that already exists. You do not need to put the full path to the directory; the relative path is acceptable. If you do not include this parameter, the default is the current working directory.
netfetch.tnsnames
Indicates whether to distribute TNSNAMES.ORA files. Values are ON or OFF. Default is ON, but select OFF if Oracle Names is part of the network.
Example of NETFETCH in Command-Line Mode
An example of using command-line mode for NETFETCH and its parameters follows:
netfetch netfetch.network_name=acmelan
   netfetch.username=scott netfetch.password=tiger
   netfetch.service=prod netfetch.node=spirit.world
|
Prev Next |
Copyright © 1996 Oracle Corporation. All Rights Reserved. |
Library |
Product |
Contents |
Index |