

Configuration
This chapter describes how to configure your network,
including:
Configuration Overview
Before a database server can receive connections
from clients, clients must be configured with well-known service names
and system identifiers (SIDs) that match the address and SID(s) preconfigured
in each server machine's LISTENER.ORA file. These addresses are used by
the client to connect to the listener during a connection. During a connection,
a client passes the SID of the server to which it wants to connect.
The LISTENER.ORA file identifies and controls
the behavior of the listeners that listen for the databases on the machine.
This file includes service names and addresses of all listeners on a machine,
the SIDs of the databases they listen for, and various control parameters
used by the Listener Control Utility.
Client configuration is accomplished by creating
a list of the service names and addresses of network destinations through
a TNSNAMES.ORA client configuration file or an Oracle Names Server. A client
(or a server that is part of a distributed database) needs this information
to tell it where it can make connections.
Configuration is based upon one of two models:
| Network Configuration
Model... |
Suitable For... |
Configuration Tool... |
| Local Naming (no Oracle Names Server) |
Networks where network addresses are mapped in
a TNSNAMES.ORA configuration file on each node. |
SQL*Net Easy Configuration
Oracle Network Manager |
| Oracle Names Server |
Networks where an Oracle Names Server
performs network address resolution. An Oracle Names Server stores client
configuration profiles in one location. |
A centralized, managed network with Oracle Names
with the Dynamic Discovery Option (DDO) does not require creating configuration
files. If you are using SQL*Net for the first time, and are willing to
accept all default parameters, with ANO, the only configuration file needed
is a LISTENER.ORA. If you are using Oracle Names without DDO, you must
configure using Oracle Network Manager. |
Choosing a configuration tool depends upon whether
or not your network uses Oracle Names.
SQL*Net Easy Configuration
SQL*Net Easy Configuration makes configuration quick
and simple by automatically creating configuration files needed by the
networking products. Use SQL*Net Easy Configuration if:
-
your network administrator has chosen SQL*Net Easy Configuration as your
workgroup's network standard
-
SQL*Net configuration for your environment is not done by a central administrator
(and you know your server name)
Oracle Network Manager
Oracle Network Manager includes a graphical user
interface that enables you to view the network in a:
-
hierarchical, or "tree view," structure so you can see the relationships
among the network services
-
map view that shows the network services as they relate to the user's actual
network
Oracle Network Manager enables you to configure more
complex features, such as Advanced Networking Option (ANO).
Simple and Complex Network Considerations
SQL*Net Easy Configuration is ideal for smaller networks,
while Oracle Network Manager is suitable for larger, more complex networks.
Consider your network layout when selecting a configuration tool. This
decision is important because once you select a tool and configure with
it, you cannot use the other tool.
Review the guidelines below before choosing either
SQL*Net Easy Configuration or Oracle Network Manager:
-
Oracle Corporation only supports configuration files created by using SQL*Net
Easy Configuration (for simple database connections) or Oracle Network
Manager (for advanced SQL*Net features, such as Oracle Names without DDO
and ANO).
-
Oracle Corporation strongly recommends that every machine in the workgroup
network be configured with one, and only one, of the configuration tools.
-
SQL*Net Easy Configuration and Oracle Network Manager are mutually exclusive
on any one machine.
Additionally, note which Oracle Protocol Adapters
can be configured with SQL*Net Easy Configuration or Oracle Network Manager:
| Oracle Protocol Adapter |
Can You Use SQL*Net Easy Configuration? |
Can You Use Oracle Network Manager? |
| TCP/IP |
yes |
yes |
| SPX |
yes |
yes |
| DECnet |
no |
yes |
| Named Pipes |
yes |
yes |
| NetBIOS |
yes |
yes |
| LU6.21 |
no |
yes |
| Bequeath |
yes |
no |
Configuring a Network Without Oracle Names
After you have installed the necessary Oracle network
products, use SQL*Net Easy Configuration or Oracle Network Manager to create
the TNSNAMES.ORA and regenerate the SQLNET.ORA configuration files.
This section describes how to use both products.
Using SQL*Net Easy Configuration
| Caution:
SQL*Net Easy Configuration is mainly implemented
by the Oracle Installer. Therefore, it cannot perform extensive error checking
on the data you enter. Ensure that you enter the correct data. |
SQL*Net Easy Configuration must be used on the server
and each of the clients to regenerate the SQLNET.ORA files and create the
TNSNAMES.ORA configuration files.
|
Note: If
you are not authorized to use the server, ask a server administrator to
help you.
|
To create the configuration files:
-
From the server or client machine, start SQL*Net Easy Configuration:
| On Windows 3.1 or Windows NT 3.51: |
Double-click the SQL*Net Easy Configuration icon
in the Oracle for Windows/Windows NT program group. |
| On Windows NT 4.0 or Windows 95: |
Choose Start>Programs>Oracle for Windows NT/Windows
95>SQL*Net Easy Configuration. |
The SQL*Net Easy Configuration dialog box
appears:
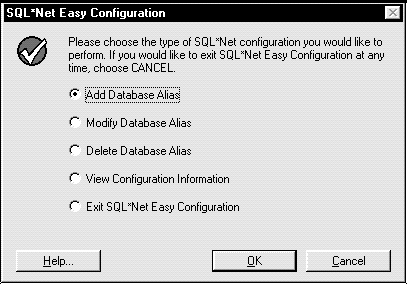
-
Select Add Database Alias and click OK.
The Choose Database Alias dialog box appears:
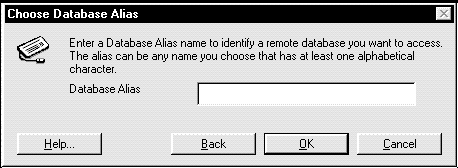
-
Enter a database alias name to identify the database to access and click
OK. The alias can be any name you choose.
The Choose Protocol dialog box appears
if more than one Oracle Protocol Adapter resides in your ORACLE_HOME
directory. Go to Step 4
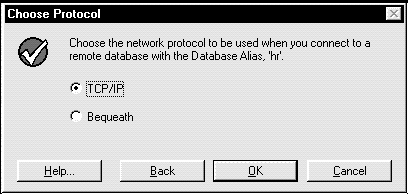 .
.
If you installed only one protocol adapter, the
dialog box appropriate for your protocol adapter appears, as shown in Step
4. Go to Step 5.
-
Select the protocol to use for your database alias name and click OK.
The dialog box appropriate for your protocol adapter
appears; in the example here, TCP/IP is assumed:
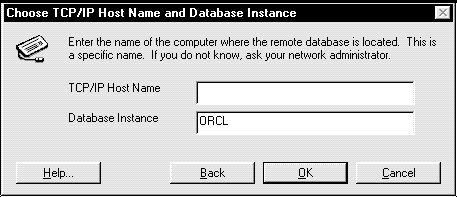
-
Enter the appropriate information for your chosen protocol adapter in the
first field and enter the name for the SID of the database to which you
want to connect in the Database Instance field. The database instance is
typically ORCL.
-
Click OK.
The Confirm Adding Database Alias dialog
box appears:

-
Click Yes to confirm.
The SQL*Net Easy Configuration dialog box
re-appears.
The configuration files are created in the ORACLE_HOME\NETWORK\ADMIN
directory.
|
Note: You
can add up to 15 new database aliases with SQL*Net Easy Configuration.
|
The table below describes the results of installing
SQL*Net Server and Client and adding a database alias with SQL*Net Easy
Configuration:
| Action |
Result |
| Install SQL*Net Server and SQL*Net Client |
SQLNET.ORA and LISTENER.ORA files are created
on the server, and SQLNET.ORA is created on the client. |
| Run SQL*Net Easy Configuration on the client |
SQLNET.ORA is regenerated and TNSNAMES.ORA is
created on the client.
If a previous TNSNAMES.ORA file was created, it
is moved to TNSNAMES.001. |
| Run SQL*Net Easy Configuration again on the client |
SQL*Net Easy Configuration creates a new TNSNAMES.ORA
file, and the older TNSNAMES.ORA is moved to TNSNAMES.OLD. |
-
Select Exit SQL*Net Easy Configuration and click OK.
-
Go to "Testing the Configuration on the Server"
in this chapter.
Using Other SQL*Net Easy Configuration Features
This section describes SQL*Net Easy Configuration's
other features that allow you to:
| Note:
If you modify or delete a database alias on a
server, you have to make the same edits on each of the client machines
to ensure the configuration files are consistent. |
Modify a Database Alias
-
From the server or client machine, start SQL*Net Easy Configuration:
| On Windows 3.1 or Windows NT 3.51: |
Double-click the SQL*Net Easy Configuration icon
in the Oracle for Windows/Windows NT program group. |
| On Windows NT 4.0 or Windows 95: |
Choose Start>Programs>Oracle for Windows NT/Windows
95>SQL*Net Easy Configuration |
The SQL*Net Easy Configuration dialog box
appears.
-
Select Modify Database Alias, and click OK.
The Modify Database Alias dialog box appears
with the list of database aliases (if any).
-
Select the database alias to modify, and click OK.
The Choose Protocol dialog box appears
if you installed more than one Oracle protocol adapter. If not, the
Enter Modification Information dialog box appears and you must
go to Step 5.
-
Select the protocol to use for your database alias name, and click OK.
The Enter Modification Information dialog
box appears.
-
Enter the database alias and other appropriate protocol-specific fields,
such as:
-
TCP/IP Host Name
-
SPX/IPX Service Name
-
Named Pipes Server Name
-
NetBIOS NTB Name
-
Bequeath Computer Name
-
Accept the database instance name or enter the SID of the database in the
Database Instance field, and click OK.
| Note:
If you used SQL*Net version 1 in the past, you
can use the same values for Service Name and Database Instance (SID). If
you do not know this information, ask the person who administers your network
or remote database. |
The Confirm Modifying Database Alias dialog
box appears.
-
Click Yes to modify the Database Alias.
The configuration files for your machine are modified
with your edits.
The SQL*Net Easy Configuration dialog box
re-appears.
-
Select Exit SQL*Net Easy Configuration and click OK to exit from SQL*Net
Easy Configuration.
Delete a Database Alias
-
From the server or client machine, start SQL*Net Easy Configuration:
| On Windows 3.1 or Windows NT 3.51: |
Double-click the SQL*Net Easy Configuration icon
in the Oracle for Windows/Windows NT program group. |
| On Windows NT 4.0 or Windows 95: |
Choose Start>Programs>Oracle for Windows NT/Windows
95>SQL*Net Easy Configuration |
-
Select Delete Database Alias from the SQL*Net Easy Configuration
dialog box, and click OK.
The Delete Database Alias dialog box appears
with the list of database aliases.
-
Select the Database Alias to delete, and click OK.
The Confirm Deleting Database Alias dialog
box appears with the configuration information for that Database Alias.
-
Select Yes to delete that Database Alias.
The database alias is deleted from the configuration
files for the machine you are on.
The SQL*Net Easy Configuration dialog box
re-appears.
-
Select Exit SQL*Net Easy Configuration and click OK to exit from SQL*Net
Easy Configuration.
View Configuration Information
-
From the server or client machine, start SQL*Net Easy Configuration:
| On Windows 3.1 or Windows NT 3.51: |
Double-click the SQL*Net Easy Configuration icon
in the Oracle for Windows (NT) program group. |
| On Windows NT 4.0 or Windows 95: |
Choose Start>Programs>Oracle for Windows NT/95>SQL*Net
Easy Configuration |
-
Select View Configuration Information from the SQL*Net Easy Configuration
dialog box, and click OK.
The Choose Database Alias dialog appears
with a list of databases.
-
Select the database alias to view, and click OK.
The Configuration Information dialog box
appears with the configuration data for that database alias.
-
View the information, and click OK.
The SQL*Net Easy Configuration dialog box
re-appears.
-
Select Exit SQL*Net Easy Configuration and click OK to exit from SQL*Net
Easy Configuration.
Using Oracle Network Manager
| Note:
Oracle Network Manager is a 16-bit application.
It is not available for installation from the Windows 95 or Windows NT
Oracle Installer. To install Oracle Network Manager on either Windows 95
or Windows NT, go to the \WINDOWS subdirectory of your CD-ROM disc, and
run ORAINST or SETUP. Then, select Custom Installation to install Oracle
Network Manager. |
This section describes how to use Oracle Network
Manager to create the network configuration files.
When using Oracle Network Manager, you:
-
Create a network definition.
-
Save the network definition to a file or database.
| Note:
If you want to copy the client files to a Windows
workstation, either comment out (REM)--or set the value of OFF--the AUTOMATIC_IPC=ON
statement in the SQLNET.ORA file. This prevents a client machine from trying
to make a connection through IPC first before trying to use the protocol
defined in the TNSNAMES.ORA file. |
-
Generate the network configuration files.
-
Distribute the network configuration files to the server and each of the
client machines.
Creating Configuration Files
A basic configuration for a TCP/IP network not using
Oracle Names is described below.
To use Oracle Network Manager:
-
Start Oracle Network Manager from the Oracle for Windows program group
or go to ORAWIN\BIN\NETMAN.EXE from File Manager.
The Oracle Network Manager appears with the Open
Network Definition dialog box.
-
Click Cancel.
-
Choose New from the File drop-down menu in the Oracle Network Manager menu
bar, or choose the New icon from the Command Tool Bar.
You are asked if you want to have a configuration
walk-through. If you click Yes, on-screen instructions appear on how to
use Oracle Network Manager.
If you click No, go to Step 4.
-
Choose the Community icon or choose Community from the Create menu to bring
up a property sheet for a new community. Use this property sheet to provide
information about the protocol (or network community) the clients and servers
share.
In the General page of the Community property
sheet:
-
a. Enter TCP for name of the community in the Name field.
-
b. Select the TCP/IP protocol from the Protocol drop-down list.
-
c. Click OK to close the property sheet.
TCP.world (the new community) is added to the Treeview.
-
Choose the Node icon or choose Node from the Create menu to bring up a
property sheet for a new node. Use this property sheet to provide information
about the node on which the Oracle server is installed.
In the Node property sheet:
-
a. Enter the name of your Windows NT server in the Name field. If you are
unsure of the name of your computer, go to the Control Panel and choose
the Network icon. It displays a Network dialog that displays the name of
your computer.
-
b. Select User Defined for the Windows NT operating system from the Type
drop-down list.
-
c. Choose the Communities tab, then choose the TCP.world community, and
click << Add to add it the Selected list.
-
d. Click OK to close the page and place the node on the Treeview community.
-
Choose the listener icon or choose Listener from the Create menu to bring
up a property sheet for a new listener. Use this property sheet to provide
information about the listener for the Oracle7 database.
In the Listener property sheet:
-
a. The default name LISTENER appears; you do not need to change it unless
there is more than one listener for the server. If there are multiple listeners
for a server, each listener must have a unique name.
-
b. If only one node has been defined, it appears in the Node field; you
do not need to change it.
-
c. If more than one has been defined, select the down arrow and select
the desired node from the drop-down list box that appears.
-
d. Select the Addresses tab and click Create. A Service Address property
sheet appears in which to define the protocol-specific address of the listener,
but do not make any changes, unless you want to change the host
to the IP address of the Windows NT machine or the port number from the
default.
-
e. Click OK to close the Service Address property sheet. A short form of
the new address displays on the Addresses page.
-
f. Click OK to exit the Listener property sheet.
-
Choose the Database icon or choose Database from the Create menu to bring
up a property sheet for an Oracle7 database.
In the Oracle Database property sheet:
-
a. Enter the name of the database you want to use in the Name field. This
is going to be your SQL*Net connect string. In most cases, you use your
SID name if you have multiple SIDs on your database, or your computer name
for systems that have one database name.
-
b. Enter the instance name of the database in the SID field. The default
database instance name is ORCL.
-
c. Click OK to exit from the Oracle Database property sheet.
-
Choose Validate from the File menu of the Oracle Network Manager window
to verify that the information you entered is consistent and complete.
-
Save the data you entered into a network definition file by selecting Save
from the File menu.
The Save Network Definition dialog box
displays the option to save the definition to the file system as a default
choice.
-
a. Click OK. The Save As dialog appears, prompting you for a file
name.
-
b. Enter any name (this example uses GEN) and click OK.
-
Choose Generate from the File menu or choose the Generate icon from the
Command Tool Bar to create the configuration files for your network.
-
a. From the Export Network Definition dialog box that appears, choose
File System. The Select a directory dialog box appears.
-
b. Select the ADMIN directory to save the network configuration files to
ORACLE_HOME\NETWORK\ADMIN and click OK.
The configuration files are created.
-
Choose Exit from the File menu.
Results of Oracle Network Manager
After creating the configuration files with Oracle
Network Manager, the ORACLE_HOME\NETWORK\ADMIN\GEN directory contains
two subdirectories:
-
TCP_WORL for the clients
-
host_name for the server
The following configuration files exist, where host_name
is the name of the Oracle7 database that you entered in Step 5.A:
| Server host_name contents |
TCP_WORL contents |
| SQLNET.ORA |
SQLNET.ORA |
| TNSNAMES.ORA |
TNSNAMES.ORA |
| TNSNAV.ORA |
TNSNAV.ORA |
| LISTENER.ORA |
|
Distributing Configuration Files
The generated server configuration files need to
be distributed to ORACLE_HOME\NETWORK\ADMIN on the server, and the
client configuration files need to distributed to ORACLE_HOME\NETWORK\ADMIN
on all clients.
See Chapter 6, "Distributing
the Configuration Files," in the Oracle
Network Manager Administrator's Guide for complete information
on the various distribution methods, including FTP and NETFETCH.
Configuring a Network With Oracle Names
SQL*Net requires minimal configuration (TCP/IP, SPX
and Named Pipes networks only) through Oracle Names. SQL*Net minimizes
configuration by having:
-
destination addresses retrieved from Oracle Names
-
Names Servers and listeners transparently listen on predefined TCP/IP ports
when initiated
Oracle Names Server configuration does not require
a TNSNAMES.ORA file on the clients. Additionally, if DDO is used, SQLNET.ORA
is not required on the clients.
| Additional Information:
See:
|
This section describes:
Choosing Whether to Use Oracle Names and the Dynamic Discovery Option
Oracle Names contains an option that provides dynamic
registration of servers with well-known Names Servers on the network and
automatic replication of data between Names Servers. If you use Oracle
Names to provide a naming service for your network, you must decide whether
to use DDO.
If you choose to use DDO in your network, you
do not have to use Oracle Network Manager to create configuration files.
If you are using SQL*Net for the first time, and are willing to accept
all default parameters with DDO, the only configuration file needed is
a LISTENER.ORA file. That file is created as part of the installation process.
DDO in Oracle Names Servers is not for every network.
There are several factors to consider before using DDO on your network.
| Yes, Use DDO |
No, Do Not Use DDO |
| If you are setting up a new network, using DDO
is a good choice. DDO enables all SQL*Net services on the network to self-register
with a well-known Names Server.
This feature eliminates the need for any preconfiguration
or maintenance for the network administrator. |
If you have multiple naming domains
in your network, or expect to grow to the point of needing multiple naming
domains, using DDO is not a good choice. DDO relies on the existence of
a flat naming space. While a flat naming space is convenient for small,
local installations, it is not suitable for large, enterprise-scale networks. |
| If you have a simple existing network that is
growing, DDO is a good choice. Administrative changes can be made in a
central location, and distributed to all the clients on the network. |
If you have a network that stays the same for
long periods of time, whether large or small, converting the network to
use DDO may not be worth the effort. Static networks, especially small
ones, are easy for an administrator to update or maintain manually. |
|
If you have networks currently using Native Naming
Adapters, carefully evaluate the steps involved in converting to an Oracle
Names environment. |
Configuration Steps
To configure an Oracle Names Server:
-
Ensure the listener is not running.
From the Control Panel window, double-click
Services.
The Services window appears.
-
Check the status of the listener OracleTNSListener. If the listener is
stopped (the status column is blank), go to the next step. If the status
is Started, stop the listener.
To stop the listener:
-
a. Select OracleTNSListener (the service name if you are using the default
listener name LISTENER) or OracleTNSListenerLSNR (where LSNR
is the non-default listener name), and click Stop.
OracleTNSListenerLSNR is only created if
the following command has been run:
LSNRCTL START listener_name
A message appears confirming that you want to stop
the listener.
-
b. Click Yes.
The listener is stopped. The status column is
blank.
-
Click Close to dismiss the Services window.
-
For all clients, ensure your network administrator has named the Oracle
Names Servers as well-known names, allowing clients to access the Oracle
Names Servers using the well-known name.
For example, for TCP/IP, Oracle Names Servers
may be made well-known by adding aliases oranamesrvr(0-4) to the Domain
Name Service (DNS) or
in the /ETC/HOSTS file.
The /ETC/HOSTS file may include the following
entries:
144.25.219.146 host0 oranamesrvr0
144.25.219.147 host1 oranamesrvr1
144.25.219.148 host1 oranamesrvr2
This implies you can have as few as one well-known
Oracle Names Server (whose alias would be oranamesrvr0) and as many as
five (with aliases oranamesrvr0 to oranamesrvr4)
The numbers 0 to 4 indicate the order in which
the client tries to contact the Oracle Names Servers, if more than one
exists in the network.
| The well-known host names for TCP connections |
The well-known computer Names for Named Pipes
connections1 |
The well-known service name for an SPX connection |
oranamesrvr0
oranamesrvr1
oranamesrvr2
oranamesrvr3
oranamesrvr4 |
ORANAMESRVR0
ORANAMESRVR1
ORANAMESRVR2
ORANAMESRVR3
ORANAMESRVR4 |
oranamesrvr |
-
Well-known Names Server names for Names Pipes must be in all uppercase.
|
If you are using DDO, go to Step 6. If you are not
using DDO, go to Step 5.
-
If you are not using DDO, use Oracle Network Manager to:
-
a. Create a network definition using Network Manager property sheets.
-
b. Generate network component configuration files using the GENERATE command
in Oracle Network Manager.
-
c. Distribute the configuration files to the appropriate nodes on the network.
| Additional Information:
These procedures are all described in detail in
the Oracle Network Manager Administrator's Guide. |
Go to Step 8.
-
On every client and the server, edit the SQLNET.ORA file with the NAMES.DIRECTORY_PATH
parameter so it includes ONAMES:
NAMES.DIRECTORY_PATH = (ONAMES, TNSNAMES)
-
On every client and server, ensure the following line is in the SQLNET.ORA
file:
AUTOMATIC_IPC = OFF
-
On the server, comment out all ADDRESSes (including IPC) that you are not
using in the LISTENER.ORA file. For example:
(ADDRESS_LIST =
# (ADDRESS=
# (PROTOCOL= IPC)
# (KEY= oracle.world)
# )
# (ADDRESS=
# (PROTOCOL= IPC)
# (KEY= ORCL)
# )
# (ADDRESS=
# (COMMUNITY= NMP.world)
# (PROTOCOL= NMP)
# (SERVER= hr-PC)
# (PIPE= ORAPIPE)
# )
(ADDRESS=
(COMMUNITY= TCP.world)
(PROTOCOL= TCP)
(Port= 1521)
)
(ADDRESS=
(COMMUNITY= TCP.world)
(PROTOCOL= TCP)
(Port= 1526)
)
)
-
On the server, add the GLOBAL_DBNAME parameter for each database instance
and USE_PLUG_AND_PLAY_listener_name (for DDO) parameters to the
LISTENER.ORA file:
SID_LIST_listener_name=
(SID_LIST =
(SID_DESC =
(SID_NAME = SID)
(GLOBAL_DBNAME = global_dbname.domain)
)
)
USE_PLUG_AND_PLAY_listener_name = ON
| GLOBAL_DBNAME |
This is the name with which the listener registers
the database instance with an Oracle Names Server and the name by which
the Oracle Names Server identifies a database.
When clients request the connect information for
a database from an Oracle Names Server, this is the alias they use.
The domain is defined in the SQLNET.ORA
file by the NAMES.DEFAULT_DOMAIN parameter. The default is set to WORLD. |
| USE_PLUG_AND_PLAY |
Instructs the listener to find and register with
a well-known Oracle Names Server.
When the listener starts, it looks for hosts with
the well-known host names, tries to gather connection information from
the Oracle Names Server, and registers its SID(s) with it. |
-
Create and start the OracleNamesService by using the Names Control Utility,
NAMESCTL. On the Oracle Names Server, enter:
C:\>NAMESCTL
NAMESCTL>START
The OracleNamesService is created and configuration
is complete.
-
Go to the section, "Testing the Configuration
on the Server".
Using DDO with SQL*Net Version 2.2 Clients
DDO is a SQL*Net version 2.3 and above feature. If
you want to use DDO in a network with SQL*Net version 2.2 and SQL*Net version
2.3 or above clients, you must add the following NAMES.PREFERRED_SERVERS
parameter to the SQLNET.ORA file.
SQL*Net version 2.2 clients cannot automatically
find well-known Oracle Names Servers, while SQL*Net version 2.3 can. Adding
the NAMES.PREFERRED_SERVERS parameter to the SQLNET.ORA file provides directions
to the Oracle Names Servers for SQL*Net version 2.2 clients.
The entry in the SQLNET.ORA looks like:
NAMES.PREFERRED_SERVERS=
(address_list =
(address =
(protocol = tcp)
(host=oranamesrvr0)
(port = 1575)
)
)
Testing the Configuration on the Server
Once you have configured the network, test the configuration
by performing a loopback test on the server.
This section covers the following:
These instructions are valid for a network with or
without an Oracle Names Server.
Step 1: Set Up for a Loopback Test
In order to perform a loopback test, the following
must be performed prior to performing a loopback test:
Step 1a: Start Oracle Names
To start Oracle Names:
| Using the Command Line Utility NAMESCTL |
Using the Windows NT Control Panel |
-
Verify whether the Oracle Names Server is running or not running.
From the command line, enter:
C:\>NAMESCTL.
NAMESCTL> STATUS
If the STATUS command indicates the Oracle Names
Server is running, go to Step 3. If the Oracle Names Server is not running,
go to Step 2.
-
Start the Oracle Names Server. Enter:
NAMESCTL>START
-
Exit from the NAMESCTL utility. Enter:
NAMESCTL>EXIT
|
-
From the Control Panel window, double-click Services.
The Services window appears. Look for the
OracleNamesService. A blank in the Status column indicates that the service
is not running. If the service is already running, close the window and
go to the section "Step 1b: Start the Listener".
-
Select the service and click Start.
The service starts.
-
In the Services window, click Close.
|
Step 1b: Start the Listener
For SQL*Net to accept connections on the server,
a listener must be started. If you have started an Oracle Names Server,
the listener upon startup automatically registers the databases specified
in the SID_LIST_listener_name section of the LISTENER.ORA file with
the well-know Oracle Names Servers.
To start the listener:
| Using the Command Line Utility LSNRCTL |
Using the Windows NT Control Panel |
-
Verify whether the listener is running or not running.
From the command line enter:
C:\>LSNRCTL.
LSNRCTL> STATUS listener_name
where listener_name is the name of the
listener defined in the LISTENER.ORA file with the alias LISTENER. It is
not necessary to identify the listener if you are using the default listener,
named LISTENER.
If the STATUS command indicates the listener is
running, go to Step 2. If the listener is not running, go to Step 3.
-
Even if the listener is running, Oracle Corporation advises you to stop
the listener, and start it again. To stop the listener, enter:
LSNRCTL>SET PASSWORD password
LSNRCTL>STOP listener_name
SET PASSWORD is only required if the password
is set in the LISTENER.ORA file. The password defaults to ORACLE.
-
Start the listener. Enter:
LSNRCTL>START listener_name
OracleTNSListenerLSNR is created if this
command is run for the first time for the first time for a non-default
listener name.
-
Exit from the LSNRCTL utility. Enter:
LSNRCTL>EXIT
|
-
From the Control Panel window, double-click Services.
The Services window appears. Look for OracleTNSListener
(the service name if you are using the default listener name LISTENER)
or OracleTNSListenerLSNR (where LSNR is the non-default listener
name). OracleTNSListenerLSNR is only created if the following command
has been run:
LSNRCTL START listener_name
A blank in the Status column indicates that the
service is not running. If the service is already running, close the window
and go to the section "Step 2: Perform a Loopback
Test on the Server".
-
Select the service and click Start.
The service starts.
-
In the Services window, click Close.
|
Step 2: Perform a Loopback Test on the Server
Once your network is configured and a SQL*Net network
listener is started on an Oracle7 database, clients connect to the Oracle7
database using a SQL*Net service name (or database alias). The service
name is mapped to the connect descriptor. Connect descriptors define protocol
adapter information for the destination server's address and the SID for
the destination server.
This section show how to execute:
A loopback uses SQL*Net to go from the server right
back to itself. Performing a successful loopback verifies that SQL*Net
works on the server.
| Note:
In order to perform the loopback, ensure that
the AUTOMATIC_IPC parameter is set to off (AUTOMATIC_IPC=OFF) in the SQLNET.ORA
file to turn off Interprocess Communication (IPC). If it is left on, the
loopback is performed through IPC instead of the connection going out of
the network card with the protocol adapter, which defeats the purpose of
the loopback test. |
Loopback with Server Manager
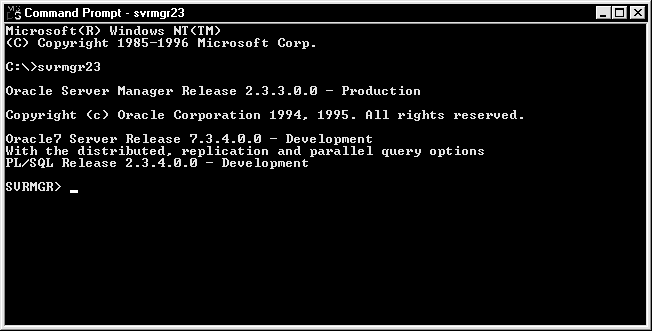
To execute a loopback using Server Manager:
-
Start Server Manager. Enter:
C:\>SVRMGR23
The SVRMGR> prompt appears:
-
Connect to the database. Enter:
SVRMGR>CONNECT SYSTEM/MANAGER@service_name
or
SVRMGR>CONNECT SYSTEM/MANAGER@global_dbname
The service_name is the database alias you
defined earlier with SQL*Net Easy Configuration or Oracle Network Manager
and the global_dbname is the global database name you defined in
the LISTENER.ORA file for the Oracle Names Server.
Server Manager returns the following message:
Connected
You probably do not have to use the full service
name. There are two parameters in the SQLNET.ORA file that, if set, automatically
add domains to any connect string you use. These parameters are NAMES.DEFAULT_DOMAIN
and NAME.DEFAULT_ZONE.
For example, if your service name in the TNSNAMES.ORA
file reads ORACLE.WORLD and the two .DEFAULT parameters are set to WORLD
in the SQLNET.ORA file, the command to do a loopback is:
SVRMGR> CONNECT SYSTEM/MANAGER@oracle
The two parameters in SQLNET.ORA add a .WORLD extension
to ORACLE, which matches the ORACLE.WORLD defined in the TNSNAMES.ORA file.
-
Issue SQL commands.
-
When done, enter:
SVRMGR>EXIT
Exiting Server Manager closes the database connection.
-
Go to the section, "Testing the Configuration
on the Client".
Loopback with SQL*Plus
To execute a loopback using SQL*Plus :
-
Start the SQL*Plus application:
| On Windows 3.1 or Windows NT 3.51: |
Double-click the SQL Plus 3.3 icon in the Oracle
for Windows/Windows NT program group. |
| On Windows NT 4.0 or Windows 95: |
Choose Start>Programs>Oracle for Windows NT/Windows
95>SQL*Plus 3.3. |
-
If you are on Windows NT 3.51, double-click the SQL Plus 3.3 icon.
-
If you are on Windows NT 4.0 or Windows 95, select the Programs folder
from the Start icon in the Taskbar, then select the Oracle folder, and
choose SQL Plus 3.3.
The Log On dialog box appears:
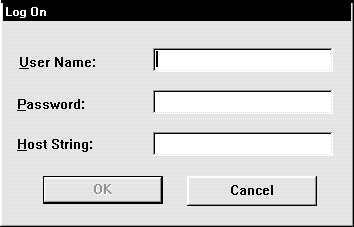
-
Enter SYSTEM in the User Name field, MANAGER in the Password field, and
the database alias (from the TNSNAMES.ORA file) or the global database
name for the Oracle Names Server (from the LISTENER.ORA file) in the Host
String field.
-
Click OK.
The Oracle SQL*Plus window appears with a SQL>
prompt.
-
Issue SQL commands.
-
When done, enter:
SQL>EXIT
Exiting SQL*Plus closes the database connection.
-
Go to the next section, "Testing the Configuration
on the Client".
Testing the Configuration on the Client
After performing a loopback test, follow the procedures
in this section:
Step 1: Verify TCP/IP Network Connections
If you are using TCP/IP, follow the instructions
below to specify the destination address for TCP/IP and use PING to see
if the server is running.
Most TCP/IP transports attempt to use the Domain
Name Service (DNS). DNS is a mechanism used to translate the host name
specified in the TNSNAMES.ORA file into the host internet address (IP).
If a DNS is present on your network and the TCP/IP vendor supports DNS,
the host name is successfully translated to the host address. The host
IP address can be determined by using the Control Panel's Network utility
to access DNS information.
Depending on your vendor, workstation configuration,
and network configuration, your TCP/IP software can also use a HOSTS file
to map host names to Internet addresses if DNS is not detected or supported.
If DNS and the HOSTS file are unable to resolve
the host name during a remote database connection, the following error
message appears:
ORA-12545: TNS: name lookup failure
If your network administrator cannot resolve the
problem, the solution to this error message is go around DNS and the HOSTS
file by modifying the (HOST = server_name) section of the TNSNAMES.ORA
so server_name is changed to the IP address of the server.
The following sections explain how to determine
the server's IP address and verify that DNS and the HOSTS file are working
correctly.
Determine the Server's IP Address
If you are not using TCP/IP, go to "Step
2: Verify Oracle Database Connections Using TNSPING" in this chapter.
The instructions below explain how to determine
the IP address from Windows NT 4.0. The instructions are different on Windows
NT 3.51. Please see your operating system documentation for specific DNS
information.
To determine the server's TCP/IP internet address:
|
Note: If
you are not authorized for access on the server, ask your server administrator
for assistance.
|
-
From the Control Panel window, double-click Network.
The Network window appears.
-
Choose the Protocols tab.
The Protocols view appears:
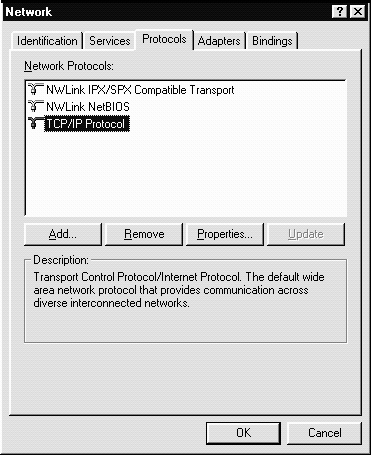
-
From the Protocol view, select the TCP/IP Protocol adapter and click
Properties.
The Microsoft TCP/IP Properties dialog
box appears with the IP Address view:
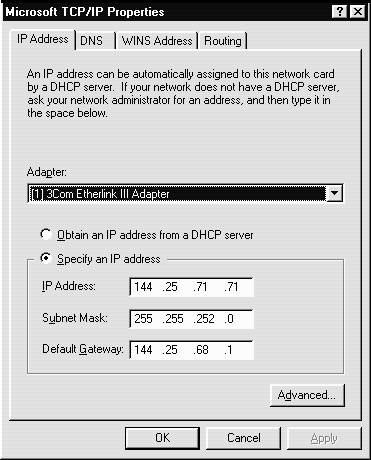
-
Obtain the IP address and click Cancel to close the Microsoft TCP/IP
Properties dialog box.
-
Click Cancel to close the Network window.
-
Go to the next section, "Use PING."
Use PING
If you are using TCP/IP, PING allows you to determine
if DNS or the HOSTS file are correctly set up and your network operating
system is functioning correctly.
To use PING:
-
From the client, enter:
C:\>PING server_name
where server_name is the host name, alias,
or Internet address of the server to which you are trying to connect. If
your network is functioning correctly, the following message appears:
Reply from server_name: bytes=nn time=nnms
If there is a problem, this message appears:
Request timed out
Or:
Reply from server_name: Destination host unreachable
The following is a partial list of reasons why a
host is inaccessible:
-
the server is not accessible through the network
-
the remote host is not online
-
the domain name server is not functioning
-
a domain name server is not accessible through the network
-
the server name does not exist in the HOSTS file
If PING returns an error message, ask your network
administrator to help you resolve the problem. If the problem is not resolved,
and you attempt to make a SQL*Net connection, you may receive one of the
following error messages:
-
ORA-12203: TNS: unable to connect to destination
-
ORA-12535: TNS: Failure to redirect to destination
-
ORA-12541: TNS: no listener
-
Go to the next section, "Step 2: Verify Oracle
Database Connections Using TNSPING."
Step 2: Verify Oracle Database Connections Using TNSPING
Use the TNSPING utility to determine whether or not
you can reach the listener service. TNSPING, however, never actually connects
with the listener. A socket is never created and opened. TNSPING just checks
to make sure a listener is running on the server side.
When you connect to a listener using TNSPING,
an estimate of the round trip time in milliseconds appears. If TNSPING
fails, a network error message appears without the overhead of a database
connection.
To use TNSPING:
From the client, enter:
TNSPING service_name count
where service_name is the database alias (or
service name) and count is the number of times the program attempts
to reach the server. count is optional.
The output looks like:
TNS Ping Utility for 32-bit Windows: Version 3.0.2.0.0 - Production on 12-DEC-
96 20:20:33
Copyright, 1996(c) Oracle Corporation 1995. All rights reserved.
Attempting to contact
(ADDRESS=(COMMUNITY=tcp.world)(PROTOCOL=TCP)(Host=host_name)(Port=1521))
OK (60 msec)
Closing a Database Connection
Closing a database connection involves:
Step 1: Stop Oracle Names
Stop the Oracle Names Server (if you are using it)
when you have completed database connections:
| Using the Command Line Utility NAMESCTL |
Using the Windows NT Control Panel |
-
Verify whether the Oracle Names Server is running or not running.
From the command line, enter:
C:\>NAMESCTL
NAMESCTL> STOP
-
Exit from the NAMESCTL utility. Enter:
NAMESCTL>EXIT
|
-
From the Control Panel window, double-click Services.
The Services window appears. Look for the
OracleNamesService.
-
Select the service, and click Stop.
The Services confirmation dialog box appears,
prompting you if it is OK to stop the service.
-
Click Yes to acknowledge the message, and click Close to exit the Services
window.
|
Step 2: Stop the Listener
Stop the listener when all database connections have
completed and the Oracle Names Server has been stopped:
|
Note: The
listener can be left running on the server, if you choose.
|
|
Note: If
you are not authorized for access on the server, ask your server administrator
for assistance.
|
To stop the listener:
| Using the Command Line Utility LSNRCTL |
Using the Windows NT Control Panel |
-
Verify whether the listener is running or not running.
From the command line, enter:
C:\>LSNRCTL.
LSNRCTL>SET PASSWORD password
LSNRCTL>STOP listener_name
where listener_name is the name of the
listener defined in the LISTENER.ORA file. It is not necessary to define
the listener if you are using the default listener name, LISTENER.
SET PASSWORD is only required if the password
is set in the LISTENER.ORA file. The password defaults to ORACLE.
-
Exit from the LSNRCTL utility. Enter:
LSNRCTL>EXIT
|
-
From the Control Panel window, double-click Services.
The Services window appears. Look for OracleTNSListener
(the service name if the listener name is the default LISTENER) or OracleTNSListenerLSNR
(where LSNR is the non-default listener name). OracleTNSListenerLSNR
is only created if the following command has been run:
LSNRCTL START listener_name
-
Select the service, and click Stop.
The Services confirmation dialog box appears,
prompting you if it is OK to stop the service.
-
Click Yes to confirm the message, and click Close to exit the Services
window.
|