

Database Connection Tasks
This chapter describes how to connect to a database,
including:
Connecting to a Database from a Client Machine
Client workstations and other servers connect to
a server's network listener with a service name when logging onto an Oracle7
database. The appropriate Oracle Protocol Adapter is used automatically
when the database alias (or service name) used to request a connection
specifies that protocol in the configuration file.
This section describes:
Step 1: Start Server Services
The following must be performed prior to connecting
to a database from a client machine:
Step 1a: Start Oracle Names
To start Oracle Names:
| Using the Command Line Utility NAMESCTL |
Using the Windows NT Control Panel |
-
Verify whether the Oracle Names Server is running or not running.
From the command line, enter:
C:\>NAMESCTL
NAMESCTL> STATUS.
If the STATUS command indicates the Oracle Names
Server is running, go to Step 3. If the Oracle Names Server is not running,
go to Step 2.
-
Start the Oracle Names Server. Enter:
NAMESCTL>START
-
Exit from the NAMESCTL utility. Enter:
NAMESCTL>EXIT
|
-
From the Control Panel window, double-click Services.
The Services window appears. Look for the
OracleNamesService. A blank in the Status column indicates that the service
is not running. If the service is already running, close the window and
go to the section "Step 1b: Start the Listener".
-
Select the service and choose Start.
The service starts.
-
In the Services window, choose the Close button.
|
Step 1b: Start the Listener
For SQL*Net to accept connections on the server,
a listener must be started. If you have started an Oracle Names Server,
the listener upon startup automatically registers the databases specified
in the SID_LIST_listener_name section of the LISTENER.ORA file with
the well-known Oracle Names Servers.
To start the listener:
| Using the Command Line Utility LSNRCTL |
Using the Windows NT Control Panel |
-
Verify whether the listener is running or not running.
From the command line enter:
C:\>LSNRCTL.
LSNRCTL> STATUS listener_name
where listener_name is the name of the
listener defined in the LISTENER.ORA file with the alias LISTENER. It is
not necessary to identify the listener if you are using the default listener,
named LISTENER.
If the STATUS command indicates the listener is
running, go to Step 2. If the listener is not running, go to Step 3.
-
Even if the listener is running, Oracle Corporation advises you to stop
the listener, and start it again. To stop the listener, enter:
LSNRCTL>SET PASSWORD password
LSNRCTL>STOP listener_name
SET PASSWORD is only required if the password
is set in the LISTENER.ORA file. The password defaults to ORACLE.
-
Start the listener. Enter:
LSNRCTL>START listener_name
OracleTNSListenerLSNR is created if this
command is run for the first time for a non-default listener name.
-
Exit from the LSNRCTL utility. Enter:
LSNRCTL>EXIT
|
-
From the Control Panel window, double-click Services.
The Services window appears.Look for OracleTNSListener
(the service name if the listener name is the default LISTENER) or OracleTNSListenerLSNR
(where LSNR is the non-default listener name). OracleTNSListenerLSNR
is only created if the following command has been run:
LSNRCTL START listener_name
A blank in the Status column indicates that the
service is not running. If the service is already running, close the dialog
box and go to the section "Step 2: Connect to
a Database".
-
Select the service and choose Start.
The service starts.
-
In the Services window, choose the Close button.
|
Step 2: Connect to a Database
Database connections can be tested in one of two
ways:
Use Server Manager
To connect to a database using Server Manager:
-
Choose the Server Manager icon (if you are on Windows 3.1x) or enter
the following for other operating systems:
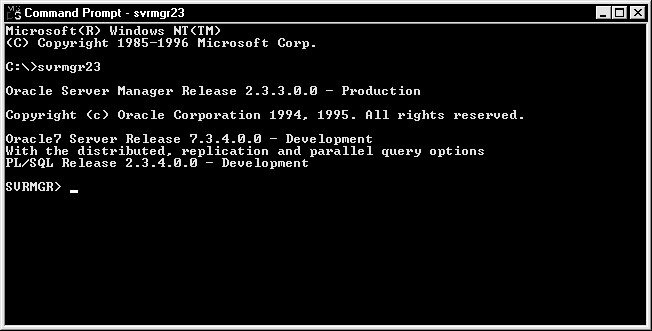
C:\>SVRMGR23
The SVRMGR> prompt appears:
-
Connect to the database. Enter:
SVRMGR>CONNECT SYSTEM/MANAGER@service_name
or
SVRMGR>CONNECT SYSTEM/MANAGER@global_dbname
The service_name is the database alias you
defined earlier and the global_dbname is the global database name
you defined in the LISTENER.ORA file for the Oracle Names Server.
Sever Manager returns a Connected message to the
screen.
-
Issue SQL commands.
-
When done, enter:
SVRMGR>EXIT
Exiting Server Manager closes the database connection.
Use SQL*Plus
To connect to a remote database using SQL*Plus:
-
Start the SQL*Plus application:
| On Windows 3.1 or Windows NT 3.51: |
Double-click the SQL Plus 3.3 icon in the Oracle
for Windows NT/Windows 95 program group. |
| On Windows NT 4.0 or Windows 95: |
Choose Start>Programs>Oracle for Windows
NT/Windows 95>SQL*Plus 3.3. |
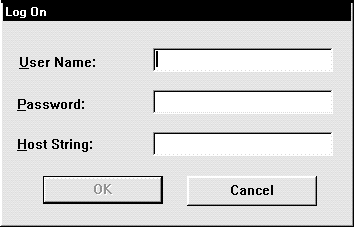
The Log On dialog box appears.
-
Enter SYSTEM in the User Name field, MANAGER in the Password field, and
the database alias (from the TNSNAMES.ORA file) or the global database
name for the Oracle Names Server (from the LISTENER.ORA file) in the Host
String field.
-
Choose OK.
The Oracle SQL*Plus window appears with a SQL>
prompt.
-
Issue SQL commands.
-
When done, enter:
SQL>EXIT
Exiting SQL*Plus closes the database connection.
Step 3: Close a Database Connection
Closing a database connection involves:
Step 3a: Stop Oracle Names
Stop the Oracle Names Server (if you are using it)
when you have completed database connections:
| Using the Command Line Utility NAMESCTL |
Using the Windows NT Control Panel |
-
Verify whether the Oracle Names Server is running or not running.
From the command line, enter:
C:\>NAMESCTL
NAMESCTL> STOP
-
Exit from the NAMESCTL utility. Enter:
NAMESCTL>EXIT
|
-
From the Control Panel window, double-click Services.
The Services window appears. Look for the
OracleNamesService.
-
Select the service and choose Stop.
The Services confirmation dialog box appears,
prompting you if it is OK to stop the service.
-
Choose Yes to acknowledge the message, and choose Close to exit the Services
window.
|
Step 3b: Stop the Listener
Stop the listener when all database connections have
completed and the Oracle Names Server has been stopped.
| Note: The listener
can be left running on the server, if you choose. |
| Note: If you
are not authorized for access on the server, ask your server administrator
for assistance. |
To stop the listener:
| Using the Command Line Utility LSNRCTL |
Using the Windows NT Control Panel |
-
Verify whether the listener is running or not running.
From the command line, enter:
C:\>LSNRCTL.
LSNRCTL>SET PASSWORD password
LSNRCTL>STOP listener_name
where listener_name is the name of the
listener defined in the LISTENER.ORA file. It is not necessary to define
the listener if you are using the default listener name, LISTENER.
SET PASSWORD is only required if the password
is set in the LISTENER.ORA file. The password defaults to ORACLE.
-
Exit from the LSNRCTL utility. Enter:
LSNRCTL>EXIT
|
-
From the Control Panel window, double-click Services.
The Services window appears. Look for OracleTNSListener
(the service name if you are using the default listener name LISTENER)
or OracleTNSListenerLSNR (where LSNR is the non-default listener
name). OracleTNSListenerLSNR is only created if the following command
has been run:
LSNRCTL START listener_name
-
Select the service, and click Stop.
The Services confirmation dialog box appears,
prompting you if it is OK to stop the service.
-
Click Yes to confirm the message, and click Close to exit the Services
window.
|
Connecting from Windows on Windows NT and Windows 95
This section describes connecting to a database from
a 32-bit Windows NT and Windows 95 machine running 16-bit Windows tools.
Windows 16-bit applications are unable to communicate
with a 32-bit environment because the 16-bit applications are expecting
to find a real Windows environment with the AUTOEXEC.BAT, WIN.INI, and
ORACLE.INI files (rather than the registry), even though the applications
are running on a 32-bit system.
For example, unlike the 32-bit SQL*Plus application,
which is able to communicate to the local Oracle7 database through the
native 32-bit internal process communication of the 32-bit operating system,
the 16-bit SQL*Plus application requires SQL*Net to break through the "imaginary
wall" created when running in 16-bit emulation mode.
Resolving this problem depends upon if you want
to connect to a remote or local database.
Connecting to a Remote Database
For a 16-bit client application on a 32-bit machine
to connect to a remote database, install 16-bit SQL*Net on your client
in addition to an existing 32-bit SQL*Net on the server:
Figure 5-1 16-Bit Application Connections From 32-Bit Machines
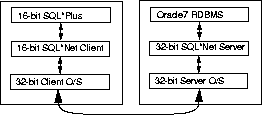
The 16-bit client applications can use the TNSNAMES.ORA
and SQLNET.ORA files from the 32-bit ORANT\NETWORK\ADMIN directory as long
as the TNS_ADMIN parameter is defined in the ORACLE.INI file and is set
to this directory path. The default location of 16-bit configuration files
is ORAWIN\NETWORK\ADMIN.
Connecting to a Local Database
For a 16-bit application to connect to a local database,
the TCP/IP Protocol Adapter, Named Pipes Protocol Adapter, or Bequeath
Protocol Adapter can be used. You must install 16-bit SQL*Net Client software
in addition to 32-bit SQL*Net Server software.
The Bequeath Protocol Adapter, which is automatically
installed with the Oracle7 database products, does not use a listener.
Connecting with the NDS Native Naming Adapter
| Note:
To connect from a client using the NDS Native
Naming Adapter, the server must be running the NetWare operating system. |
The NDS Native Naming Adapter for Windows, Windows
NT, and Windows 95 clients uses the NDS naming environment to store service
names and addresses of Oracle7 NetWare Servers. This lets an NDS user view
the entire network under a single NDS directory tree. You can use native
name services in addition to or instead of Oracle Names or the TNSNAMES.ORA
file.
If the NDS Authentication Adapter is also used,
a single log on can access a multi-server and multi-database network.
| Additional Information:
See:
|
To connect from a client with the NDS Native Naming
Adapter:
-
Install and configure the NDS Native Naming Adapter and SQL*Net on your
client.
-
When you configure the NDS Native Naming Adapter, add NOVELL to the NAMES.DIRECTORY_PATH
parameter in the SQLNET.ORA file:
NAMES.DIRECTORY_PATH = (NOVELL, TNSNAMES, ONAMES)
-
Install and configure SQL*Net 2.3.4 for NetWare on your server.
-
Log into the NDS tree.
-
Open SQL*Plus on your client.
-
Enter the following command to access an Oracle7 database for NetWare database:
CONNECT USERNAME/PASSWORD@database_object_name
where database_object_name identifies the
Oracle7 database in NDS.
Connecting with Authentication Adapters
SQL*Net has two authentication adapters that allow
you to access a server and Oracle7 database with a single log on:
Windows NT Authentication Adapter
The Windows NT Authentication Adapter allows clients
connecting to an Oracle7 database on a Windows NT server to be authenticated
at the operating system level. The database maps Windows NT user accounts
to Oracle database accounts. By default, the authentication adapter does
not perform any additional checks once it obtains the operating system
user name. This allows a user logged into a Windows NT server to be automatically
authenticated to use that server's Oracle7 database without entering an
additional user name and password.
| Note:
This type of operating system authentication only
works with Windows NT, Windows 95, and Windows for Workgroups 3.11 clients.
When using NT 3.51, you must have Service
Pack 5 installed in order for OS authentication to work. |
| Note:
The operating system user name that is seen by
the database is not prefixed with the Windows NT domain name for domain
users by default. If qualification of all domain user accounts in the database
with their Windows NT domain name is necessary, the Registry entry HKEY_LOCAL_MACHINE\SOFTWARE\ORACLE\OSAUTH_PREFIX_DOMAIN
can be set to TRUE. |
To connect with the Windows NT Authentication Adapter:
-
Install and configure SQL*Net version 2.3.4 on clients and servers.
The Windows NT Authentication Adapter is automatically
installed on both the clients and server.
-
For both clients and server, add the following entry to the SQLNET.ORA
file:
SQLNET.AUTHENTICATIONS_SERVICES = (NTS)
-
Configure the clients to log in to the Windows NT domain to which that
Windows NT server belongs or to a Windows NT domain that trusts the domain.
If qualification of all domain users accounts
with their Windows NT domain name is necessary, go to Step 4. Otherwise,
go to Step 5.
-
Set the NT registry variable HKEY_LOCAL_MACHINE\SOFTWARE\ORACLE\OSAUTH_ENFORCE_
STRICT to TRUE on the server to enforce the adapter to verify the operating
system's user account's membership to one of the following Windows NT local
groups:
-
ORA_SID_USER
-
ORA_SID_DBA
-
ORA_SID_OPER
-
ORA_USER
-
ORA_DBA
-
ORA_OPER
-
Create a special Oracle7 database account for the database you want to
access on the machine where the Oracle7 database is installed. Do not
create an operating system account. This Oracle7 database account specifies
the user name required when you perform a Windows for Workgroups 3.11 log
on.
-
a. Open SQL*Plus on your server.
-
b. Enter:
SQL>CONNECT SYSTEM/MANAGER;
SQL>CREATE USER "OPS$[DOMAIN]\USERNAME" IDENTIFIED EXTERNALLY;
if the registry entry HKEY_LOCAL_MACHINE\SOFTWARE\ORACLE
\OSAUTH_PREFIX_DOMAIN is set to TRUE, or:
SQL>CREATE USER "OPS$USERNAME" IDENTIFIED EXTERNALLY;
-
Grant the privileges to this user account.
SQL>GRANT role to "OPS$[DOMAIN]\USERNAME";
SQL>GRANT CONNECT to "OPS$[DOMAIN]\USERNAME";
-
Establish a networking session between your client and Windows NT server.
-
If clients and server are in the same domain or in trusted domains, then
operating system names retrieved on the server always work.
-
If clients and server are in unrelated domains, then the adapter may not
be able to retrieve the user name dependency on user ID. In this case,
user accounts and passwords must match on both server and clients. If a
pre-existing connection exists between clients and server, the operating
system user name retrieved by the adapter is the user name of the pre-existing
session, allowing for a connection.
-
Open SQL*Plus on your client.
-
Enter the following command to access an Oracle7 database for Windows NT
database:
CONNECT /@service_name
where service_name identifies the database
alias.
NDS Authentication Adapter
| Note: To connect
from a client using the NDS Authentication Adapter, the server must be
running the NetWare operating system. |
The NDS Authentication Adapter allows client applications
and users to access a NetWare server running Oracle using NDS. A user logged
into an NDS directory tree can be automatically authenticated to use an
Oracle7 database on a NetWare server in the same NDS directory tree. This
lets a user access an Oracle7 database on NetWare without entering an additional
username and password.
If the NDS Naming Adapter is also used, an NDS
user can view the entire network under a single NDS directory tree.
| Additional Information:
See:
-
"Non-NT Authentication Servers" in this chapter
for more information about ANO NDS Native Naming Adapter
-
Novell NetWare documentation for more information about NDS
-
Oracle7 Server Getting Started for NetWare
-
Oracle7 Workgroup Server Getting Started for NetWare
|
To connect with the NDS Authentication Adapter:
-
Install and configure SQL*Net version 2.3.4 on client and server.
-
For both clients and server, add the following entry to the SQLNET.ORA
file:
SQLNET.AUTHENTICATIONS_SERVICES = (NDS)
-
Log into the NDS tree.
-
Open SQL*Plus on your client.
-
Enter the following command to access an Oracle7 database for NetWare database:
CONNECT /@service_name
where service_name identifies the database
alias.
Non-NT Authentication Servers
Oracle does not support any native authentication
when connecting from an Oracle7 database to a UNIX authentication server.
On the Windows NT machine where the Oracle7 database is located, modify
the TNSNAMES.ORA file to include the following:
...
(CONNECT_DATA =
(SID = <SID>))
(SECURITY=(AUTHENTICATION_SERVICES=NONE)
...
| Note:
If you want a secure connection, you can still
use ANO's Kerberos, CyberSAFE, or SecurID Authentication Adapter. If you
use one of these adapters, do not add this line. |
Understanding Windows 3.1x Connection Issues
When using SQL*Net for Windows, be aware of the following
issues:
-
If you type anything on your workstation keyboard during a SQL*Net for
Windows 3.1x command that accesses the database, SQL*Net does not
store all the characters you type, which may cause an error. Wait until
each SQL*Net command is fully executed before you resume typing.
-
If using the Oracle LU6.2 Protocol Adapter, non-blocking queries are not
fully supported. For example, using SQL*Plus, you can cancel:
SELECT * FROM EMP;
but you cannot cancel:
SELECT COUNT (*) FROM EMP;
Setting the LOCAL and REMOTE Parameters
Specify a default database without having to specify
a connect string using the LOCAL and REMOTE parameters in the ORACLE.INI
file for Windows 3.1x. See Appendix C,
"Modifying Oracle Parameters for Windows 3.1x,"
for instructions. These parameters can also be implemented on the Windows
NT server. See Appendix D, "Modifying
Oracle Configurations for Windows NT and Windows 95."
Working with Security for the Named Pipes Protocol Adapter
If you are using Oracle Named Pipes Protocol Adapter
with Oracle Names Server, the listener may not be unable to connect to
the Oracle Names Server.
Oracle Names Server creates a Names Pipe at startup
time. The listener tries to open the Named Pipe at startup. If it cannot,
the listener uses the default system account "Local System." The listener
service may not be able to open the Named Pipe created by the Oracle Names
Server unless the OracleListenerServiceLSNR service has a valid
user ID and password associated.
To set up the listener permissions:
-
From the Control Panel window, double-click Services.
The Services window appears.
-
Select the OracleTNSListenerLSNR service and double-click.
The Service dialog box appears.
-
Choose the:
-
This Account option button
-
... button next to the This Account option button
The Add User dialog box appears.
-
Select your log on ID (user ID) from the Names list box and choose the
Add button.
The user ID appears in the Add Name field.
-
Choose OK.
The Services dialog box appears with the
user ID displayed in the This Account field.
-
Enter your password in the Password field.
-
Retype the same log on ID password in the Confirm Password field.
-
Choose OK.