Release 8.0.5 for Windows NT
A64425-01
Library |
Product |
Contents |
Index |
| Oracle
Parallel Server Getting Started
Release 8.0.5 for Windows NT A64425-01 |
|
![]()
![]()
This chapter describes how to install and set up Oracle Parallel
Server Manager (OPSM).
Specific topics discussed are:
You can control the activity of parallel servers and parallel
server instances using the OPSM.
OPSM is a comprehensive and integrated system management
solution for the Oracle Parallel Server. OPSM allows you to manage multi-instance
databases running in heterogeneous environments through an open client-server
architecture.
In addition to managing parallel databases, OPSM allows you
to schedule jobs, perform event management, monitor performance, and obtain
statistics to tune parallel databases.
Oracle Enterprise Manager provides database administrators
(DBAs) with a powerful set of tools to manage, monitor, and administer
even the most complex network of databases from a single workstation, called
the Enterprise Manager Console.
This console requires the following components:
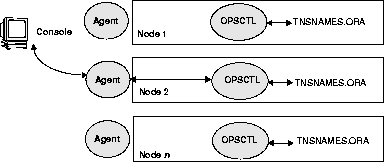
OPSM uses the OPSCTL utility (installed on each node) to
manage instances. This utility is run directly from the command line on
a node, or called by the Oracle Enterprise Manager Console. OPSCTL gathers
information about all the instances in a cluster from the TNSNAMES.ORA
files. When OPSCTL is called by the Oracle Enterprise Manager Console,
only one node's Intelligent Agent is used to communicate to OPSCTL. OPSCTL
on that node then communicates to the other nodes through Net8.
Figure 6-1 shows how OPSCTL
operates between the agent and the nodes:
The following requirements must be met in order to use OPSM
from the Oracle Enterprise Manager Console:
The requirements for each node are:
| Node Requirements | For additional information, see: |
|---|---|
|
Ensure Oracle8 Enterprise Edition, Oracle Parallel Server Option, Oracle Parallel Server Manager Server, and Oracle Intelligent Agent are installed on each node in the cluster. |
"Step 1: Install Oracle8 Enterprise Edition and Oracle Parallel Server on Nodes" in Chapter 4, "Installing Oracle Parallel Server" |
|
The INIT_COM.ORA and INITSID.ORA initialization files must located in ORACLE_HOME\DATABASE. |
"Step 1: Copy Initialization Files" in Chapter 5, "Configuring Oracle Parallel Server" |
|
Use OPSCONF or Oracle Net8 Easy Config to create a TNSNAMES.ORA file for each node. Each instance must have a service name defined for it, which is used in defining the database links for the instances. Also, edit the LISTENER.ORA file accordingly if you use the Net8 Easy Config. |
"Step 6: Configure the Network" in Chapter 5, "Configuring Oracle Parallel Server" |
|
The SIDs of the instances in the parallel server must be different. |
|
|
In order to use the optional Oracle Performance Manager component, run OPS_8MON.SQL script. |
"Step 3: Configure Oracle Performance Manager" in this chapter |
The requirements for the Oracle Enterprise Manager Console
are:
| Oracle Enterprise Manager Console Requirements | For additional information, see: |
|---|---|
|
Install your Enterprise Manager version 1.6 software (with or without Oracle Diagnostics Pack option) on a Windows NT, Windows 95 or Windows 98 computer. Oracle Diagnostics Pack, which contains the Oracle Performance Manager application, is sold separately. |
"Step 1: Install Oracle Enterprise Manager" in this chapter. |
|
If the Oracle Enterprise Manager Console is on separate machine than the repository database, ensure that the Net8 Client is installed and properly configured on the Console. |
"Step 1: Install Oracle Enterprise Manager" in this chapter. and "Step 2d: Create Configuration Files" in this chapter |
|
Configure and connect to the repository database, including performing auto-discovery of your nodes. |
"Step 2: Configure Oracle Enterprise Manager" in this chapter. |
|
To use the optional Oracle Performance Manager component, specify the user preferences for your Oracle Parallel Server nodes and your Oracle Parallel Server databases. |
Chapter 2, "Oracle Parallel Server Management Operations," of the Oracle Parallel Server Management User's Guide. |
Set up your Oracle Enterprise Manager Console environment
in either of two ways. Both environments are illustrated below
You can install Oracle Enterprise Manager on a Windows NT,
Windows 95 or Windows 98 machine.
Installing Oracle Enterprise Manager includes:
The repository database is an Oracle8 Enterprise Edition
database installed on the console if it is a Windows NT machine, or on
another Windows NT machine where the Windows NT, Windows 95 or Windows
98 console can connect.
To install the repository database:
Install Oracle8 Enterprise Edition on a Windows NT Server
by following the instructions in Oracle8
Enterprise Edition for Windows NT Installation CD-ROM insert.
Oracle Enterprise Manager version 1.5 is installed on a console
workstation, a Windows NT, Windows 95 or Windows 98 client which connects
to the Oracle8 repository database.
To install the Oracle Enterprise Manager:
| Additional
Information:
See the Oracle8 Enterprise Edition for Windows NT Installation CD-ROM insert for complete installation instructions. |
| Additional
Information:
See the Oracle8 Enterprise Edition for Windows NT Installation CD-ROM insert for complete installation instructions. |
| Additional
Information:
See the Oracle Diagnostics Installation CD-ROM insert for complete installation instructions. |
This table describes the tasks that must be performed to
configure the two Oracle Enterprise Manager Console environments illustrated
above. Each task is then described fully below:
|
Note: These instructions assume Oracle Enterprise Manager is already installed on a console workstation. See the installation CD-ROM insert to install Oracle Enterprise Manager and see "Step 1b: Install Oracle Enterprise Manager on Console Workstation" to install OPSM Client. |
Start OracleServiceSID, OracleHOME_NAMETNSListener80,
OracleAgent and OraclePGMSService services are running on each node:
To start the Oracle services:
The Services window appears.
If all the services are already running, close the window and go to "Step 2b: Create a Repository User Account". If a service is not running, to Step 3 in this procedure.
|
Note: Prior to starting a OracleServiceSID service, the OraclePGMSService service must be running. If you used the CRTSRV script in "Step 4: Create Services" in Chapter 6, "Installing and Configuring Oracle Parallel Server Manager", OraclePGMSService automatically starts when the OracleServiceSID service is started. If you chose to create your services with another method, you can still have OraclePGMSService start up automatically with a OracleServiceSID service by entering the following at the command for each node: C:\> OPSREG80 ADD SID |
C:\> NET START SERVICE
The SNMP_RW.ORA and SNMP_RO.ORA files located in ORANT\NET80\ADMIN
are automatically generated when the Intelligent Agent is started. These
files contain the listening address of the agent, the names of Net8 listener
and Oracle database services it knows about, plus tracing parameters. Do
not update these read-only files
.
| Additonal
Information:
See Appendix A, "Configuration Files," of the Oracle Enterprise Manager Configuration Guide, for a description of SNMP_RO.ORA and SNMP_RW.ORA parameters. |
You need to have a user account with DBA (database administrator)
privileges set up on the Oracle8 repository database. Oracle Enterprise
Manager places its repository in the default tablespace of the user account
to which you are connected when creating the repository. Oracle Corporation
recommends creating a new user account, creating a new tablespace, and
the customizing the newly-created user to use the new tablespace as its
default tablespace.
To create a repository user account on the Oracle8 repository database:
C:\> SVRMGR30
SVRMGR> CONNECT SYSTEM/MANAGER
SVRMGR> CREATE TABLESPACE REPOSIT_TABLESPACE DATAFILE 'PATH\DATAFILE' SIZE
XM;
where X is the tablespace size in megabytes; 20 MB is a good starting point.
SVRMGR> CREATE USER USERNAME IDENTIFIED BY PASSWORD
2> DEFAULT TABLESPACE REPOSIT_TABLESPACE;
SVRMGR> GRANT DBA TO USERNAME IDENTIFIED BY PASSWORD;
SVRMGR> EXIT
Exiting Server Manager closes the database connection.
After a repository user account is created, an NT user account
with the same user name as the repository user account must be created
on the the individual Oracle Parallel Server nodes.
To create a user account on each node of the cluster:
The User Manager window appears:
The New User dialog box appears:
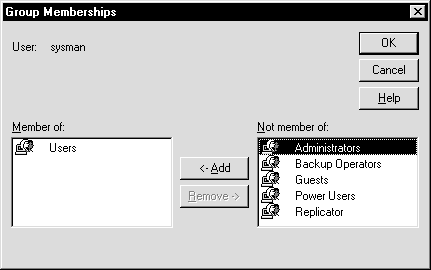
The Group Memberships dialog box appears:
Administrators is added to the Member of list box.
The user is added and the User Manager window re-appears.
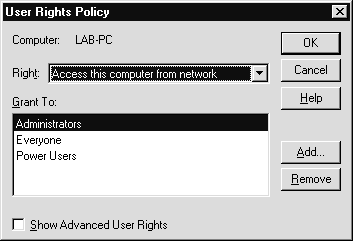
The User Rights Policy dialog box appears:
If Users does not exist, create it:
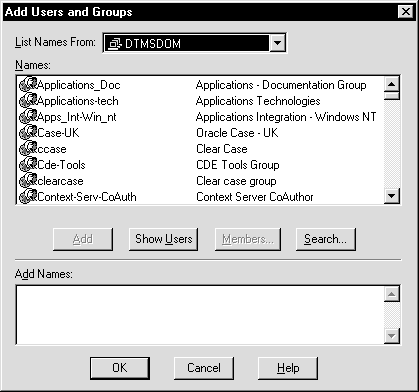
The Add Users and Groups dialog box appears:
Users appears in the Grant To list box.
The User Manager window re-appears.
If Oracle Enterprise Manager is installed on a Windows NT,
Windows 95 or Windows 98 client console separate from the machine on which
the repository database is installed, you must configure the client machine
so it can connect to the Oracle8 repository database. Use the Oracle Net8
Easy Config to configure your network.
Before you can use Oracle Enterprise Manager Console, you
need a repository on the console workstation where Oracle Enterprise Manager
Console will run. The repository is a set of base tables in a database
that contains status and environment information for your managed databases.
A separate repository must be created for each user wanting to use Oracle
Enterprise Manager Console.
The Oracle Enterprise Manager Console machine must also discover
network services, such as databases, listeners, and nodes, to populate
the Navigator tree. In addition to discovery, the Oracle Enterprise Manager
Console must also be able to manage these services for the Job Scheduling
and Event Management systems. This can be achieved with the Discovery Wizard.
When the agent starts up and is explicitly requested by the
Oracle Enterprise Manager Console with the Navigator Discovery feature,
the agent passes information from the Oracle Enterprise Manager Console
to populate the Navigator tree.
To create a repository on the Oracle Enterprise Manager Console machine:
The Repository Login Information dialog box appears:
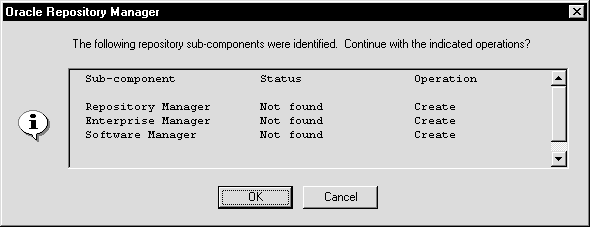
The Oracle Repository Manager window appears, prompting you to build the repository:
The repository is built. A dialog box asking if you want a quick tour of Oracle Enterprise Manger appears.
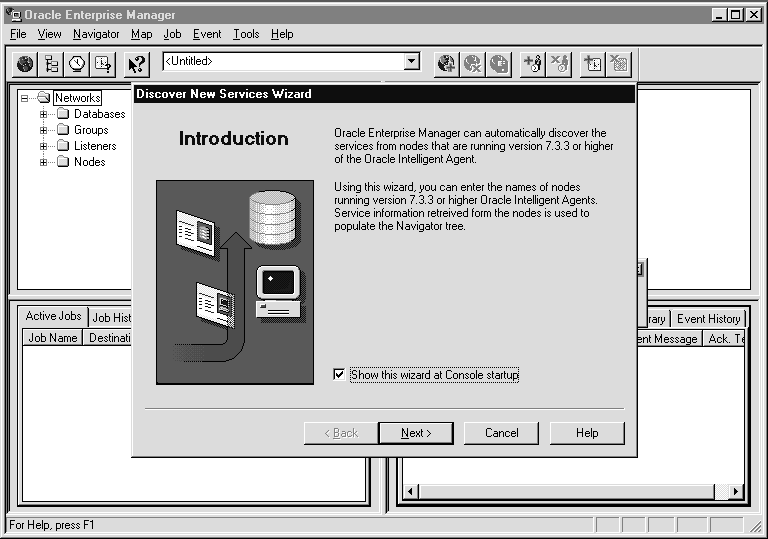
The Discover New Services Wizard appears:
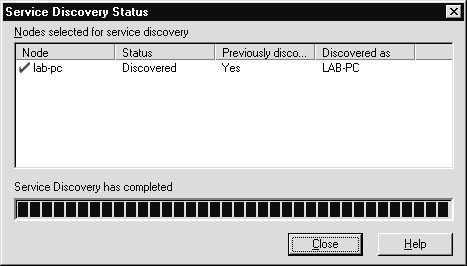
Services are discovered when you see the dialog box below with a status of Discovered:
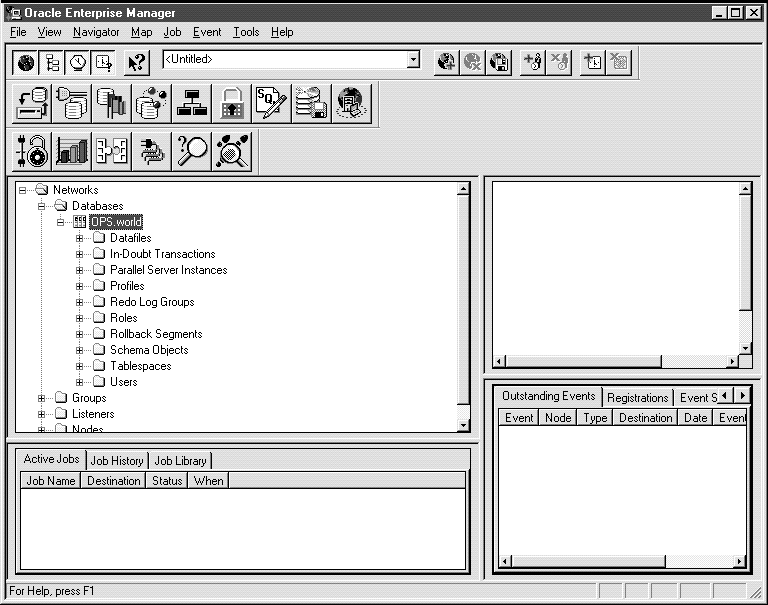
The Oracle Enterprise Manager Console appears with access to the Oracle Parallel Servers in the Navigator tree:
| Additional
Information:
See the Oracle Parallel Server Management User's Guide for further information about managing Oracle Parallel Servers and parallel server instances from Oracle Enterprise Manager Console. |
The Oracle Enterprise Manager's Oracle Performance Manager
allows you to choose from a variety of tabular and graphic performance
statistics for parallel servers. The statistics represent the aggregate
performance for all instances running on a parallel server. The statistics
are displayed in individual charts and include information on data block
pings, lock activity, file I/O, and session and user information.
|
Note: The Enterprise Manager Intelligent Agent is not required by the Oracle Performance Manager, as its functions are performed using a database connection to the parallel server. |
To configure Oracle Performance Manager:
C:\> CD ORACLE_HOME\OPS
C:\ORACLE_HOME\OPS> SVRMGR30
SVRMGR> @OPS_8MON.SQL
|
Note: By default these parameters are not stored in the INIT_COM.ORA file. To increase the value of these parameters, you must add them to the INIT_COM.ORA file. |
Oracle Enterprise Manager Oracle Performance Manager can be invoked against any instance of the parallel server. Oracle Performance Manager will execute a PL/SQL procedure on this instance to query for performance data from all instances of the parallel server via database links, aggregating the results into a set of database tables, which are then displayed in graphical form by Oracle Performance Manager.
|
Note: Oracle Performance Manager requires at least two instances in the Oracle Parallel Server be up and running. |
To start Oracle Performance Manager:
The Repository Login Information dialog box appears:
The Oracle Performance Manager application appears.
The list of available charts appears.
The charts display in the right-hand window.
| Additional
Information:
See the Oracle Parallel Server Management User's Guide for further information about managing Oracle Parallel Servers and parallel server instances from Oracle Enterprise Manager Console. |