Release 1.5
A56287-01
Library |
Product |
Contents |
Index |
| Oracle
Parallel Server Management User's Guide
Release 1.5 A56287-01 |
|
![]()
![]()
Oracle Enterprise Manager and Oracle Parallel Server Management
provide an integrated solution for managing your heterogeneous environment,
including management of Oracle Parallel Servers on your network.
This chapter discusses the following topics:
The Oracle Enterprise Manager Console allows you to perform
a variety of management tasks on your parallel servers, distributed systems,
and databases. The Enterprise Manager Console provides a central point
of control for the Oracle environment through an intuitive graphical user
interface (GUI) that provides drag-and-drop system management.
The Enterprise Manager Console enables you to manage a heterogeneous
environment as easily as a homogeneous one. You can schedule jobs on multiple
nodes simultaneously or monitor groups of services together.
A database or system administrator can thus handle all nodes
in a parallel server as a single entity. For example, you can configure
Oracle Enterprise Manager to execute a job across all nodes of a parallel
server.
From the Enterprise Manager Console Navigator, you can view
and manage both single-instance and multiple instance Oracle Servers. The
information available for parallel servers is the same as for single-instance
databases.
The Navigator displays all the network objects and their
relationships to other objects including a direct view of objects such
as user-defined groups, nodes, listeners, servers, databases, and database
objects. Refer to the Oracle Parallel Server Management Configuration
Guide or your platform-specific installation and configuration guide
for information on the requirements for performing automatic discovery
of parallel server objects on the Navigator.
From the Navigator window, parallel servers are located in
the Databases folder which contains entries for databases. Each entry can
be either a single instance database or a parallel server which can be
expanded by double-clicking the entry.
Each parallel server folder contains the objects for datafiles,
in-doubt transactions, profiles, redo log groups, roles, rollback segments,
schema objects, tablespaces, and users. Entries that represent parallel
servers also contain a Parallel Server Instances folder which can be expanded
to display the instances belonging to the parallel server.
|
Note: Right-clicking on a Navigator object may display a menu allowing
you to drill down to view other related options.
|
The icon which represents Oracle Parallel Servers in the
Enterprise Manager Console is shown in Figure
2-1.

Figure 2-2 illustrates
the tree structure of the Oracle Parallel Server named "opsmz" in the Navigator
window.

For more information on the Navigator window and manipulating
objects in the window, see Navigator in the Oracle Enterprise Manager
Configuration Guide.
|
Important: There are three requirements that you must perform before
you can use the Enterprise Manager Console to start up or shut down a parallel
server. These requirements are listed below:
|
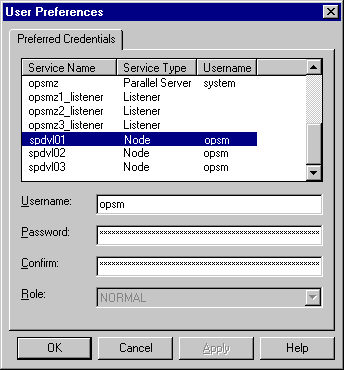
Follow these steps to specify a username and password for at least one node belonging to each Oracle Parallel Server on your network:
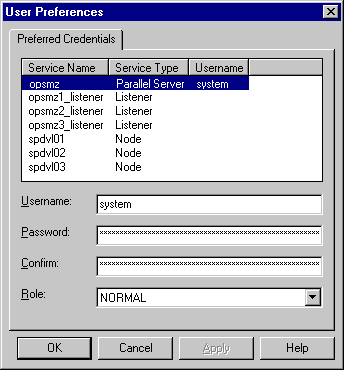
Follow these steps to specify a username and password for your Oracle Parallel Server database:
|
Important: The SYSDBA role is required for Oracle Parallel Server startup
and shutdown.
|
You are now ready to start up your Enterprise Manager Console
to manage your Oracle Parallel Server(s).
The process of starting up a parallel server from the Startup
page on the Quick Edit property sheet works by initiating a startup job
on one of the nodes of the parallel server. Enterprise Manager many select
any node to run the job. This process is similar for shutting down a parallel
server.
When running the job, this process requires the operating
system credentials (username and password) for the selected node which
you should have already set in the Preferred Credentials dialog box by
choosing the File>Preferences menu. Refer to "Setting
Node Credentials" above for details.
Typically, all nodes share the same preferred credentials. However, in certain situations, Enterprise Manager may not be able to determine the credentials for a node. For example:
In these situations, the following Parallel Server Node Credentials
dialog box is displayed:
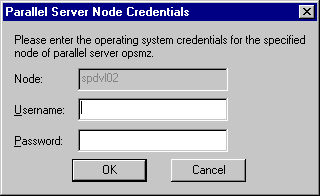
Enter the valid username and password for the selected node
in the appropriate text boxes and click OK to accept these credentials
and run the job.
Or, you can click Cancel to dismiss the dialog box and cancel
the job.
You can start up all instances or only selected instances
belonging to a parallel server that are not already up and available. Starting
up the instances also starts up all the required services such as the listener,
group membership services, and so on.
Starting up these services has traditionally been a time-consuming
and tedious task. This task has now been vastly simplified by the OPSM
utilities which allow the DBA to start up the parallel server from the
Enterprise Manager Console.
From the Enterprise Manager Console, the DBA can start up
all Oracle Parallel Server instances or only selected parallel server instances.
The Operation Results Status Details window, which is described on 2-16,
displays the progress of the instance start up or shut down operation.
In addition, the status of the various instances of the Oracle Parallel
Server can be monitored from the Enterprise Manager Console.
The Startup page on the Quick Edit Parallel Server property
sheet allows you to start up all instances or only selected instances that
are not already up and available. Starting up the instances also starts
up all the necessary services such as the listener, group membership services,
and so on.
Follow these steps to start all instances or only selected instances:

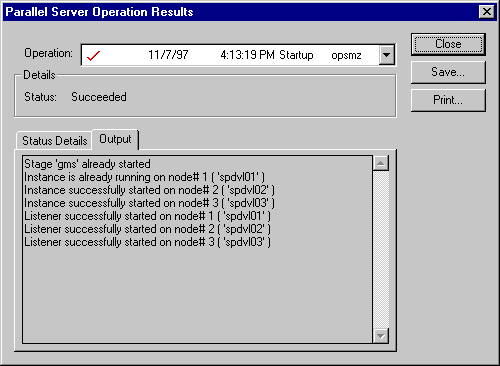
The Parallel Server Operation Results window displays the
progress of the startup operation. For more information, see "Viewing
the Parallel Server Operation Results".
If the instances were started successfully, the Parallel
Server Started message box appears as shown below.
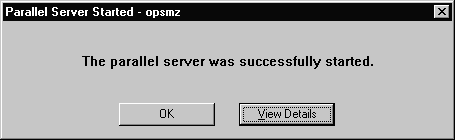
Click the View Details button to display more information
in the Operation Results window on Figure
2-9 about the instances that were started.
If the startup fails, the Parallel Server Failed message
box appears. Click the View Details button to display more information
in the Operation Results window about why the startup failed.
You can shut down all instances or only selected instances
belonging to a parallel server which are currently up and available. Once
all parallel server instances are shut down, the parallel server is considered
to be shut down.
|
Note: Occasionally, a parallel server database may be completely
down, but some of its services such as the database listener or group membership
services may remain running.
|
The Shutdown page on the Quick Edit Parallel Server property
sheet allows you to shut down all instances or only selected instances
that are currently up and available. Once all the parallel server instances
are shut down, the parallel server is considered shut down.
Follow these steps to shut down all instances or only selected instances:
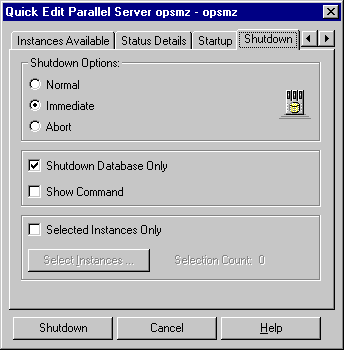
The Shutdown Page on the Quick Edit property sheet contains
these options:
Table
2-2 Options on the Shutdown Page
The Operation Results window displays the progress of the
shutdown operation. For more information, see "Viewing
the Parallel Server Operation Results"on page 2-16.
If the instances were shut down successfully, the Parallel
Server Shutdown Successful dialog box appears. Click the View Details button
to view more information in the Operation Results window about the instances
that were shut down.
If the shutdown fails, the Parallel Server Shutdown Failed
message box appears. Click the View Details button to view more information
in the Operation Results window about why the shutdown failed.
The Parallel Server Operation Results window displays information
about the progress of the instance startup or shutdown operation you selected.
The operation results are presented in two views: Status
Details and Output.
The Status Details view presents the instance operation status
graphically.

The following are the possible states that each component
may experience:
Table
2-4 Current State of a Component from Status Details View
Results are presented in the Parallel Server Operation Results
window shown on page 2-16. The requested
operation on the Oracle Parallel Server can have any of the following results:
Table
2-5 Status Icons on the Operation Results Page, Status Details View
The Output view displays the commands executed by the parallel
server node and any associated error messages in textual format.
In addition to displaying the results in both the Status Details and Output views, you can save or print the results of the operation from the Parallel Server Operation Results window as directed below:
The following pages from the Quick Edit Parallel Server property sheet allow you to view various status information about your parallel server(s):
|
Note: To display all tabs, click the forward and backward arrow
buttons displayed at the top-right corner of the tab area.
|
The Status page on the Quick Edit Parallel Server property
sheet displays banner information about the Oracle Parallel Server release.
This page also contains connection information.

The Instances Available page on the Quick Edit Parallel Server
property sheet displays the instances belonging to the parallel server
which are currently up and available.
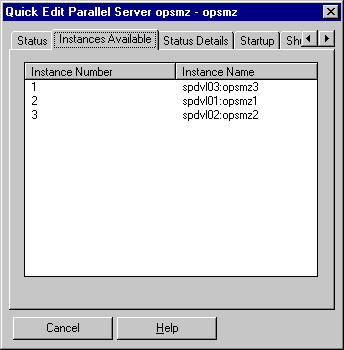
The following parallel server and instance information is
presented:
Table
2-7 Information on the Instances Available Page
The Status Details page on the Quick Edit Parallel Server
property sheet allows you to obtain an overall view of the state of the
parallel server at any given time. This page displays the status of the
various components such as GMS, listeners, and instances for all parallel
server nodes.
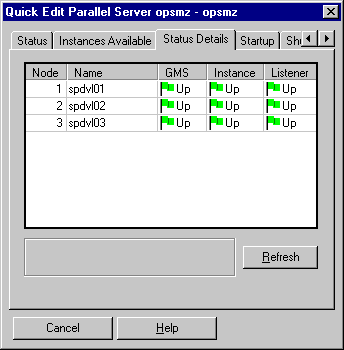
The following are the possible states that each component
may experience:
Table
2-8 Current State of a Component from the Status Details Page
By clicking the Refresh button, the status view is updated
with its current display. All components are dimmed until their status
is determined.
The job scheduling system provides a highly reliable and
flexible mechanism for DBAs to schedule and automate repetitive jobs on
both the parallel server database and parallel server instances.
The Enterprise Manager Console contains a full-featured scheduling
tool which allows DBAs to come up with a customized schedule. This provides
DBAs with true "lights out" management capability so that they can focus
on other tasks. A rich selection of jobs is provided for parallel servers.
You can create a job with a parallel server or a parallel server instance as the destination. To create a new job, follow these steps:
|
Note: There is usually a slight delay between submitting the job
and notification by the Intelligent Agent.
|
To modify or view details about a job, refer to the Oracle
Enterprise Manager Administrator's Guide.
From the Create Job property sheet, you can specify the details of a new job. The Create Job property sheet contains these pages:
From the General page, specify the Job Name, Description,
Destination Type, and Destinations as show in the following window.

The General page contains these options:
Table
2-9 Options on the Create Job General Page
From the Tasks page, choose the task(s) that you want the
job to perform. The list of tasks that appear is different depending on
whether you select a parallel server or a parallel server instance as your
Destination Type from the General page.
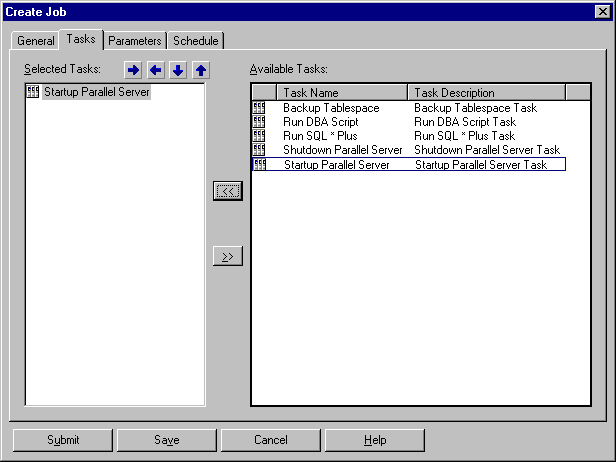
Move the tasks between the Available Tasks and Selected Tasks
lists with the << (Add) and >> (Remove) buttons.
Table
2-10 Options on the Create Job Tasks Page
If your Destination Type is a parallel server, you can choose
from these tasks:
Table
2-11 Tasks for Parallel Server Destination
For a description of these tasks and the parameters you need
to set, see "Parameters for the Parallel
Server Startup Task" and "Parameters
for the Parallel Server Shutdown Task".
If your Destination Type is a parallel server instance, you
can choose from these tasks:
Table
2-12 Tasks for Parallel Server Instance Destinations
For a description of these tasks and the parameters you need
to set, refer to the Oracle Enterprise Manager Administrator's Guide.
From the Parameters page, you can specify parameter settings
for the job tasks you selected on the Tasks page. The parameters which
display vary according to the job task. Parameters for parallel server
startup and shutdown tasks are described below. To find out what parameters
you need to set for parallel server instance tasks, refer to the Oracle
Enterprise Manager Administrator's Guide.
When you select the Startup Parallel Server task on the Tasks
page, the following Parameters page displays.

Complete the parameters on the page and click the Submit
button to run the parallel server startup task.
The Parameters page for Startup contains these options:
Table
2-13 Options on the Startup Parameters Page
When you select the Shutdown Parallel Server task on the
Tasks page, the following Parameters page displays.
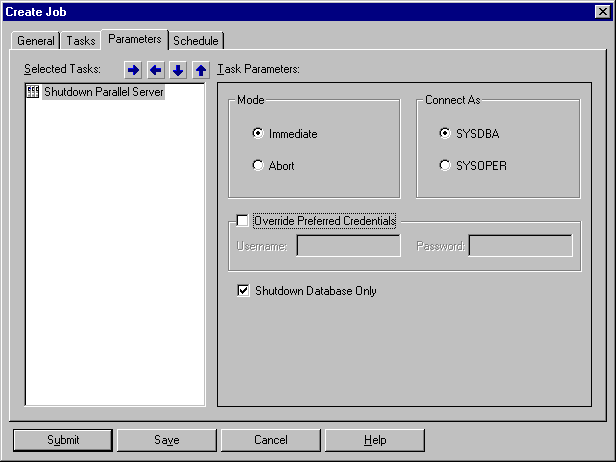
Complete the parameters on the page and click the Submit
button to run the parallel server startup task.
The Parameters page for Shutdown contains these options:
Table
2-14 Options on the Shutdown Parameters Page
From the Schedule page, schedule the time, date, and frequency
at which you want to execute your job.
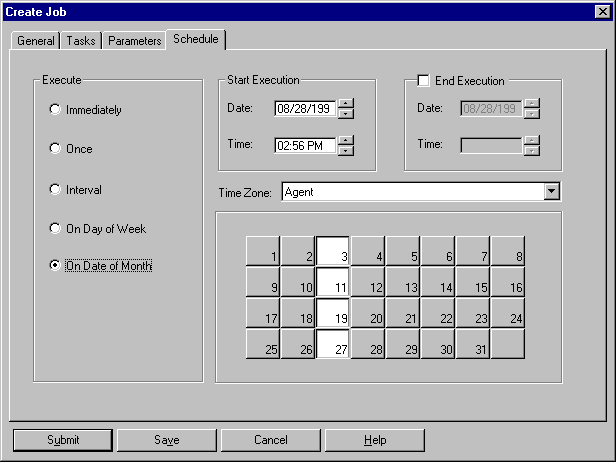
The Schedule page contains these options:
Table
2-15 Options on the Schedule Page
The Oracle Enterprise Manager's Event Management System allows
you to register Database event sets for Oracle Parallel Server instances.
To register Database event sets for OPS instances, complete the following steps:

For more information about the Event Management System, refer
to the Oracle Enterprise Manager Administrator's Guide.
From the Enterprise Manager Console, you can execute a number of database administration tools and utilities on parallel servers and parallel server instances. Click a parallel server or parallel server instance in the Navigator window, then right-click. Select the Related Tools command. A menu displays with the following options:
Select the tool or utility you want to run for the parallel
server or parallel server instance.
|
Note: For more information on database tools and utilities, refer
to the Oracle Enterprise Manager Administrator's Guide and the Oracle
Enterprise Manager Performance Monitoring User's Guide.
|


